If you’re confused about what Amazon PPC is or how it fits into your business, you’re in the right place. For new sellers, the world of Amazon advertising can feel confusing and, honestly, a little intimidating. Between campaign types, bidding strategies, and acronyms everywhere, it’s tough to know where to begin.
The truth is, Amazon has become more than just an e-commerce site. It’s now a major advertising platform, bringing in over $46 billion in ad revenue last year alone. That’s because most shoppers don’t go to Google anymore. They go straight to Amazon. And if you’re not running ads, chances are your competitors are taking the sales that could’ve been yours.
In this guide, we’ll break down what Amazon PPC is, how it works, and the steps it takes to launch your first ad campaign in 2026. By the end, you’ll have a solid foundation to confidently start advertising on Amazon.
What is Amazon PPC and How Does It Work?
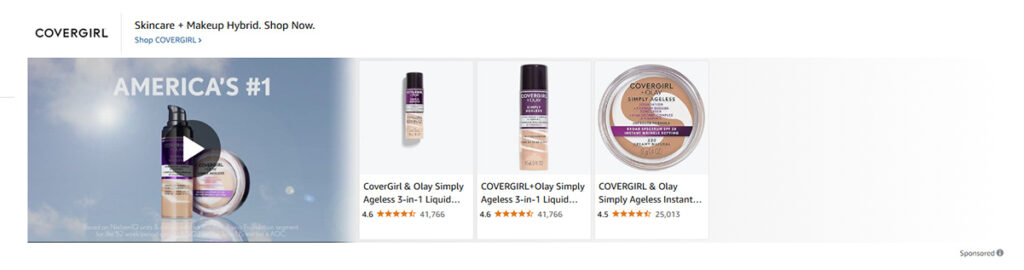
When you see products marked “Sponsored” while shopping on Amazon, you’re looking at Amazon PPC in action. PPC stands for pay-per-click, and it’s the system Amazon uses to let sellers advertise directly within the marketplace.
At a basic level, Amazon PPC is about paying for visibility. You create a campaign, set a daily budget, and choose how much you’re willing to pay when someone clicks your ad. Depending on the campaign type, Amazon might use keywords you provide, or it might automatically decide where and when to show your ads based on shopper behavior or product categories.
A major advantage of PPC is control. You decide how much you want to spend, which products to promote, and how much involvement you want in targeting. Whether you’re launching a new product, retargeting interested shoppers, or building brand awareness, Amazon Advertising gives you the tools to reach customers and drive traffic when it matters most.
Why Amazon Advertising Matters in 2026
In 2026, getting noticed on Amazon without running ads has become almost impossible. With more sellers joining the platform every year and competition heating up in nearly every category, relying on organic traffic alone won’t cut it anymore. Paid advertising has shifted from an optional method of scaling your business to a necessity.
One of the biggest reasons for this shift is how Amazon’s search results have changed. Sponsored ads now take up more space than ever before, dominating the first page of search results and pushing organic listings farther down. To show just how extreme this has become, we ran a search for the term “dog bed” and examined the first 22 listings.
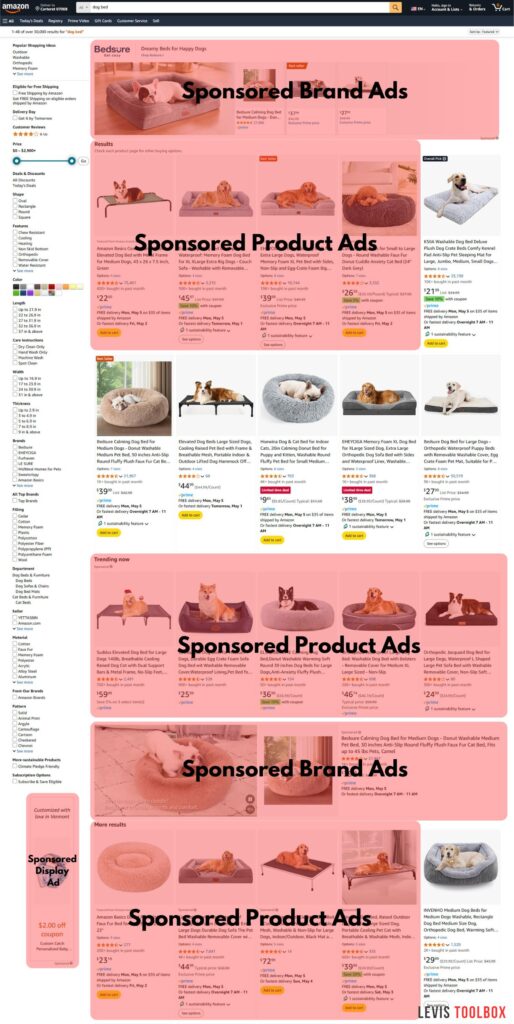
As you can see in the image above, out of the first 22 results, 15 were ads. With a total of 13 Sponsored Product ads and 2 Sponsored Brand ads. That leaves just 7 organic listings. This means that unless you’re paying for advertising, you’re putting yourself at a massive disadvantage.
This isn’t a one-off example either. You can search for almost any category or product on Amazon, and you’ll find similar results. Amazon has clearly prioritized paid placements, and for sellers, this means visibility now comes at a cost.
That said, running ads isn’t just about getting seen; it’s also one of the best ways to boost your organic ranking. Amazon’s algorithm is built around sales. The more sales your product makes, especially on important keywords, the more likely Amazon is to push your listing higher in the search results. And yes, those sales can come from ads.
This is why Amazon Advertising matters even beyond the clicks. When your campaigns start converting, they send a clear signal to Amazon that your product is relevant and in demand. That momentum helps you gain ranking in organic placements, which over time can reduce how much you need to rely on ads to drive traffic.
So if you’re launching a new product or building a brand from scratch in 2026, ads aren’t just helpful, they’re essential. With fewer organic spots on page one and more competition than ever, paid advertising is now a necessary part of getting your business off the ground.
The 3 Types of Amazon Ad Campaigns
Before you dive into setting up your first campaign, it’s important to understand the different types of Amazon PPC ads. Each campaign type, Sponsored Products, Sponsored Brands, and Sponsored Display, has its own purpose, strengths, and best-use scenarios. Knowing the difference will help you choose the right campaign type based on your goals and budget.
Sponsored Product Ads
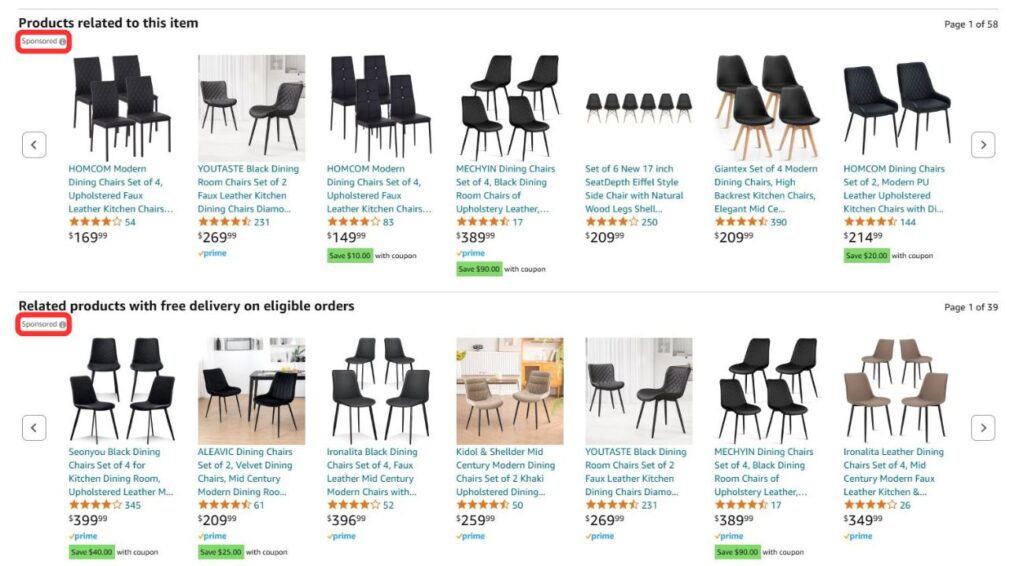
Sponsored Product ads are the most popular type of Amazon PPC, and for good reason. They show up right where shoppers are already looking, on search results pages and product detail pages. Aside from the small “Sponsored” tag, these ads look just like regular listings, which makes them easy to trust and more likely to earn clicks.
When launching a Sponsored Product campaign, you choose which product you want to promote and how you want to target customers. You can let Amazon handle the targeting automatically based on your listing content, or switch to manual targeting to select specific keywords like “nonstick frying pan” or “yoga mat for beginners.”
Your ad placement, whether it lands at the top of page one or gets buried lower down, depends on your bid and how competitive the keyword is. Regardless of where it shows up, any click will take the shopper straight to your product detail page, so having an optimized product listing matters.
Sponsored Products work well for everything from driving early traffic to a new product to scaling an established bestseller. They offer a flexible mix of automation and control, which is why most sellers, new or experienced, start here.
For a complete walkthrough of how these ads work and how to set them up, check out our in-depth guide on Sponsored Products on Amazon.
Sponsored Brand Ads
Sponsored Brands are Amazon’s answer to top-of-funnel advertising. Instead of promoting just one product, these ads highlight your brand as a whole, often with multiple products, custom headlines, and even video. They’re a great way to drive awareness, especially if you have a product line or an Amazon Store you’d like to feature.

Unlike Sponsored Products, which take shoppers straight to a product page, Sponsored Brands give you more flexibility with where you send traffic, whether that’s a custom landing page, a product detail page, or your Amazon storefront. And with three different ad formats to choose from, you have much more creative control compared with Sponsored Products.
You’ll need to be enrolled in Amazon’s Brand Registry to run Sponsored Brand Ads. If you meet that requirement, I strongly recommend giving them a try. These ads work especially well for new product launches, brand-building, and driving more traffic to your Amazon Store.
For a full breakdown with setup steps, real examples, and pro tips, check out my complete guide to Amazon Sponsored Brands.
Sponsored Display Ads
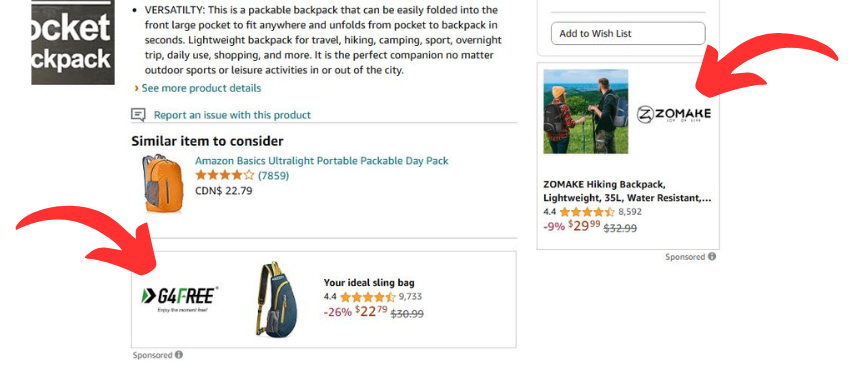
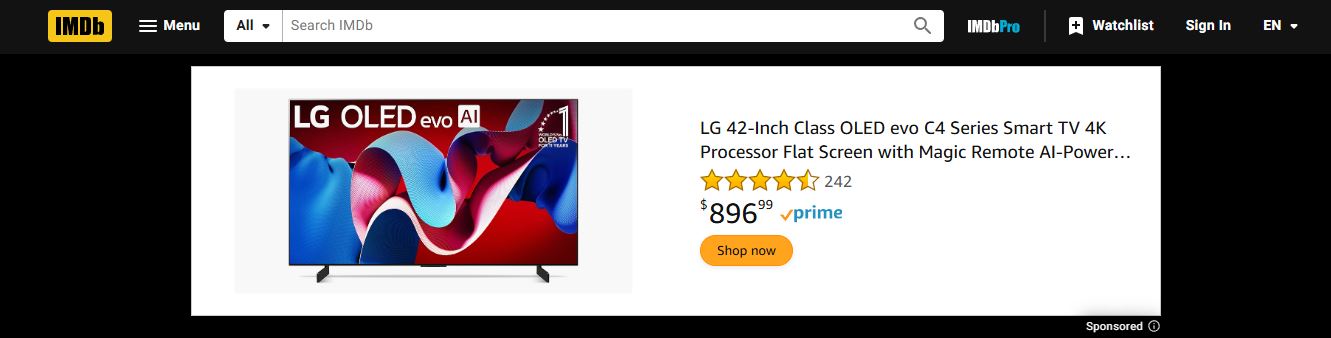
Sponsored Display ads give you a unique way to reach shoppers both on and off Amazon. These ads have many placement options, including product detail pages, search results, the Amazon homepage, and even on external sites like IMDb, Twitch, and thousands of third-party websites.
What makes them stand out is their retargeting power. If someone viewed your listing, but didn’t complete the purchase, you can serve them an ad later to bring them back. These types of ad campaigns are often called “retargeting campaigns,” and they tend to be very profitable. Besides retargeting, you’ll also have the option of selecting specific categories, products, or audience groups to show your ads to.
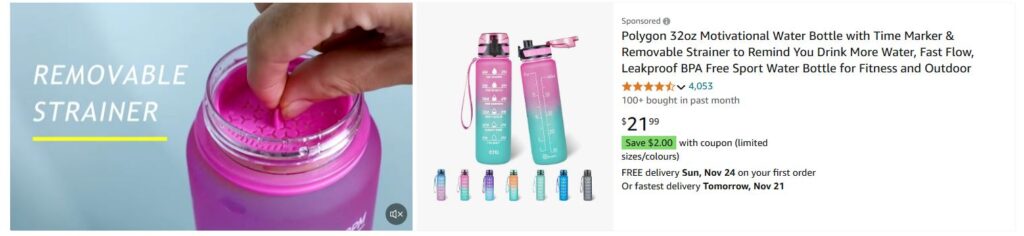
When it comes to creatives, Sponsored Display ads currently have two options: image and video. With image ads, you’ll have the option to upload a custom creative, or you can choose to use your existing product listing or any product photos you’ve previously uploaded to Amazon. With video, you’ll be able to upload a short product demonstration or marketing video that will autoplay in Amazon search results and other placements.
For a full, detailed guide on Amazon Sponsored Display Ads, including a walkthrough on how to set up your own campaign, check out our easy 6-step guide to Amazon Sponsored Display Ads.
.
How Much Does Amazon Advertising Cost?
This is one of the most common questions, and unfortunately, there’s no one-size-fits-all answer. The cost of Amazon Advertising depends on several variables: your product, the keywords you’re targeting, the level of competition in your niche, and how relevant Amazon thinks your listing is to the shopper.
To understand why costs vary so much, it helps to know how Amazon’s ad system works. When someone searches for a product, Amazon runs a real-time auction to decide which ads to show. You place a bid, which is the maximum amount you’re willing to pay for a click. But you don’t pay that full amount, Amazon only charges you a penny more than the next highest bidder. So if you bid $2.50 and the next highest bidder offered $1.60, you’d pay just $1.61 for the click.
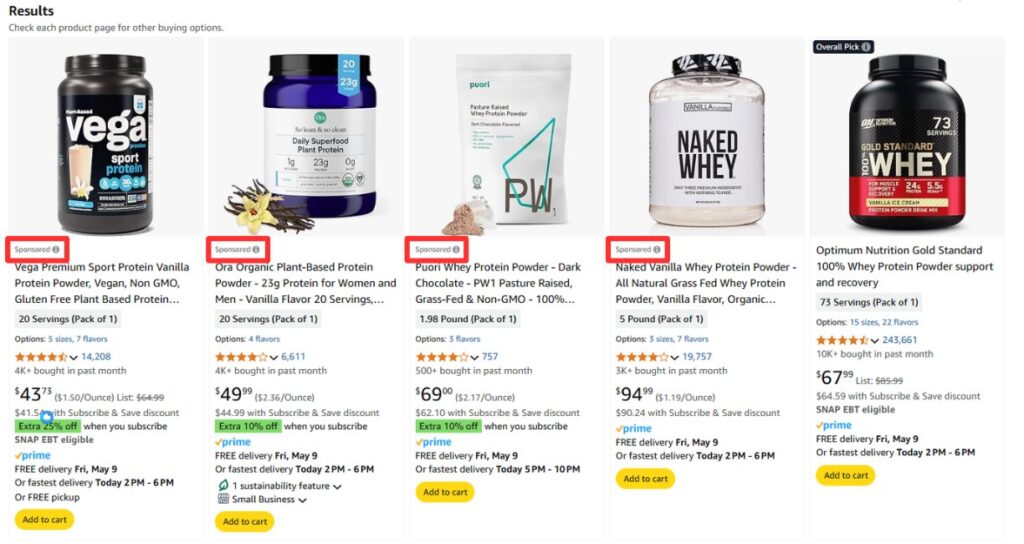
Because it’s an auction, your actual cost-per-click (CPC) depends on how competitive your keywords are. A popular keyword in a saturated category (like “protein powder” or “health supplement”) will naturally be more expensive than a niche term with lower demand. That’s why CPCs can range from less than $0.50 to over $3.00.
In 2025, the average CPC for Sponsored Products was about $0.98. But think of that as a ballpark, not a guarantee. You might pay more or less depending on how well your product fits the customer’s search and how much competition is in play.
The good news? Amazon doesn’t require a minimum budget to run ads. Whether you’re spending $5 a day or $50, you’re free to set a budget that fits your business. If you’re just starting out, we recommend allocating around $30/day for your first campaign. That gives you enough volume to optimize your campaign without overspending.
Understanding Common Advertising Terms
If you’re new to the world of online advertising, you’ll notice there are a lot of terms and initials thrown around that you may not fully understand. Here’s a quick breakdown of some of the more important metrics and what they mean when it comes to Amazon advertising.
ACOS (Advertising Cost of Sale)
ACOS tells you how much you’re spending on ads to make a sale. It’s calculated with a simple formula: ACOS = (Ad Spend ÷ Ad Revenue) x 100
For example, if you spend $20 on ads and make $100 in sales, your ACOS is 20%. A lower ACOS usually means you’re making more profit from your ad spend. There are some cases, especially during product launches, where you might aim for a higher ACOS if your goal is ranking or visibility, not just profit.
To quickly find out your current ACoS and other helpful metrics, please check out our Amazon PPC Calculator. It’s completely free to use, no email or signups required!
ROAS (Return on Ad Spend)
ROAS is the flip side of ACOS. Instead of showing how much you’re spending to earn money, it shows how much you’re earning for every dollar you spend.

So if you spend $20 and make $100 in sales, your ROAS is 5.0 (which means you earned $5 for every $1 spent). A higher ROAS is a good sign that your campaign is working well. Over time, tracking ROAS helps you figure out which products or campaigns are actually worth scaling.
CPC (Cost Per Click)
CPC is how much Amazon charges you when someone clicks on your ad. You’ll never pay just a flat rate, it’s all based on a live auction. You set a max bid, but if no one else bids as high, you’ll often pay less.
Let’s say you bid $2 and your competitor only bids $1.20—you might end up paying $1.21. The more competitive your niche (think supplements or electronics), the higher your CPC will likely be. That’s why managing your bids carefully is so important.
CTR (Click-Through Rate)
CTR tells you how many shoppers clicked on your ad after seeing it.
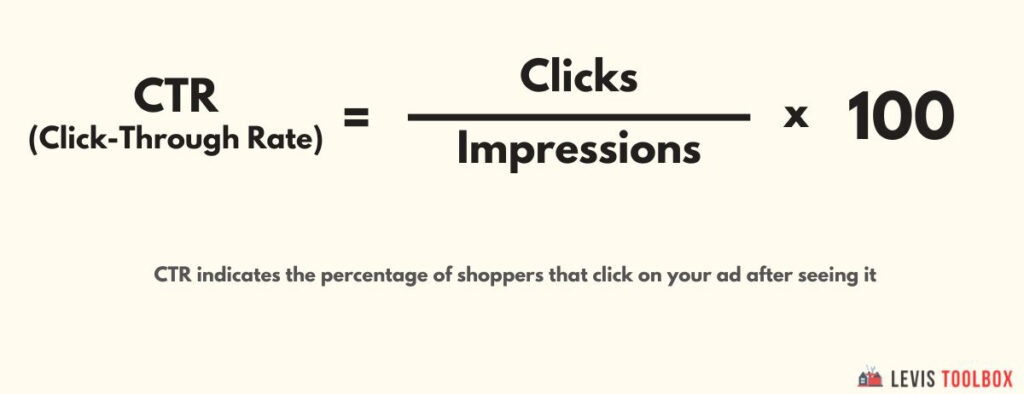
If 1,000 people see your ad and 25 click on it, your CTR is 2.5%. A strong CTR usually means your ad is grabbing attention, maybe because your main image is eye-catching or your title speaks directly to what shoppers are searching for. Low CTR? That might be a sign your ad isn’t resonating, and you’ll need to make changes.
Impressions
An impression is counted every time your ad appears in front of a shopper. It doesn’t matter if they scroll past it—if it’s shown, it counts.
Here’s where it gets confusing for some advertisers: reach and impressions aren’t the same thing. The term reach refers to the number of unique people who saw your ad. Impressions include repeat views. So if one person sees your ad five times, that’s five impressions but just one reach.
Impressions are a good way to measure your ad’s visibility. If you’re not getting many, your bids might be too low, or your keywords might be too specific.
Conversions
This is how many people actually bought your product after clicking on your ad. Amazon tracks this automatically, and it’s one of the most important numbers to watch.
High impressions and a decent CTR are great, but if your conversion rate is low, it might mean your product page needs work, like better images, more reviews, or improved copy. Tracking conversions helps you figure out if your ads are leading to sales, not just clicks.
How to Set Up Your First Amazon PPC Campaign
Before you can start optimizing or scaling your campaigns, you need to start with the basics: getting your first campaign live. This quick walkthrough will show you how to launch a simple, effective Sponsored Products campaign in just a few easy steps, no experience required.
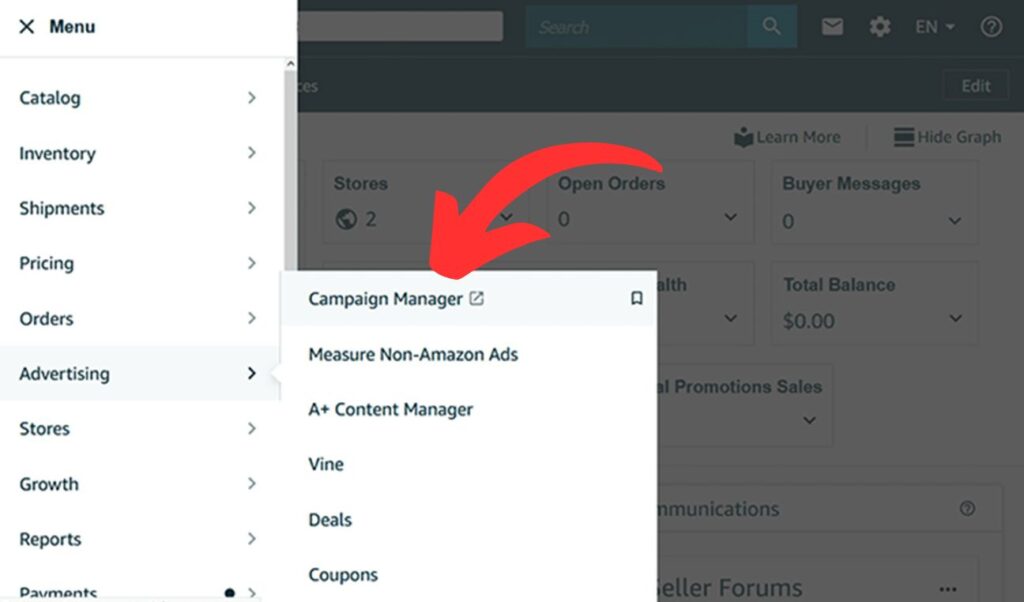
To get started, log into your Seller Central account. From the main menu, click the “Advertising” tab, then select “Campaign Manager.” This will take you to Amazon’s advertising dashboard, where you can create and manage all your Amazon ad campaigns.
Step 1: Choose Sponsored Products as Your Campaign Type
When you first create a new ad campaign, the first major decision you’ll face is choosing your campaign type. The screen will display three options: Sponsored Products, Sponsored Brands, and Sponsored Display.
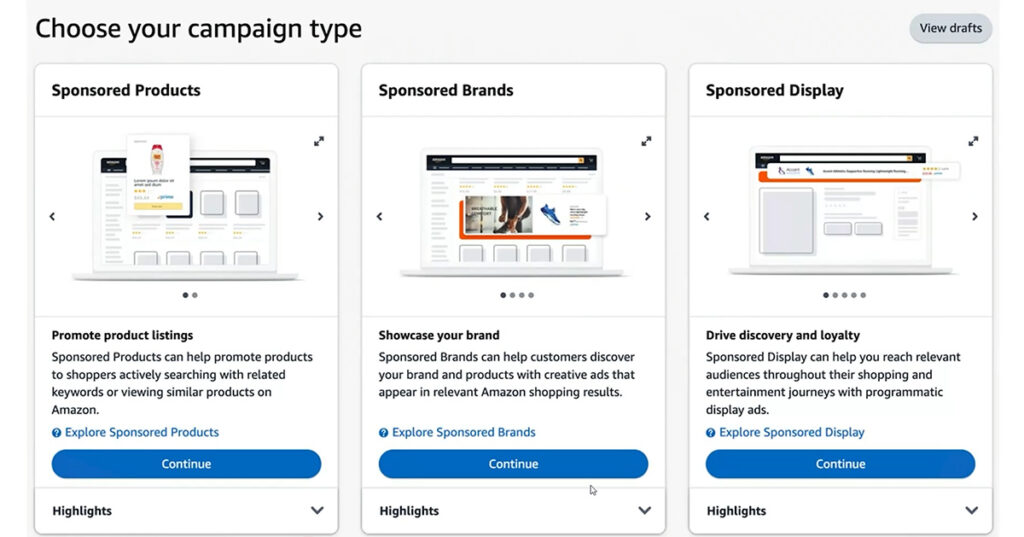
If you are a new seller or if this is your first ad campaign, we highly recommend choosing Sponsored Products as your campaign type.
This ad type is Amazon’s most widely used format, very easy to set up, and ideal for promoting individual product listings. Sponsored Product ads appear right in search results and on competitor product pages, making them incredibly visible to shoppers. They also don’t require any graphic design or custom assets, which keeps things simple for new sellers.
Step 2: Select the Product You Want to Advertise
Once you choose Sponsored Products as your campaign type, you’ll land on a page where you’ll create your Ad Group Name and select the product(s) you want to advertise.
An ad group is simply a container within your campaign that holds your product(s) and targeting settings. Think of it as a way to organize your ads—each ad group can have its own bids and targeting, which makes it easier to test and optimize.
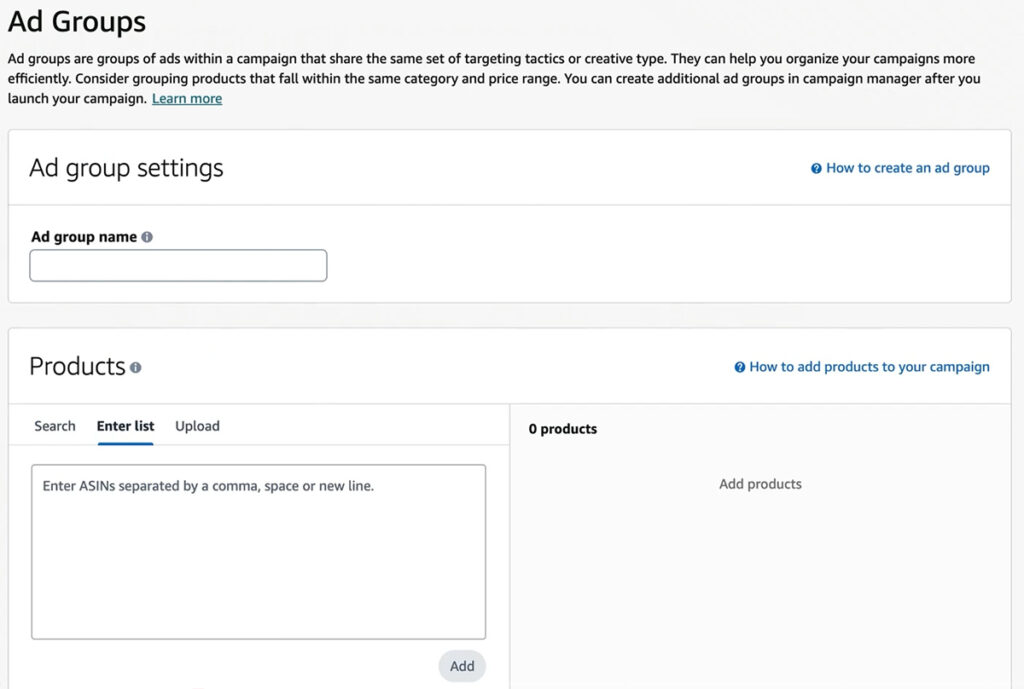
When naming your ad group, it’s a good habit to develop a consistent structure, especially as your account grows. A clear naming system (e.g., “ProductName-Auto-April2025”) helps you quickly identify and manage campaigns later on.
Next, you’ll choose which product or products to include in the ad group. For your first campaign, it’s often best to focus on a single product that already has an optimized listing—strong images, clear bullet points, a compelling title, etc. If the product also has a few early reviews or some sales history, even better.
If you’re advertising product variations, here’s a helpful rule of thumb: group similar versions (like the same item in different sizes) together. But if your variations differ significantly, like a floral phone case vs. a monster truck design, it’s better to separate them into different campaigns. That’s because each version may attract different audiences, convert on different keywords, and require its own targeting strategy.
Step 3: Set Targeting Type and Bids
After naming your ad group and selecting the product you want to advertise, the next screen will prompt you to choose between Automatic or Manual targeting. For your first campaign, we suggest Automatic Targeting; it’s easier to set up, doesn’t require you to have a keyword list, and gives Amazon the freedom to test which search terms and product placements perform best.
After choosing Auto Targeting, you’ll also see a section where you can customize your bids for each targeting group. By default, Amazon will apply a suggested bid, but you’ll have the option to either set one bid across all targeting types (Set default bid), or adjust bids by targeting group.
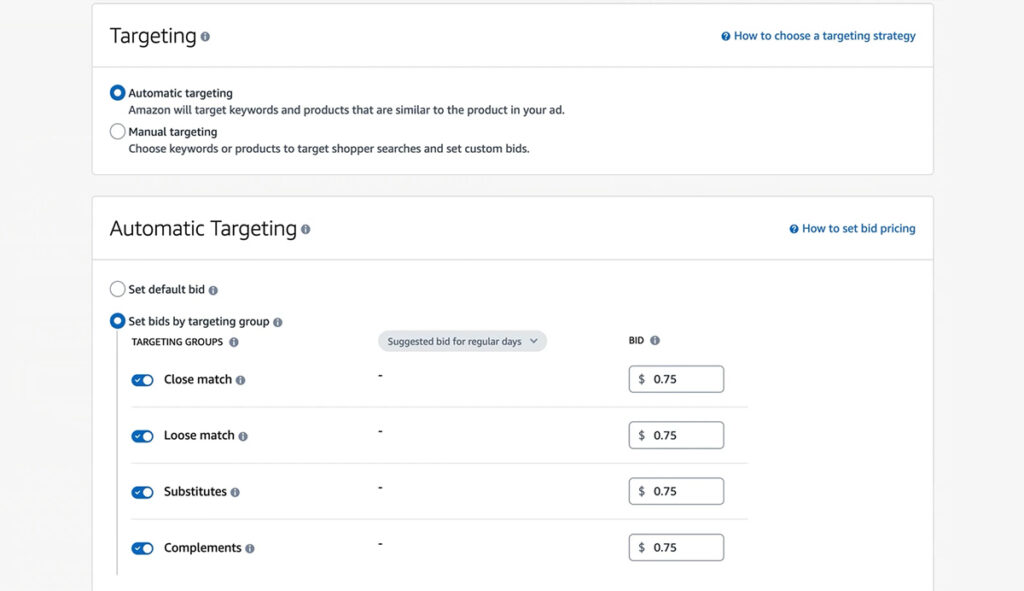
If you choose to adjust bids by group, you’ll see Amazon splits automatic targeting into four types:
- Close Match: Your ad appears when a shopper’s search term is closely related to your product. For instance, if you’re selling “pet shampoo,” your ad might show up for “dog shampoo” or “cat shampoo.” These searches are highly relevant and typically convert better, so this is the group where you should bid the highest.
- Loose Match: These placements are broader, matching loosely related terms. Using the same “pet shampoo” example, your ad might show up under more general searches like “dog grooming” or “pet supplies.” These can help with brand awareness, but usually have lower conversion rates than Close Match.
- Substitutes: Your ad will appear on product detail pages of similar items. For example, if you sell sandals, your ad might show on listings from other sandal or flip-flop brands. While these clicks can be valuable, they tend to be more competitive and may convert differently depending on how similar the products are.
- Complements: Complement targeting shows your ad on product detail pages for items often bought alongside your product. For example, if you sell hair dryers, your ad could appear on listings for diffuser attachments or hair products. These placements can unlock placements you wouldn’t get from keywords alone.
In many cases, the default bid that Amazon sets for each placement tends to be a bit high. We recommend setting a lower default bid and then checking back in a few days. If you’re not getting impressions, consider raising your bids.
Step 4: Choose Your Campaign Bidding Strategy
Before you launch your campaign, you’ll need to decide how Amazon should handle your bids in real time. This is where you select your campaign bidding strategy. You’ll see three options: Dynamic Bids – Down Only, Dynamic Bids – Up and Down, and Fixed Bids.
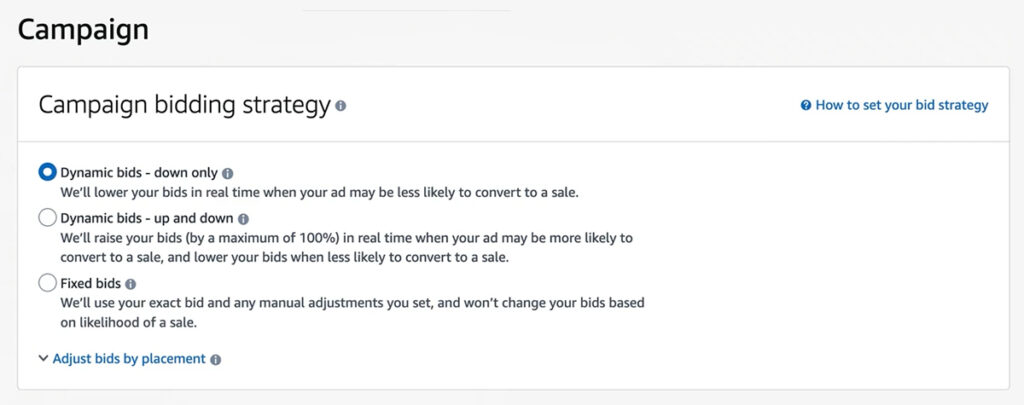
Dynamic Bids – Down Only means Amazon will lower your bid when it thinks a click is unlikely to convert. This option helps conserve your budget and is a safer choice if you’re worried about overspending early on.
Dynamic Bids – Up and Down gives Amazon more flexibility. It can lower your bid when conversion seems unlikely, but it can also raise your bid (up to 100% for top-of-search and 50% elsewhere) when the data suggests a higher chance of a sale. We recommend this option for beginners because it allows Amazon to aggressively pursue high-converting placements while still protecting you from overspending on low-quality clicks.
As the name suggests, Fixed Bids is the most rigid option. What you bid is what Amazon will use, every time. Amazon won’t adjust it, even if the chance of conversion is high or low. This approach works best if you have experience managing PPC and want full control over how much you’re spending in every auction.
Step 5: Finalize Your Campaign Settings and Launch
At the bottom of the setup page, you’ll find the final campaign settings. This is where you give your campaign a name, choose whether or not to set a custom start and end date, and enter your daily budget.
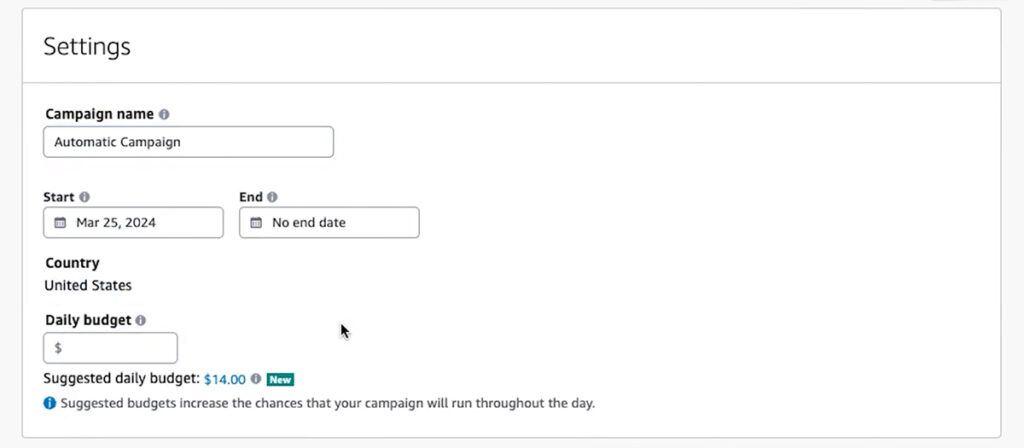
You can also choose when your campaign starts and stops. If you don’t add an end date, the campaign will keep running until you turn it off. Most advertisers leave the end date blank so they can monitor their campaign and make changes based on performance, not an arbitrary end date.
Your daily budget is one of the most important decisions you’ll make here. It sets the limit on how much you’re willing to spend each day on ads. While we often recommend a starting point of $20 to $30, what matters most is choosing an amount that fits your personal budget—something you can afford to lose while your campaign gathers data. As someone who started in e-commerce many years ago, I know what it’s like to launch a business with a limited budget.
The goal isn’t to spend recklessly; it’s to invest just enough to learn what’s working without putting unnecessary stress on your finances. Just be aware that if your budget is too low—say $2 or $5 a day—it can be hard to collect enough data to fully optimize your campaigns.
Once everything looks good, scroll down and click Launch Campaign. Amazon will run a quick review, and then your ads will start showing in search results and on product pages.
Just like that, you’ve launched your first Amazon PPC campaign. Now it’s time to watch the data roll in and start making improvements.
What’s Different with Manual Targeting?
Once you’re comfortable with auto campaigns, you might want to explore manual targeting. The setup looks almost the same, but there’s one big difference: you get to choose who sees your ad.
With a manual campaign, Amazon doesn’t decide your targeting—you do. That means picking your own keywords, ASINs (specific products), or categories to target. You’ll also choose how closely Amazon should match your ads to a shopper’s search by setting a match type:
- Broad: Casts the widest net—your ad can show up for searches that include your keyword in any order, plus related terms.
- Phrase: A little tighter—your ad shows when someone types your keyword in the same order, even if there are extra words before or after.
- Exact: The most precise—your ad only appears when someone searches for that exact keyword or a close variant.
Manual campaigns give you more control over your targeting and spend, but they also require more work. You’ll need to research keywords, monitor performance, and make adjustments based on what’s working. For that reason, many new sellers start with auto campaigns to gather data, then use that insight to build smarter manual campaigns later on.
Optimizing Your Amazon PPC Campaigns
Launching your campaign is just the first step. The real work and the real results come from what you do next. Amazon Advertising isn’t something you can set and forget. It requires ongoing attention, optimizations, and a willingness to learn from the data. Here’s how to keep improving your performance and turning clicks into profits.
- 1. Let the Data Build Up: Don’t start making changes too early. Give your campaign at least 7–10 days to collect enough data before analyzing performance. Amazon needs time to test your ads across different search queries, placements, and shoppers. The early days are about learning—both for the algorithm and for you.
- 2. Trim Wasted Spend: Once data starts coming in, check for keywords (or search terms) that are getting clicks but not converting into sales. If a term has spent more than your product’s profit margin without generating a sale, it’s time to pause or reduce bids. This will stop you from bleeding money on poor performers.
- 3. Double Down on Winners: On the flip side, if a keyword is converting well and staying within your target ACOS, consider increasing your bid slightly. A higher bid can improve your placement in search results, potentially bringing in even more profitable traffic. Also, look at your top-converting search terms and consider adding them as exact match keywords in a separate manual campaign for better control.
- 4. Adjust Your Bids by Placement: Amazon lets you adjust bids depending on where your ads show up, like at the top of search results or on product pages. If you notice that one placement is driving better conversion rates, you can raise your bid multiplier for that position to capture more of that traffic.
- 5. Monitor Your Search Term Report Regularly: Your search term report is a goldmine. It tells you exactly what shoppers typed into Amazon before clicking your ad. Over time, you’ll start to notice patterns, keywords that consistently convert, irrelevant terms that never do, and new keyword ideas you hadn’t considered before. To save time, you can run your file through our free Amazon Search Term Report Analyzer, which highlights wasted spend, top-performing terms, and coverage gaps in minutes. Make it a habit to check this report at least once a week.
- 6. Test Small, Scale What Works: Instead of launching multiple large campaigns at once, test small ideas, like new keywords or different bidding strategies, on a limited budget. If something shows promise, scale it gradually. This approach keeps your ad spend efficient and your learning fast.
Common Mistakes Beginners Make (and How to Avoid Them)
Amazon advertising can be complicated. And while mistakes are part of the process, a few of them can eat through your budget fast, or leave you wondering why your ads aren’t getting impressions, clicks, or simply aren’t working at all. Here are some of the most common missteps new sellers make, plus some tips to help you avoid them.
Ignoring Your Search Term Reports
One of the most common mistakes new sellers make is launching a campaign and then forgetting about it. While it’s true that campaigns need time to collect data, that doesn’t mean you should take a completely hands-off approach. You should be checking in regularly, looking for opportunities to improve performance as new data becomes available.
One of the most valuable tools for this is Amazon’s Search Term Report. It shows you exactly what shoppers searched for before clicking on your ad, giving you valuable data that can help you improve your targeting and bids.

Without reviewing this report, you’re flying blind. You might be wasting money on clicks for unrelated or overly broad keywords that have little chance of converting. By checking your search terms regularly, you can find out which keywords are draining your budget and add them as negative keywords so they stop showing your ads. You’ll also be able to see which keywords convert best, so you can increase your budget on these search terms (with a manual campaign). It’s a simple step that can make a big difference.
Not Giving Campaigns Time to Perform
One of the biggest mistakes new advertisers make is panicking when a campaign doesn’t turn a profit in the first day or two. It’s tempting to start tweaking bids, pausing keywords, or even scrapping the whole thing when results aren’t immediate, but unfortunately, that kind of reaction does more harm than good.
Platforms like Amazon and Facebook go through a learning phase at the start of every campaign. During this time, Amazon is figuring out who’s most likely to click or convert, which placements are worth bidding on, and how your product performs in different search contexts. That process takes time, and if you’re constantly making changes, you reset that learning phase all over again.
Instead of reacting to early results, let your campaign run for at least 7 to 10 days. Use that time to collect meaningful data, identify your best and worst-performing keywords, and give Amazon the space it needs to learn. Optimizing too soon can cost you more in the long run and is an easy way to torpedo your campaign.
Under-Budgeting Your Campaigns
Many beginners set extremely low daily budgets, thinking it’s a safe way to test the waters. But with Amazon PPC, a budget that’s too small won’t give you enough clicks to understand what’s actually working. With only one or two clicks a day, it is impossible to tell which placements are working best, which keywords are underperforming, or how to properly optimize your campaign.
While it is always important to stay within a reasonable budget, we recommend trying to start with at least $25–$30 per day for an automatic Sponsored Products campaign. This gives you room to generate meaningful data in a shorter period of time. With this information, you’ll be able to adjust your bids, add negative keywords, and set your campaign up for more success in the long run.
Avoiding Automatic Targeting
A lot of sellers hear that manual campaigns give you “more control” and jump straight into them, skipping automatic targeting completely. But that’s usually a mistake, especially when you’re just starting out and don’t yet know what shoppers are searching for.
Automatic campaigns are one of the easiest ways to gather data. Amazon does the heavy lifting by testing different keywords and product placements for you. Once you’ve collected that data, you can transfer what works into a more focused manual campaign later. Think of it like scouting before building your game plan.
Running Ads Without an Optimized Listing
One of the most costly mistakes new sellers make is jumping into paid advertising before their product listing is fully optimized. It’s easy to get caught up in launching ads quickly, but if your product page isn’t ready to convert traffic into sales, you’re essentially flushing money down the drain.
Before spending a dime on ads, make sure your listing has high-quality images, clear and benefit-driven bullet points, a compelling product title, and A+ content if it’s available to you. Ads can drive traffic, but it’s your listing that closes the sale. Even with a healthy click-through rate, poor conversion means wasted ad spend and an underperforming campaign.
If you’re not confident your listing is ready, check out our complete guide to Amazon listing optimization to make sure your product page is working as hard as your ad dollars.
Forgetting to Use Negative Keywords
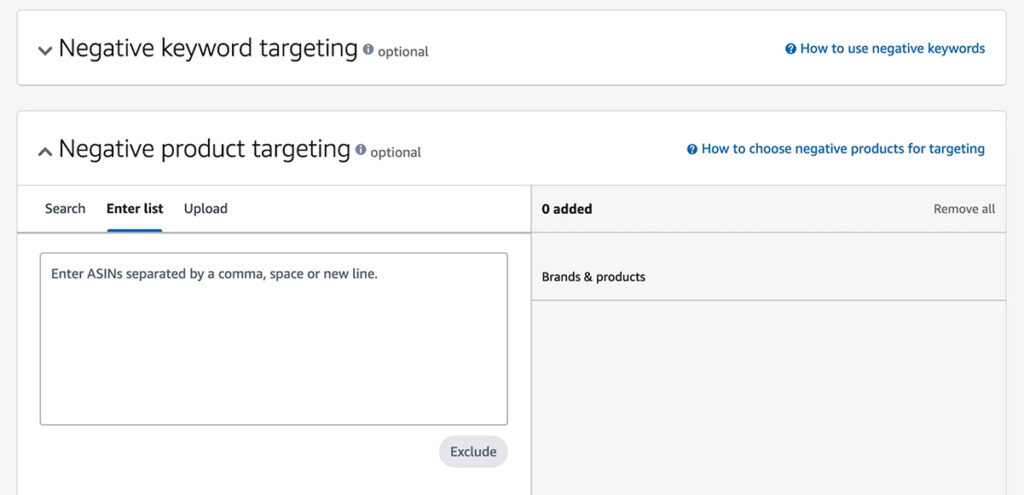
Negative keywords are easy to overlook, especially when it’s your first campaign and you don’t have any data yet. But if you’re not excluding irrelevant terms, your ads could be showing up for searches that have nothing to do with your product.
Every click on a poorly matched search term is wasted money. As you review your search term reports, keep an eye out for any keywords that are unrelated to your product. Adding those terms to your negative keyword list helps tighten up your targeting and ensures your budget is going toward shoppers who are more likely to buy.
Frequently Asked Questions (FAQ’s)
What is the difference between CPC and PPC on Amazon?
PPC stands for pay-per-click, which is the type of advertising Amazon uses; you only pay when someone clicks your ad. CPC stands for cost-per-click, which is the actual amount you’re charged for each click. In short, PPC is the advertising model, and CPC is the price you pay within that model.
How much does it cost to advertise on Amazon?
The cost of Amazon ads depends on your product, competition, and keywords. Amazon uses an auction system, so you set your bid and only pay when someone clicks. There’s no required minimum budget, and most sellers start with $10 to $30 per day when they’re brand new and need to control spending.
How many types of ads are available with Amazon Ads?
Amazon offers three main types of ads: Sponsored Products, Sponsored Brands, and Sponsored Display. Sponsored Products promote individual listings, Sponsored Brands highlight your brand and often feature multiple products, and Sponsored Display targets shoppers on and off Amazon using custom creatives and audience-based placements.
How do I advertise my products on Amazon?
To advertise on Amazon, log into your Seller Central account and go to the Advertising tab. Choose your campaign type, set your budget, select products, and launch your ad.
If you’re brand new to Amazon Advertising, you can create an ad account at advertising.amazon.com.
Do I have to pay for Amazon ads?
Yes, Amazon ads work on a pay-per-click model. You’re only charged when someone clicks your ad, based on your bid amount in the ad auction. Amazon accepts credit cards, debit cards, or deducts fees from your Seller Account balance. Vendors can also pay via monthly invoice, check, or wire transfer.
Final Thoughts on Getting Started with Amazon PPC
Starting your first Amazon PPC campaign doesn’t have to feel overwhelming. With the right foundation: understanding your metrics, avoiding beginner mistakes, and knowing how to set up a basic Sponsored Products campaign, you’re already ahead of most new sellers.
Remember, once you launch a campaign, your job isn’t done. Focus on learning from the data, adjusting as you go, and staying consistent. Over time, your advertising efforts can translate into more visibility, better organic rankings, and stronger sales.
Related Articles
- Amazon Long Tail Keywords: An Easy Guide for New Sellers
- Brand Registry on Amazon: A Comprehensive Guide for 2026
- 7 Best Amazon PPC Tools Every Seller Should Know in 2026
Levi Adler is an experienced Amazon seller, e-commerce specialist, and the founder of Levi’s Toolbox. With over a decade in the trenches selling on Amazon and managing his own Shopify stores, Levi writes from his own experience. Sharing what worked, what flopped, and the strategies he wishes he’d known sooner. When he’s optimizing listings or managing ad campaigns, you’ll find Levi hitting mountain bike trails or hanging out with his two huskies, Emma and Scout.