
You’ve probably heard the stories: people making passive income, quitting their jobs, or turning a side hustle into a full-time Amazon FBA business. But if you’re just starting out, it can also feel like a lot to figure out.
Maybe you’re stuck trying to choose a product, worried about upfront costs, or unsure if you can actually compete with big brands. I get it, and you’re not alone. The good news? You don’t need a business degree, a warehouse, or a huge budget to get started.
In this beginner’s guide, I’ll walk you through how to start an Amazon FBA business in 2026, step by step. We’ll cover everything from product research and sourcing to account setup and marketing. By the end, you’ll have a clear, realistic roadmap for getting your first FBA product live on Amazon.
What Is an Amazon FBA Business?
An Amazon FBA business is one where Amazon handles the storage, shipping, and customer service for your products, letting you focus on sales, branding, and growth. FBA stands for Fulfillment by Amazon, and it’s one of the most beginner-friendly ways to sell on the platform.
Instead of packing boxes in your garage or managing returns yourself, you send your products to Amazon’s fulfillment centers. When someone places an order, Amazon picks, packs, and ships it, and handles returns and customer service, too.
Whether you’re selling private label products, wholesale items, or doing retail arbitrage, FBA gives you the infrastructure to scale, without touching every order. From my experience, it’s one of the most efficient ways to launch and grow an Amazon business, especially if you’re new to e-commerce.
How Fulfillment by Amazon (FBA) Works
Here’s how the FBA process works:
- You send your products to Amazon: After sourcing your inventory, you create a shipment and send it to an Amazon warehouse.
- Amazon stores your inventory: Your products are stored across multiple fulfillment centers, ready for fast shipping.
- Customers place orders: When someone buys your product, Amazon handles the picking, packing, and shipping.
- Amazon handles customer service: They manage returns, refunds, and buyer support for any order fulfillment issues.
FBA isn’t free — you’ll pay fees for storage, shipping, and handling. But for most sellers, the time savings and Prime delivery benefits more than make up for the cost.
Why Choose Amazon FBA?
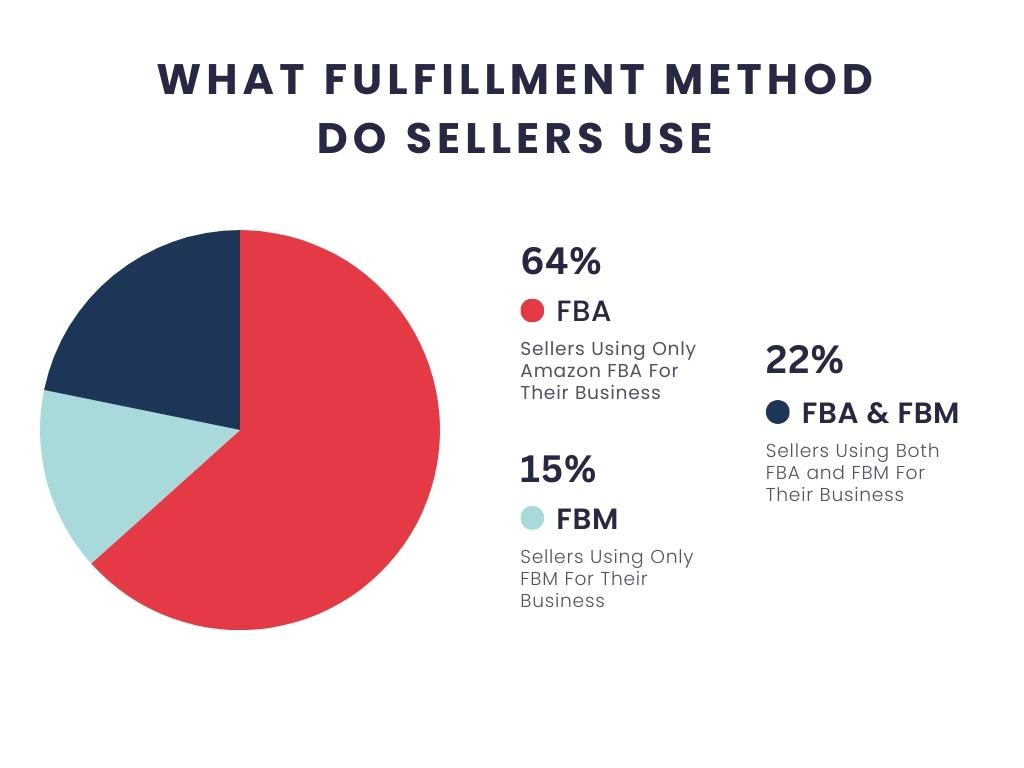
Now that you understand how FBA works, the next question is whether it’s the right fit for your business. Some sellers prefer more control with FBM (Fulfilled by Merchant), while others use FBA to simplify logistics and scale faster.
This section breaks down the main benefits of using FBA and the costs you’ll need to factor in, so you can decide if it aligns with your product, budget, and growth goals.
Top Reasons Sellers Choose FBA
- Prime Badge & Faster Shipping: FBA listings qualify for Prime, which boosts customer trust and can dramatically increase your conversion rate. Amazon handles delivery and tracking without you needing to negotiate rates or manage carriers.
- Buy Box Advantage: FBA gives you a better shot at winning the Buy Box even if you’re not the cheapest seller. Amazon’s algorithm prioritizes fast, reliable fulfillment, and FBA checks that box automatically.
- Hands-Off Logistics: Amazon handles storage, shipping, returns, and customer service. This frees up your time to focus on growth, not packing, labeling, or answering buyer messages.
- Feedback Protection: If there’s an issue with shipping or packaging, Amazon takes the hit, not you. FBA protects your seller rating from logistics-related negative feedback.
What Does Amazon FBA Cost?
FBA isn’t free; Amazon charges to store, ship, and return your products. The main fees include:
- Fulfillment Fees: Per-unit fees for picking, packing, and shipping.
- Storage Fees: Monthly charges based on how much space your inventory takes up.
- Returns & Other Fees: Amazon handles returns, but some categories (like clothing) incur extra costs.
These costs are predictable and easy to calculate once you know your product’s size and weight. I recommend using the Amazon FBA calculator to estimate fees before choosing a product.
For a full breakdown of all Amazon seller fees, check out How Much Are Amazon Seller Fees?
When FBM Might Be a Better Fit
FBA isn’t your only choice. You can also sell using FBM (Fulfilled by Merchant), which means you handle storage, shipping, and customer service yourself. Some sellers prefer FBM for heavy, seasonal, or slow-moving products since you avoid storage and fulfillment fees.

However, FBM usually means slower shipping times and lower chances of winning the Buy Box, especially important for arbitrage or wholesale sellers who compete for visibility.
FBM can be a great option if you want more control or lower upfront costs. Just know that it requires more time and effort, especially early on.
If you’re curious about setting up FBM correctly, we have a full guide on how to start an FBM business. It walks you through shipping templates, fulfillment settings, and how to manage orders like a pro.
How to Start an Amazon FBA Business: Step-by-Step Overview
If you’re ready to launch your Amazon FBA business, this step-by-step guide will walk you through the full process—from setting up your account to sending your first product to Amazon’s warehouse.
There are a few ways to sell on Amazon, but in this guide, I’ll focus on the private label model. That means creating your own branded product and working directly with manufacturers to bring it to life. It takes more upfront effort, but it’s what I recommend if you’re aiming to build a long-term business with consistent profit potential.
Step 1: Choose Your Niche and Business Model
Before you spend a dollar on inventory or launch a product, you need to answer two big questions:
- What niche are you selling in?
- What kind of business model are you building?
If you rush this part, everything else becomes harder. But when you choose the right niche and pair it with the right strategy, you give yourself a real shot at long-term success on Amazon.
What Makes a Good Amazon Niche?
You don’t need to reinvent the wheel. Some of the best Amazon businesses are built around simple, everyday products that meet the following criteria:
- Steady demand year-round: Avoid seasonal items unless you’re building your entire business around holiday spikes. Products like yoga mats, kitchen organizers, or pet grooming tools tend to sell consistently, month after month.
- Solid profit margins: You’re not just selling for fun, you’re selling to make money. I look for products that can bring in at least $10 profit per sale or give me a 30% margin after fees, shipping, and ads. Tools like the Amazon FBA Calculator or keyword tools like SellerApp and Helium 10 make this easy to check. If you’re not sure which keyword tool to use, check out my comparison of the 7 Best Amazon Keyword Research Tools in 2026 to find the one that fits your budget and goals.
- Low to moderate competition: If the top listings have thousands of reviews, it’s tough to compete unless you can significantly improve on the product. Look for niches where the top results have poor photos, weak listings, or few reviews—that’s your opportunity.
- Small and lightweight: Shipping costs can kill your margins, especially if you’re importing from overseas. I recommend starting with products under 3 lbs and small enough to fit in a shoebox. Think: resistance bands, phone stands, or silicone baking mats.
- Some advertising activity: When you search for your main keyword on Amazon and see Sponsored Products, that’s a good sign. It means other sellers are making enough money to invest in ads. No ads might mean low demand or a dead niche.
- Clear, simple use case: Complicated products = more returns and customer questions. Choose something easy to use and hard to mess up. Bonus points if you can find a product that customers will use often or reorder.
Pick a Business Model That Matches Your Goals
Although the rest of this guide focuses on the private label model, it’s not the only way to sell on Amazon, or the right fit for everyone. Depending on your budget, risk tolerance, and available time, another model might suit you better.
Before you commit, it’s worth understanding each of the most common Amazon FBA business models. Each has pros and cons, and they differ in startup costs, complexity, and scalability.
Retail Arbitrage / Online Arbitrage
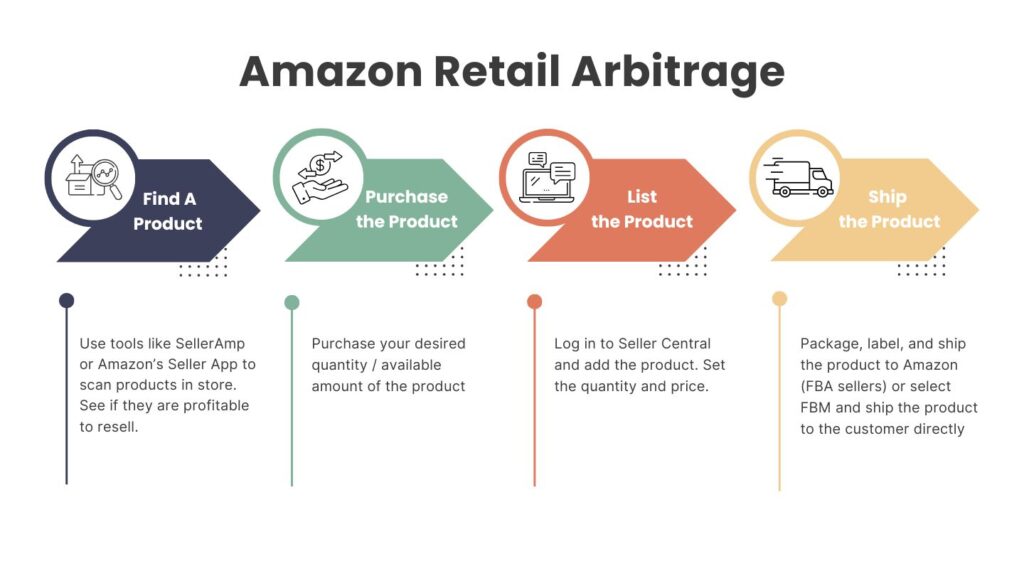
If you’re starting with a small budget, arbitrage can be a great way to learn how Amazon FBA works without spending thousands on inventory. You find discounted products at retail stores (retail arbitrage) or from websites (online arbitrage), then resell them for a profit on Amazon.
The key is buying low and selling high, often capitalizing on price mismatches between local stores and Amazon’s marketplace. You won’t have control over branding, and margins can be tight, but you can get started fast and generate cash flow. Arbitrage also teaches you key FBA skills like sourcing, shipping, and managing your seller account.
If this sounds like a good fit, check out my full guides to Retail Arbitrage and Online Arbitrage on Amazon to see what’s involved.
Wholesale
With wholesale, you buy branded products in bulk from authorized distributors or manufacturers and resell them on Amazon. You’re not creating your own product—you’re tapping into existing demand for well-known brands.
This model can be very stable and scalable, especially once you build relationships with reliable suppliers. However, it usually requires more upfront capital and involves applying for wholesale accounts, getting approval to sell certain brands, and sometimes dealing with strict MAP (Minimum Advertised Price) policies.
You’ll also be competing with other sellers on the same listing, so your success often comes down to pricing and inventory management. It’s less risky than private label, but also offers less control over branding and customer experience.
Dropshipping
Dropshipping is a business model where you sell products on Amazon without holding any inventory. Instead, when a customer places an order, you purchase the item from a third-party supplier (like AliExpress or a wholesaler) and have it shipped directly to the customer. It’s a hands-off approach that eliminates the need for storage or upfront inventory costs.
While the low startup costs and lack of inventory sound great, dropshipping on Amazon comes with several challenges. One major drawback is the lack of control over shipping times. Amazon customers expect fast, Prime delivery, but most dropshipping suppliers ship from overseas, leading to very long wait times. This can hurt your conversion rates and result in negative reviews. Secondly, dropshipping typically has very low margins. Once you add in advertising costs and other business expenses, you end up with very little profit.
In short, dropshipping on Amazon is risky, and we recommend choosing another option. If you’re serious about building a sustainable business and have the money to invest, we highly recommend the next option.
Private Label
Private label means you take an existing product, improve it or rebrand it, and sell it under your own name. You’re not inventing something new—you’re sourcing a proven product (often from Alibaba), customizing it with better packaging, features, or design, and marketing it as your own.
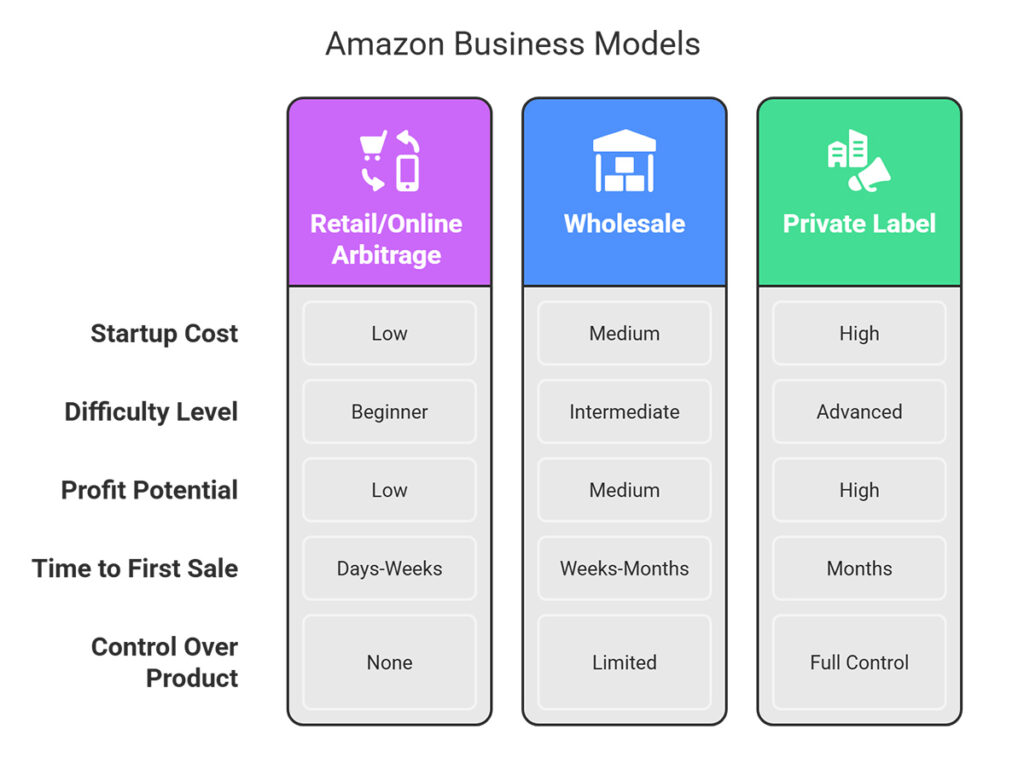
This model gives you the most control over pricing, branding, and customer loyalty. It also has the highest profit potential because you’re not competing for the Buy Box with other sellers. That said, it requires more upfront investment for inventory, product research, packaging, and advertising. If you’re serious about building a long-term business, private label is the path I recommend for most new sellers who have the capital to get started.
For the next steps, we’ll use private labeling as our example. While retail arbitrage, online arbitrage, and wholesale are solid business models, private labeling is the most popular right now. So, it made sense to focus on it for this article.
Step 2: Find a Profitable Product to Sell
Once you’ve chosen your niche and business model, it’s time to make one of the most important decisions in your Amazon business: what product to sell. Don’t rely on trends, instincts, or whatever’s going viral on TikTok. You need real data.
A great product can carry your entire business. A bad one can waste months of your time and money.
How to Research Winning Products for Amazon FBA
Finding a winning product means looking at four key areas: demand, competition, profitability, and differentiation. Here’s how to approach each one:
1. Demand
You want proof that people are already buying what you’re thinking of selling. Look for products with:
- At least 10 estimated daily orders (around 300 per month)
- $9,000–$10,000 in monthly revenue, with $3,000+ in profit
- A Best Seller Rank (BSR) under 5,000 in the main category
- Keyword search volume of 10,000+ across the top 2–3 keywords (but avoid extremely high-volume keywords that often signal saturated markets)
- Clear customer demand and visible gaps in competitor reviews
2. Competition
Strong demand means nothing if you can’t compete. I recommend looking for niches where at least a few top listings have under 50 reviews. If the entire first page is filled with major brands or listings with 2,000+ reviews, it’s time to move on.
A green flag: signs that competitors are cutting corners. Weak branding, bad images, or vague descriptions mean there’s room to stand out.
3. Profitability
I usually aim for products priced between $20 and $50. That price range is ideal for impulse buys, but still leaves enough room for healthy margins. After factoring in the cost of goods, shipping, FBA fees, and ad spend, I want to see a net margin of at least 15–25%.
To check if you’re product idea matches these criteria, you can use our 100% free Amazon Profit Calculator. Just input your costs, selling price, and product specs, and you can instantly find out your estimated profit margins, ROI, estimated fees, and more.
4. Differentiation Opportunities
Reading customer reviews on similar products is one of the fastest ways to find opportunities. If multiple customers are complaining about the same issue — flimsy packaging, poor instructions, wrong size, etc. — that’s a chance to create a better version. Sometimes even small changes can make a big difference.
For a full breakdown of how I research products (including screenshots and examples), check out my complete Amazon FBA product research guide.
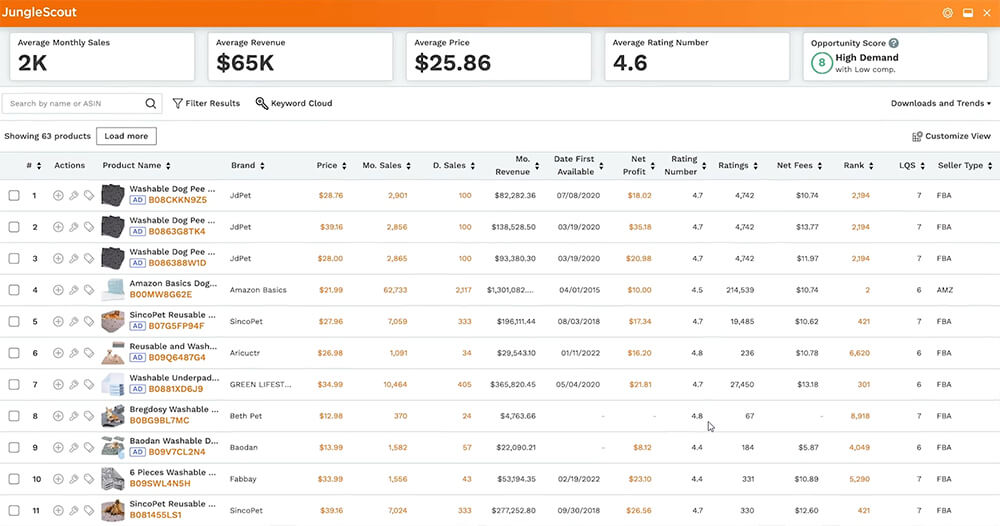
Product Research Tools
Using tools like Smart Scout, Helium 10, or Jungle Scout can speed this entire process up. These platforms help you:
- Find product opportunities based on real-time Amazon data
- Filter by price, review count, sales volume, and profit margin
- Reverse engineer your competitors’ keyword strategies
- Spot market gaps based on trends and review analysis
They’re not perfect, but they make the research process faster, more accurate, and less risky. I put together a full guide to the best Amazon product research tools if you want help choosing one.
Products to Avoid Selling on Amazon
Not every product is worth the effort, and some will burn you if you’re not careful. Here are the types of products I recommend avoiding as a beginner:
- Seasonal items (e.g., Halloween decor, ski gear) — inventory planning becomes a mess.
- Big brand categories — competing with household names usually means losing.
- “Me too” products — generic, unbranded items with nothing unique to offer.
- Oversized, heavy, or fragile products — higher shipping costs and more returns.
- Hazmat and gated categories — extra red tape and restrictions.
- Products with razor-thin margins — you’ll lose money after ads and fees.
- Near-perfect competition — if all top listings have thousands of 4.8+ star reviews, it’s hard to stand out.
Step 3: Source Your Product from a Reliable Supplier
Once you’ve validated your product idea, the next step is to find a supplier who can manufacture it reliably and at scale. Whether you choose to source domestically or internationally, your goal is the same: work with a partner who can meet your budget, quality expectations, and deadlines, without creating unnecessary risk.
Domestic vs. International Sourcing
Sourcing locally (in the U.S. or your home country) gives you faster shipping, easier communication, and fewer regulatory headaches. But it usually comes with higher costs and fewer customization options.
International sourcing — most commonly from China, India, Vietnam, or Mexico — typically gives you lower manufacturing costs and a wider product selection. The tradeoff is longer lead times, more back-and-forth during production, and added complexity with shipping, customs, and quality control.
Most new Amazon sellers start with international suppliers because of the cost advantage. But if you want to reduce risk early on, especially during product testing, starting with a local manufacturer or wholesaler can simplify things.
How to Find Suppliers

The most common place to find international suppliers is Alibaba. It’s designed for private label sellers and makes it easy to filter by manufacturer type, minimum order quantity, and industry certifications. I recommend looking for suppliers marked as “Verified” and with “Trade Assurance” enabled. These filters help you avoid scams and give you payment protection if something goes wrong.
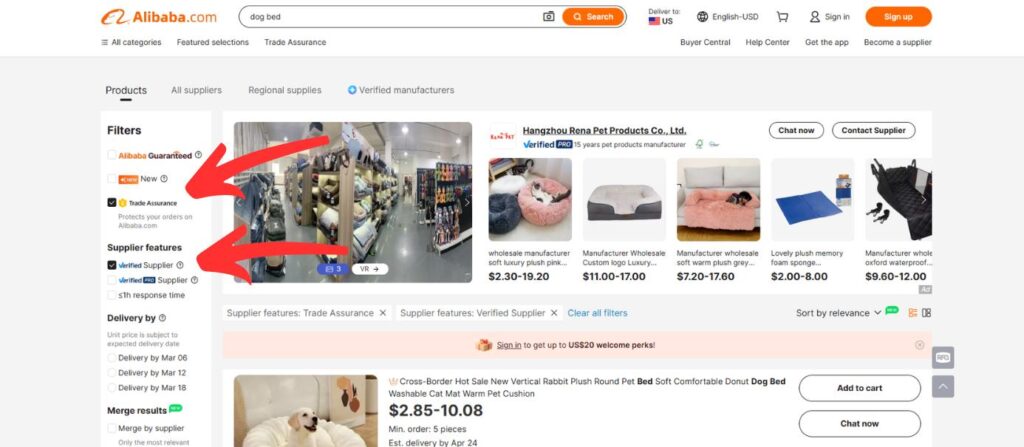
If you’ve never used Alibaba before or want a detailed walkthrough, I put together a complete guide on how to buy from Alibaba and sell on Amazon that covers everything from finding trustworthy suppliers to placing your first order.
If you’re looking beyond Alibaba, here are some solid alternatives:
- Global Sources – Similar to Alibaba, but often features more export-ready manufacturers.
- Trade shows – Canton Fair, ASD Market Week, and local industry events can be great for building relationships.
- Sourcing agents – Especially useful in China or India if you want someone to manage supplier relationships for you.
- ThomasNet or Maker’s Row – Directories of U.S. and Canadian manufacturers.
Before choosing a supplier, request quotes from several options. Ask about minimum order quantities (MOQs), lead times, and customization options. Always order a product sample first to verify quality and packaging.
Working with Suppliers
Pay close attention to how suppliers communicate. Clear, timely responses are a good sign. If you’re doing private label, make sure they can meet Amazon’s requirements for labeling, packaging, and compliance. For custom products or molds, clarify IP ownership early and consider using an NNN agreement if sourcing from China.
Negotiate pricing based on your projected order volume, and confirm payment terms, lead times, and refund policies in writing. Protect your funds using secure methods like escrow or trade assurance.
Quality Control and Compliance
Amazon holds you responsible for product safety, labeling, and compliance, not your supplier. Never assume they’ll get it right without guidance.
At a minimum, you should:
- Test samples thoroughly
- Use a third-party inspection service before final payment (especially for international orders)
- Double-check that your product meets Amazon’s packaging and prep requirements
If your supplier can’t handle labeling or bundling, consider using a 3PL or FBA prep center to get your inventory Amazon-ready before it ships to the fulfillment center.
Step 4: Set Up Your Amazon Seller Account
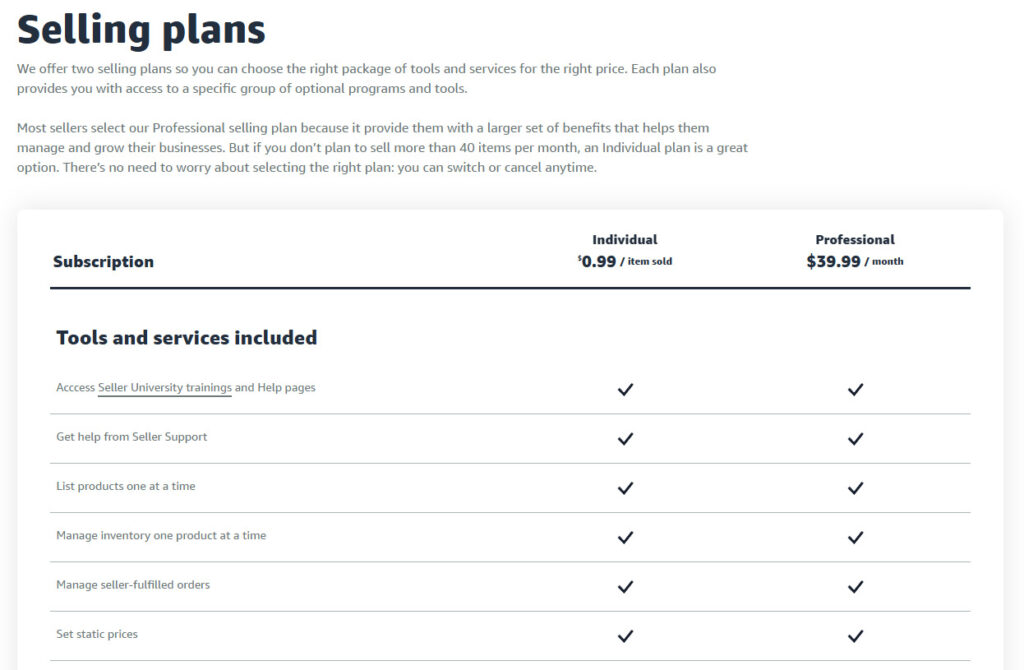
Before you can list your first product or ship your inventory to Amazon, you’ll need to register for an Amazon Seller account. Amazon offers two account types: Individual and Professional.
- The Individual plan has no monthly fee but charges $0.99 per sale. It’s best for casual or one-off sellers.
- The Professional plan costs $39.99/month and unlocks key features like the Buy Box, Amazon Ads, and access to restricted categories. If you’re building a private label brand or plan to scale, the Professional plan is the better choice.
Once you choose your plan, you’ll submit your business details, banking info, and identity documents to get verified. After approval, you’ll gain access to Seller Central—your main dashboard for managing products, orders, and account settings.
Need help with the full setup process? Follow my step-by-step guide to creating an Amazon Seller account here.
Step 5: Create an Optimized Amazon Product Listing
Your Amazon listing is where most shoppers decide whether to buy. If it’s not optimized, you’re losing sales. A high-converting listing doesn’t just describe your product, it sells it. From a keyword-rich title to eye-catching images, every detail helps turn browsers into buyers.
In this section, we’ll cover the basics of creating a listing that converts. For a more detailed guide, please see our full article, Amazon Listing Optimization: A Complete Guide.
Choosing the right keywords
Choosing the right keywords is essential for getting your product noticed on Amazon. Keywords not only help shoppers find your listing but also play an important role in your advertising campaigns. You can think of keywords as the backbone of your product listing; without them, all of your fancy images and graphics are meaningless because no one will see your listing. Here are a few tips on how to find the best keywords:
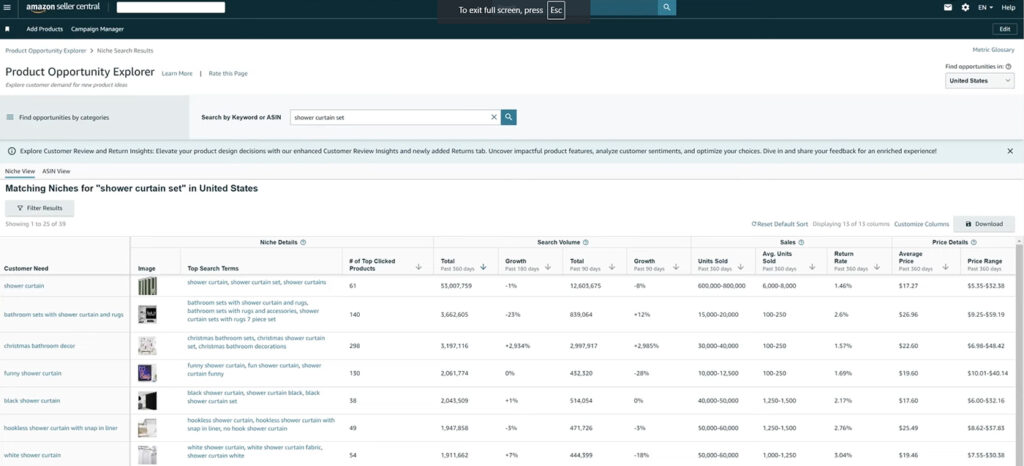
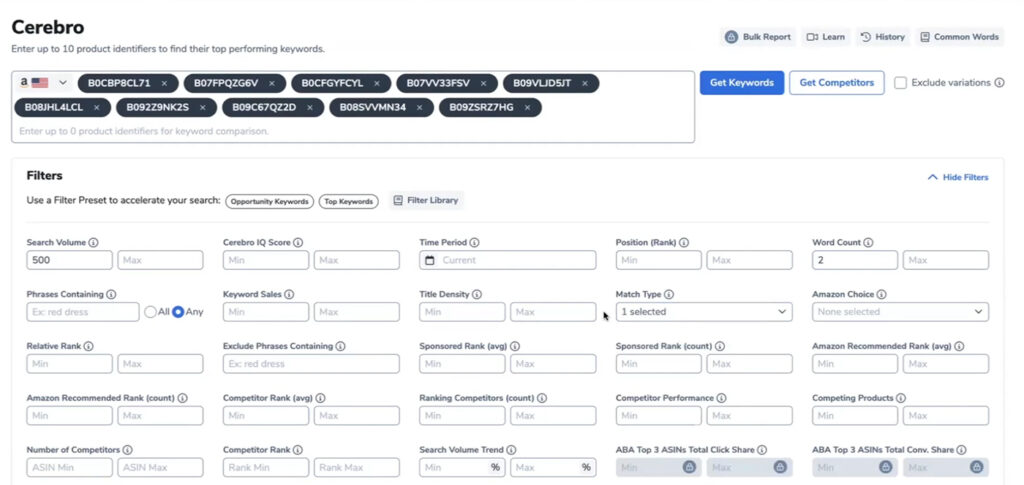
- Use a Keyword Tool: Paid tools like Data Dive or Helium 10 are great options for finding the most relevant, high-volume keywords for your product. Alternatively, free tools like Keywordstool.io or Product Opportunity Explorer can also be a big help, although with a little more work.
- Avoid Low Search Volume Keywords: A keyword might sound like it is perfect for your listing but if it only has 20 monthly searches, it is most likely not going to drive many sales. We recommend setting a “minimum search volume” filter in your keyword tool to avoid including low-volume keywords in your listing.
- Analyze Competitors: A quick way to find important, high-volume keywords for your product is through your competitors. Many keyword tools include a reverse-ASIN function where you can input a competitor’s ASIN to see which keywords they are ranking for. This can give you a head start in targeting the right search terms.
- Clean Up Your List: No matter which tool you use, it is important to clean up your keyword list. This means manually going over your list of keywords and removing any that are irrelevant, brand names, misspellings, or foreign language words.
Once you’ve identified your keywords, it’s time to put them to work. We do this by creating a keyword-optimized product listing.
Writing an optimized product listing
Now that you’ve researched your keywords, it’s time to put them to work in your Amazon listing. Listing optimization is all about using those keywords strategically to create a clear, compelling, and conversion-focused product page. From your title to your images, every element plays a role in convincing shoppers to buy your product
A well-optimized listing does more than just describe your product—it tells a story. It highlights the benefits, answers customer questions, and builds trust. And with the right keywords woven throughout, it also helps your product rank higher in Amazon’s search results.
Here are some tips for optimizing each section of your listing:
- Title: The most important part of your listing when it comes to SEO and organic search. Start with your most important keywords and include key details like your brand name, product quantity, size, and main features. Creating an optimized title is all about balancing readability while trying to include all of your most important keywords.
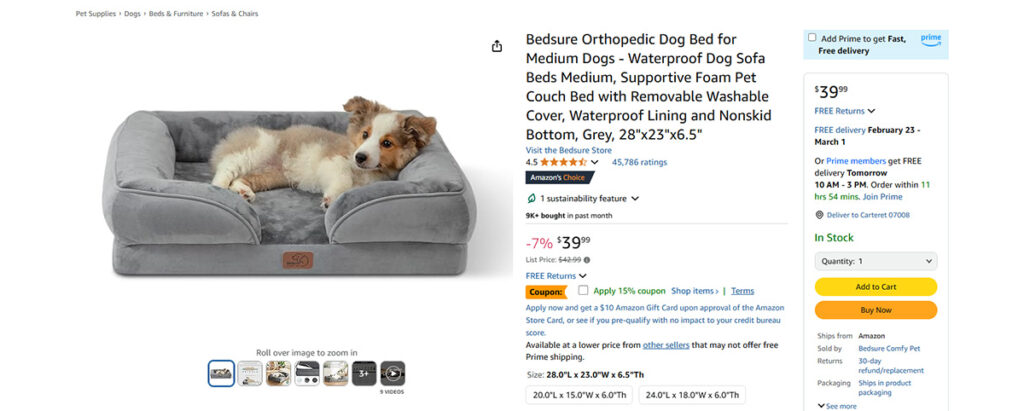
- Images (and Video): Use high-quality images that follow Amazon’s requirements (pure white background for the main image, 85% product focus). Include lifestyle shots, infographics, and close-ups. Add a product video to demonstrate use. For more details, check out our Amazon Photography Requirements guide.
- Bullet Points: Focus on benefits, not just features. Start each bullet with the benefit (e.g., “Stay Comfortable All Day”) and back it up with the feature (e.g., “Thanks to our ergonomic design”). Keep sentences short and scannable. Bullet points are another important part of your listings SEO, so make sure to include as many relevant keywords as possible.
- Product Description: Expand on your bullet points, highlight USPs (unique selling points), and address common customer concerns. Try to include the keywords you weren’t able to fit into your title or bullets while still sounding natural
- A+ Content: Once you unlock A+ content, you’re able to enhance your listing with rich media like comparison charts, videos, and interactive modules. We’ll cover A+ Content in more detail later in this guide.
A well-optimized listing is the key to increasing visibility and, more importantly, sales. By using high-quality keywords and overcoming customer objections, you’ll boost your conversion rates and improve your organic rankings.
For a detailed step-by-step guide to crafting the perfect listing, check out our full article: Amazon Listing Optimization: The Ultimate Guide.
Using Amazon Brand Registry & A+ Content
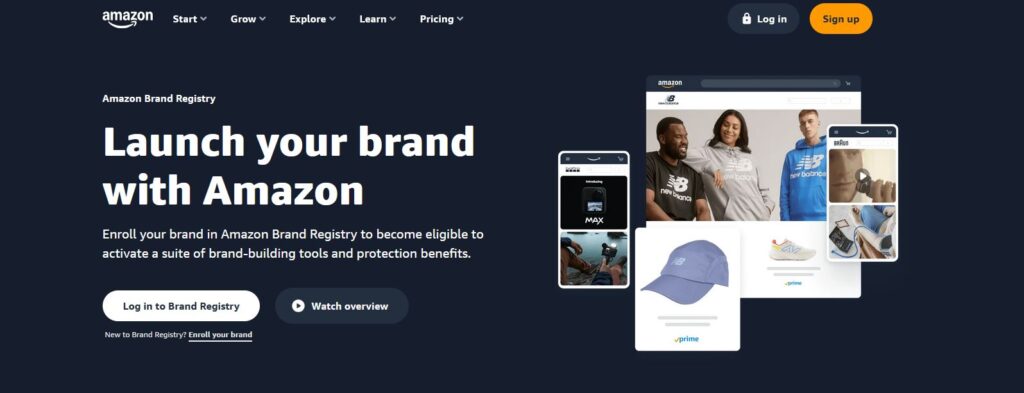
In order to use A+ Content on your listing, you’ll first need to enroll in Amazon’s Brand Registry. This program is designed to protect your brand and give you access to tools and programs that can help grow your brand on Amazon.
Why you should sign up for the Brand Registry
The Amazon Brand Registry is a program that helps sellers protect their brand and access exclusive tools. To enroll, you’ll need a registered or pending trademark for your brand, a professional seller account, and a branded product photo. Once approved, you’ll gain access to features like:
- Brand protection: The Brand Registry gives you access to programs like Project Zero and the Amazon Counterfeit Crimes Unit in order to protect your brand from counterfeits and scammers.
- Enhanced content: You’ll get access to new features like A+ Content, a Brand Store, and Brand advertising, along with sales tools like Subscribe and Save discounts.
- Financial Incentives: Amazon offers financial incentives like cash-back on brand purchases, a credit towards the Amazon Vine program, and a credit for Amazon advertising.
Enrolling in the Brand Registry is free, but the benefits are huge. It’s a must for any seller looking to build a long-term brand on Amazon. For a step-by-step guide on how to enroll, check out our full article: Amazon Brand Registry: A Complete Guide.

What Is A+ Content?
A+ Content replaces the standard product description with rich, visually engaging content. Think of it as your chance to tell your brand’s story and highlight your product’s best features. Instead of plain text, you can use modules like comparison charts, videos, and high-quality images to create a more compelling experience for shoppers.
Why is A+ Content so powerful? Studies show that listings with A+ Content convert 5-10% better than those without it. It’s also a great way to address customer concerns, showcase your USPs, and stand out from competitors.
Creating A+ Content is straightforward. You’ll choose from pre-designed modules, add your images and text, and submit it for approval. For a detailed walkthrough, check out our guide: How to Create A+ Content for Amazon Listings.
Step 6: Ship Your Inventory to Amazon’s Fulfillment Centers
Before you can start selling your products on Amazon, you’ll need to ship them to an FBA fulfillment center. While it might seem daunting at first, the process is straightforward once you understand the basics. Here’s an overview of how to send your first shipment and some tips to make it smoother:
How to Send Your First FBA Shipment
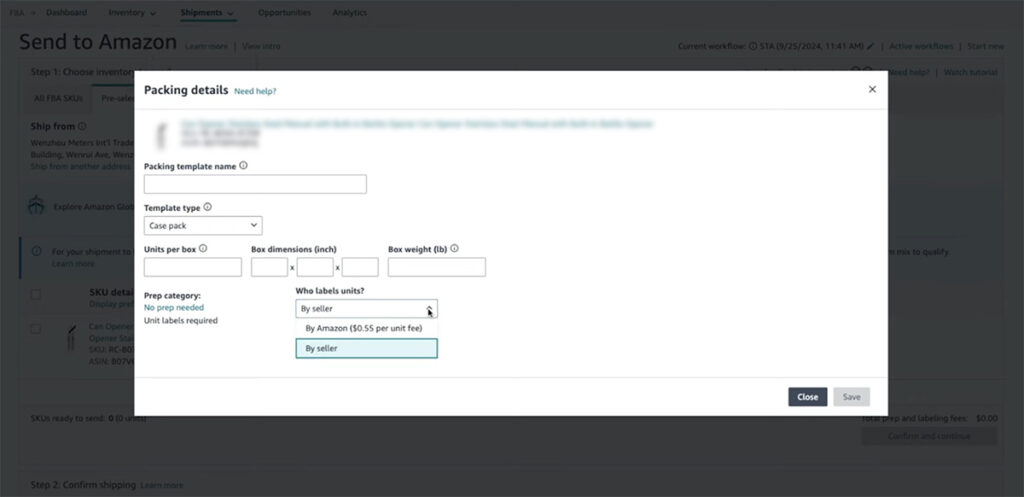
- Create a Shipping Plan: In Seller Central, go to Manage Inventory, find your product, and click “Send/Replenish Inventory.” Choose the quantity you want to ship and create a packing template if it’s your first time.
- Choose Shipping Options: Decide whether to use an Amazon-partnered carrier or a third-party service. You then have the option to split your shipment across multiple warehouses, more warehouses mean lower inbound placement fees, but fewer warehouses simplify logistics.
- Print Labels & Ship: Download and print box labels for your shipment (these are for Amazon’s internal use). If your supplier is handling shipping, send them the labels as a PDF. Arrange for pickup or drop off your shipment with the carrier, and add tracking details in Seller Central.
It’s very important to double-check your shipment details before confirming. Incorrect quantities or missed deadlines can lead to costly fees or processing delays.
Amazon Storage Fees & Inventory Management
When using Amazon FBA, managing your inventory isn’t just about keeping products in stock, it’s about balancing supply with demand while avoiding extra fees. Amazon charges several fees related to inventory, and understanding them is key to maximizing your profits.
Here are the main fees to watch out for:
- FBA Fulfillment Fees: Charged per unit based on size and weight. Smaller, lighter items cost less to fulfill.
- Monthly Storage Fees: Based on the volume (cubic feet) your inventory occupies. Rates are higher during Q4 (October-December).
- Low-Inventory Fee: Applied if you consistently run low on stock, hurting your sales velocity.
- Aged Inventory Surcharge (formerly Long-Term Storage Fee): Charged for items stored for more than 181 days.
- Inbound Placement Fee: A fee for sending inventory to fewer warehouses, which increases Amazon’s need to redistribute your products.
For a detailed guide on managing your inventory effectively and a full breakdown of these fees, check out our article, Amazon Inventory Management: A Complete Guide for 2026.
Step 7: Launch your product
Launching your first product on Amazon is both exciting and nerve-wracking. A successful launch can set the stage for long-term success, while a poorly executed one can leave your product buried in the search results. Here are some tips for nailing your first product launch and building momentum from day one:
1. Get reviews fast
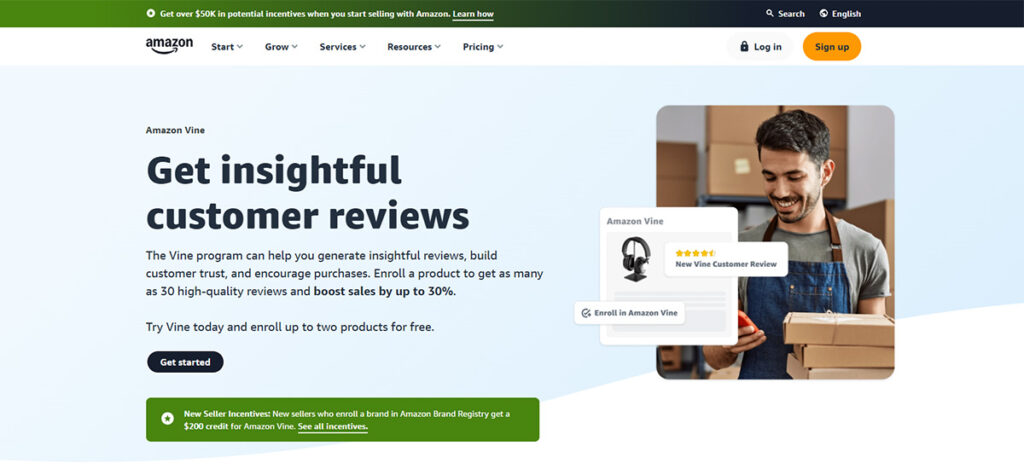
Reviews are critical for building credibility, especially for new products. Start by enrolling in Amazon Vine, which allows you to get up to 30 reviews from trusted reviewers. Additionally, you can use product testing sites like RebateKey and FBAReviews.com to get even more early reviews. Avoid running ads until you have at least a few reviews—customers are less likely to buy a product with no social proof.
2. Set a competitive launch price
Pricing is a major factor in your launch strategy. Start with a sale price or offer a coupon to attract buyers. While it’s tempting to aim for profitability right away, the goal during launch is to build momentum. Research shows that customers start trusting a product once it has around 30 reviews, so focus on getting those initial sales, even if it means breaking even or taking a small loss. Just be careful not to price too low, as this can make your product seem cheap or low-quality to potential buyers.
3. Drive traffic with Amazon advertising
Amazon is a pay-to-play platform, and PPC advertising is essential for a successful launch. Sponsored ads place your product at the top of search results, increasing visibility and driving sales. They also help improve your organic rankings by boosting sales velocity.
Start with Sponsored Products and target high-intent keywords to get your product in front of shoppers. Focus on top-of-search placements—they’re the most expensive but also the most effective. Monitor your campaigns daily at launch, adding negative keywords and adjusting bids to optimize performance.
For more information on Amazon PPC, check out our full article: What is Amazon PPC? A Beginner’s Guide to Advertising on Amazon.
4. Bring in external traffic
While Amazon PPC is crucial, don’t overlook the power of external traffic. Use social media, email lists, or affiliate sites to spread the word about your launch. Platforms like TikTok and Instagram are great for creating buzz, especially if you partner with micro-influencers to generate user-generated content (UGC). Just make sure all external traffic leads back to your Amazon listing to boost your sales velocity and organic rankings.
5. Avoid running out of stock
Nothing kills momentum faster than running out of stock. Monitor your inventory levels closely and reorder before you hit critical levels. Going out of stock can hurt your rankings and essentially force you to “relaunch” your product a second time, so plan ahead and keep a buffer of inventory.
6. Increase your price over time
Once your product has gained traction, it’s time to shift from launch mode to growth mode. Slowly raise your price over time—aim for a 10% increase each week or tie price adjustments to the number of reviews you receive. Avoid drastic price jumps, as this puts you at risk of losing the Buy Box. The goal is to transition from a competitive launch price to a profitable long-term price over time.
Step 8: Scale Your Amazon FBA Business
Once your Amazon FBA business is up and running, the next step is scaling it to new heights. Scaling isn’t just about selling more of the same product, it’s about expanding your reach, diversifying your catalog, and streamlining your business. While there are many ways to scale, from building an independent website to automating tasks with software, we’ll focus on two of the most common strategies: adding new products and hiring a virtual assistant.
Expand Your Product Line
One of the most effective ways to scale your Amazon FBA business is by adding new products to your catalog. According to Jungle Scout, 80% of successful Amazon sellers offer multiple products, with the average seller managing 12-15 items. A larger product line not only increases revenue but also strengthens your brand’s presence on Amazon.
Start by identifying new product opportunities. Use tools like Jungle Scout or Helium 10 to analyze market demand and spot trends. Look for products that complement your existing offerings or fill gaps in the market. For example, if you sell eco-friendly water bottles, consider adding reusable straws or lunch containers. This approach not only attracts new customers but also encourages repeat purchases from existing ones.
When launching new products, start small to test demand before committing to larger orders. Optimize your listings with high-quality images, compelling copy, and targeted keywords. Use Amazon’s promotional tools like Lightning Deals or Coupons to boost visibility during the launch phase. And don’t forget to collect reviews early—programs like Amazon Vine can help you build credibility quickly.
Hiring a Virtual Assistant
As your business grows, so will your workload. Hiring a virtual assistant (VA) can free up your time to focus on the bigger picture while they handle repetitive or time-consuming tasks. Whether it’s managing inventory, responding to customer inquiries, or conducting product research, a VA can be a game-changer for scaling your business.
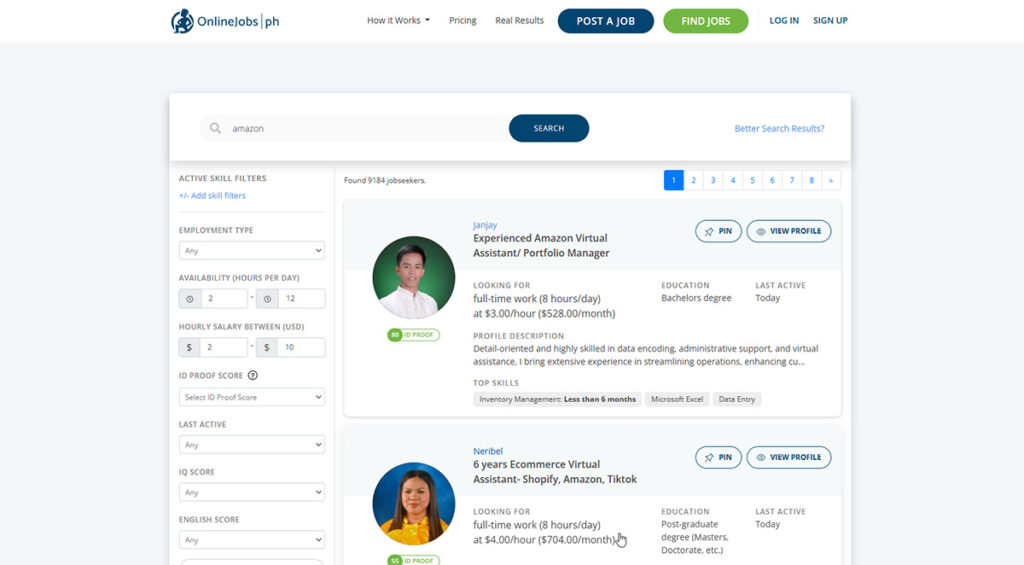
Before hiring a VA, make sure you understand the tasks you’re delegating. You’ll need to train them, so it’s important to know the ins and outs of the job yourself. Platforms like onlinejobs.ph are great for finding reliable VAs, especially if you’re looking for full-time help. Start with a small test project to see if they’re a good fit, and use tools like Loom to create training videos that make onboarding easier.
The cost of hiring a VA varies, but you can expect to pay around $450/month for an entry-level assistant from the Philippines.
FAQ – Common Questions About Starting an Amazon FBA Business
How much money do I need to start Amazon FBA?
The money needed to start selling on Amazon varies by business model. For retail arbitrage, we recommend starting with around $2,000 to source multiple products efficiently. Smaller budgets can work by selling used or bargain items from thrift stores or yard sales. Wholesale and private label models require larger investments, often several thousand dollars, for bulk inventory, packaging, and marketing.
How long does it take to start making money?
It varies, but according to a 2024 statistic, 58% of Amazon sellers become profitable within their first year. How quickly you make money depends on many factors, including your business model, product selection, and how much work you put in. Some sellers see profits within weeks, while others take longer to see results.
Is Amazon FBA still profitable in 2026?
Yes, but it takes more effort. Higher fees, tougher competition, and increased ad costs make success harder. Still, FBA is great for quick sales and testing products. New sellers can still profit if they fully commit, optimize costs, and build a long-term brand.
Can I sell on Amazon without having a registered business?
Yes, you can sell on Amazon without a registered business. To start, you’ll need a bank account, credit card, government ID, tax info, and phone number. However, registering as an LLC or business entity later can offer tax benefits and liability protection to help scale your operations.
Can I sell on Amazon from home?
Yes, you can sell on Amazon from home. Many sellers manage their businesses remotely, handling tasks like listing products, sourcing inventory, and communicating with customers. Amazon FBA can also store and ship items for you, making working from home even easier.
Final Thoughts on How to Start an Amazon FBA Business in 2026
Starting an Amazon FBA business in 2026 is more competitive than ever, but also more accessible. If you take the time to choose the right product, validate demand, and build your listings and supply chain properly, Amazon can still be a powerful path to real, long-term income.
Don’t try to shortcut the process. Focus on getting each step right—from product research and supplier sourcing to listing optimization and inventory management. Even one weak link can slow you down or hurt your margins.
If you’re serious about building a brand, I recommend bookmarking this guide and tackling it one step at a time. And if you want deeper help with specific parts of the process, you’ll find additional guides and tools throughout Levi’s Toolbox to support you as you grow.
The best time to start was last year. The second-best time is now.
Levi Adler is an experienced Amazon seller, e-commerce specialist, and the founder of Levi’s Toolbox. With over a decade in the trenches selling on Amazon and managing his own Shopify stores, Levi writes from his own experience. Sharing what worked, what flopped, and the strategies he wishes he’d known sooner. When he’s optimizing listings or managing ad campaigns, you’ll find Levi hitting mountain bike trails or hanging out with his two huskies, Emma and Scout.
