Selling on Amazon is one of the fastest ways to start an e-commerce business, but before you can list your first product, you need to set up an account. The registration process isn’t difficult, but even small mistakes can lead to long delays or even rejections.
This guide will walk you through how to create an Amazon seller account step by step—so you can get started quickly and avoid common issues. We’ll explain everything you need to get started, walk you through the process, and let you know exactly what to expect.
Let’s get started.
Before You Create an Amazon Seller Account
While signing up for a seller account isn’t complicated, you will need a couple of things before you get started. First of all, you’ll need to choose a seller plan that fits your goals and gather the required information for registration
Choosing a Seller Plan
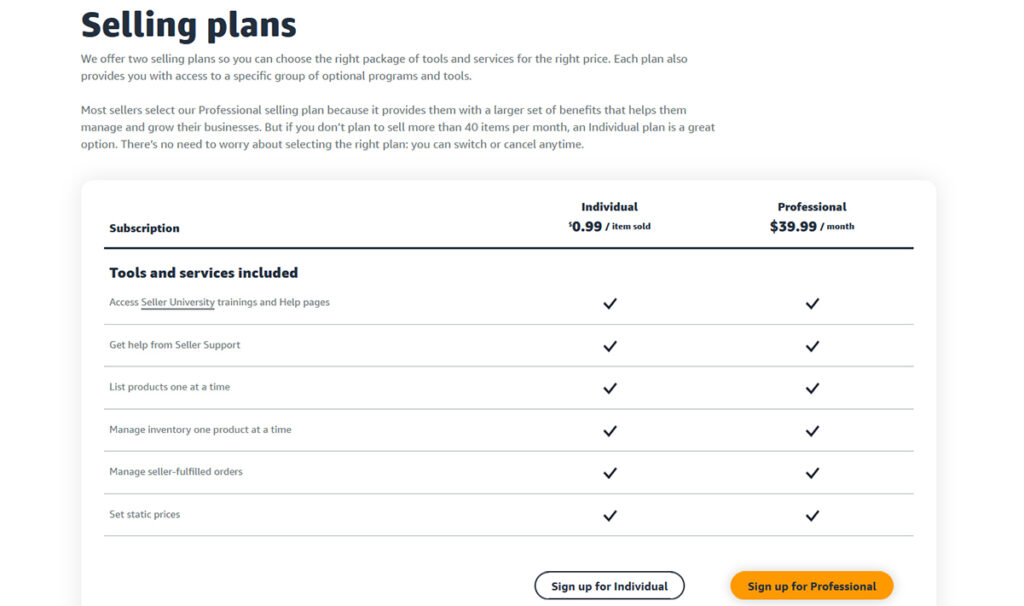
The first major choice you’ll have to make is which selling plan to choose. Amazon offers two types of seller plans: Individual and Professional. The right choice depends on how many products you plan to sell and what features you need to grow your business.
The Individual plan is a pay-as-you-go option with no monthly fee, but it charges $0.99 per sale. It’s a good choice if you’re just testing the waters or only plan to sell occasionally. However, it lacks key features like access to advertising, buy box eligibility, and brand tools.
The plan we recommend for anyone serious about starting an Amazon business is the Professional selling plan. Unlike the Individual Plan, the Pro plan does not charge you per item, instead, there is a flat $39.99 monthly fee, regardless of how many products you sell. However, the main reason we recommend the Professional Plan is all of the additional features that come along with it. With the Professional Plan, sellers can:
- Win the Buy Box: Sellers using the Professional Plan are eligible to win the buy box which is especially important if you plan to launch an online or retail arbitrage business. It also allows private label sellers to have a buy box present on their listing
- Enroll in Amazon’s Brand Registry: The Brand Registry includes a variety of features and tools for brands selling on Amazon. This includes copyright and fraud protection, the ability to create a brand store, and access to brand-specific advertising
- Amazon Advertising: The Professional seller plan gives you access to Amazon advertising including search, display, and brand ads.
- Sell in Additional Categories: Certain brands and categories are off-limits to new sellers. With a Professional Seller account, you are able to apply and then be approved to sell a wider selection of product categories and brands.
What You’ll Need Before Signing Up
Before you start the registration process, make sure you have the following information ready:
- Government-issued ID: A valid passport or government-issued ID to verify your identity. Amazon requires a clear, unedited scan of this document.
- Mobile Phone: A working phone number is needed for verification and future account security checks.
- Bank Account Information: Amazon deposits your earnings directly into your bank account, so you’ll need to provide your account details, including the bank name and routing number.
- Credit Card: A valid chargeable credit card is required to cover the monthly cost of your seller plan as well as any additional Amazon fees. Prepaid cards or debit cards are not accepted.
When uploading documents like your ID or proof of address it’s important to follow Amazon’s guidelines to avoid any unnecessary delays or rejections.
Step-by-Step Guide to Creating an Amazon Seller Account
Step 1 – Visit Amazon Seller Central
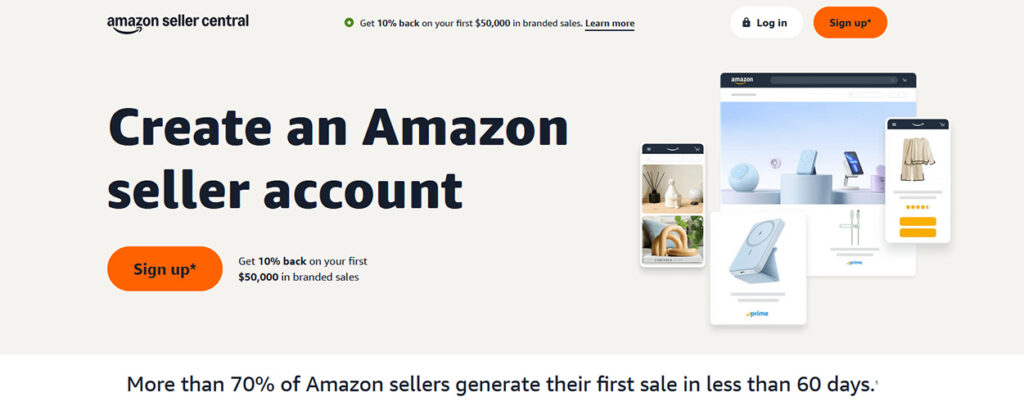
To start selling on Amazon, head to Amazon Seller Central. This is the hub where you’ll manage your business, list products, track sales, and manage inventory. Click the orange “Sign up” button to get started.
If you already have an Amazon account you can log in using the same credentials. However, to keep your business organized, we recommend creating a separate account dedicated to selling. Enter your name, email, and a strong password. Amazon will send a one-time password (OTP) to your email for verification. Enter the code to confirm your account, and you’ll be ready to move on to the next step.
Important: If you’ve previously started but didn’t finish creating a seller account, sign in with that same email—Amazon doesn’t allow multiple seller accounts in the same marketplace, and attempting to create a second account can lead to both of your accounts being deactivated, and you being permanently blacklisted from selling on Amazon.
Step 2 – Fill Out Your Business Information
In the first section, you will need to fill out the basic information about your business. Even if you don’t have a registered business, you can still proceed as an individual seller.
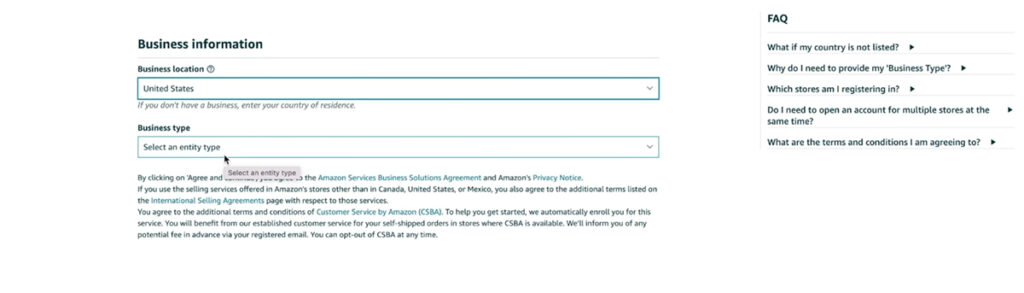
First, select your Business Location—this is either the country where your business is registered or, if you’re selling as an individual, the country where you live.
Next, choose your Business Type from the dropdown menu. There are several options but most sellers will select one of the following:
- None, I am an individual – Choose this if you don’t have a registered business.
- Privately Owned Business – Select this if you’ve registered a sole proprietorship, LLC, or other business entity.
If you chose “Privately Owned Business,” enter your Business Name exactly as it appears on your official registration documents. Then, check the box verifying that all the information you provided is accurate.
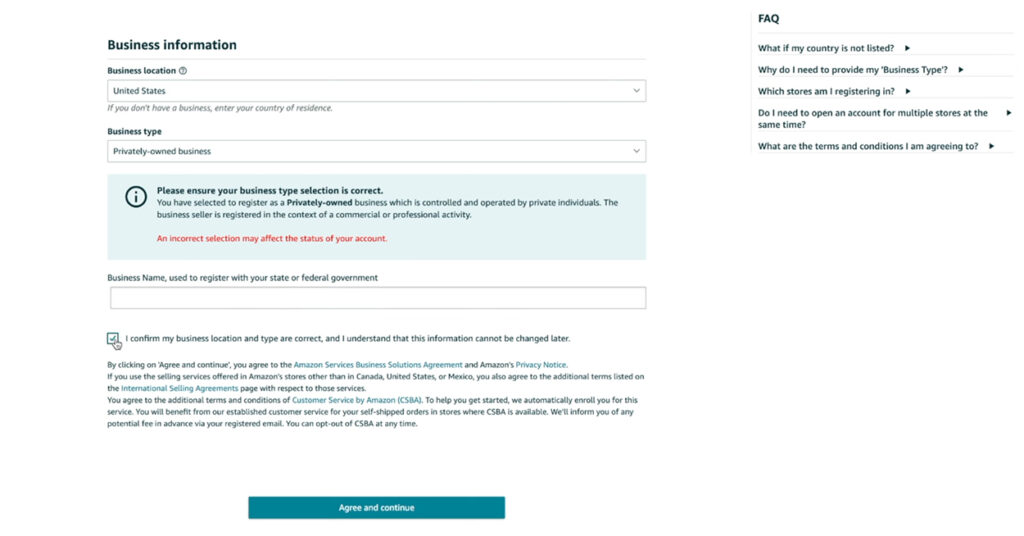
In the next section, Amazon will ask for more details. If you registered a business, you’ll need to re-enter your Business Name and provide your Company Registration Number (this number will most likely be on your business registration, but it may be referred to differently depending on the state/country where you registered your business).
Then, enter your Registered Business Address. This should match the address on your business registration exactly. If you’re selling as an individual, simply enter your home address.
Finally, choose how you want to verify your information—either via SMS or phone call. Amazon will send a verification code to confirm your details before you can move on to the next step.
Step 3 – Fill Out Your Personal Information
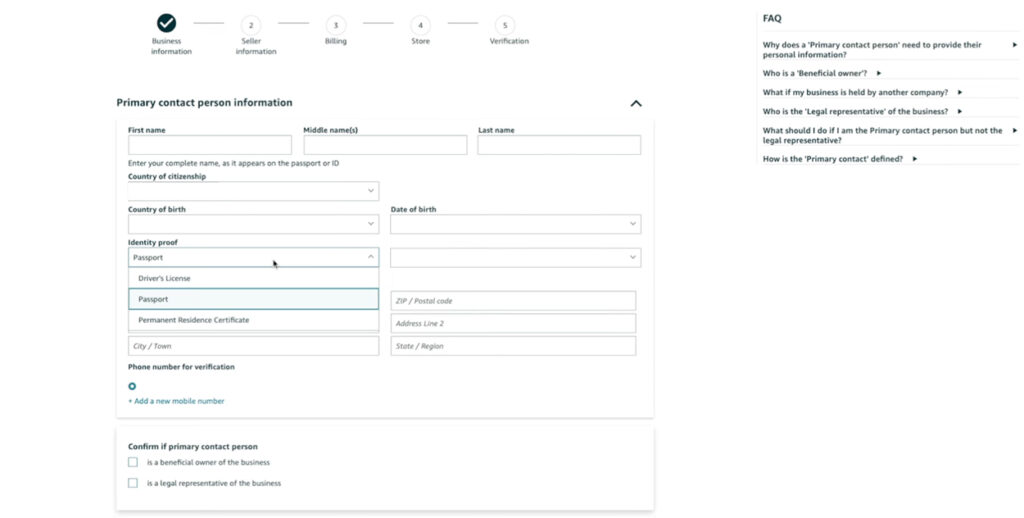
The next section is pretty straightforward as you will need to provide basic information about yourself. However, it’s important to double-check all of the info you provide for any errors. Even a simple mistake can result in big delays or your application being rejected.
To complete this step, upload a valid government-issued document, such as a passport or driver’s license. If you’re registering as a business, you’ll also need to confirm whether you’re the sole owner or acting as a representative.
Step 4 – Provide Your Payment Information
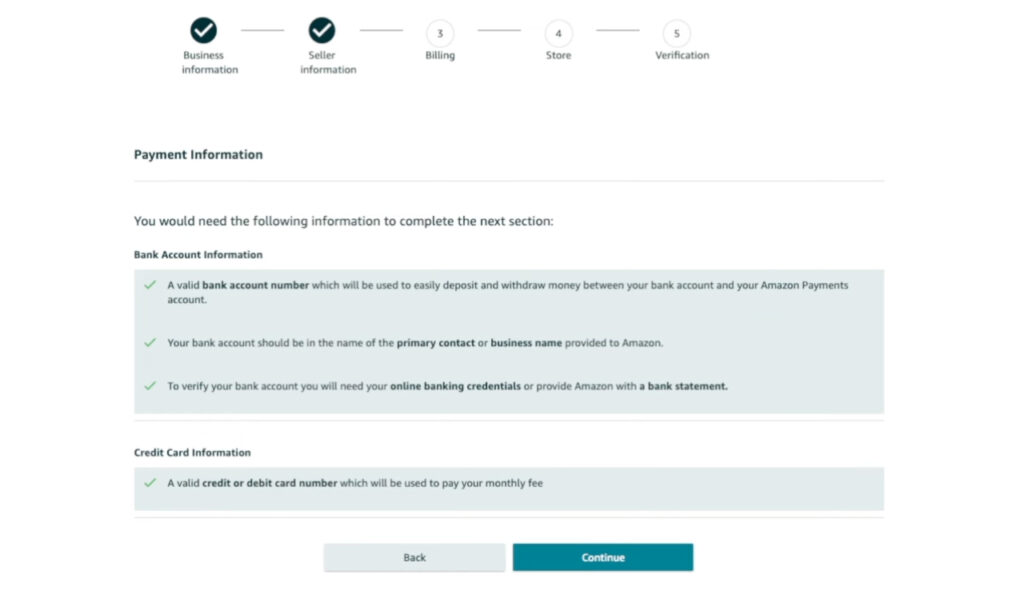
Next, you’ll need to enter your bank account details and credit card information to complete the payment setup for your Amazon seller account. Amazon will use your banking information to deposit your earnings and will use your credit card to pay for your monthly seller plan and any additional Amazon fees.
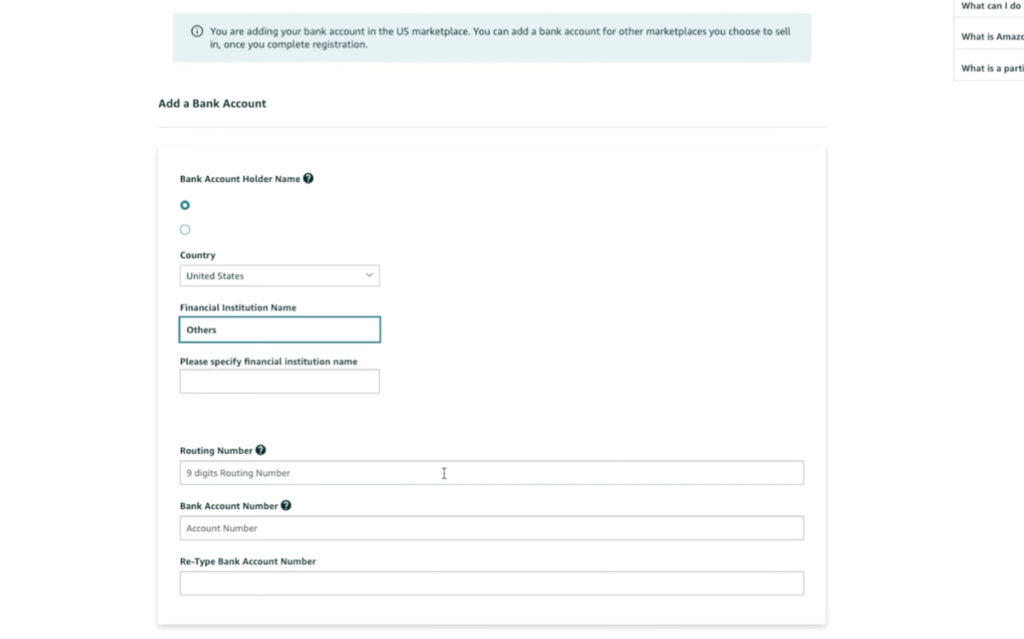
Start by selecting your bank name from the dropdown menu. If your bank isn’t listed, choose “Other” and enter the details manually. Then enter your routing number and bank account number. In most cases, you can find your bank’s routing number by checking any bank statements you have or by simply googling “[bank name] + routing number.”
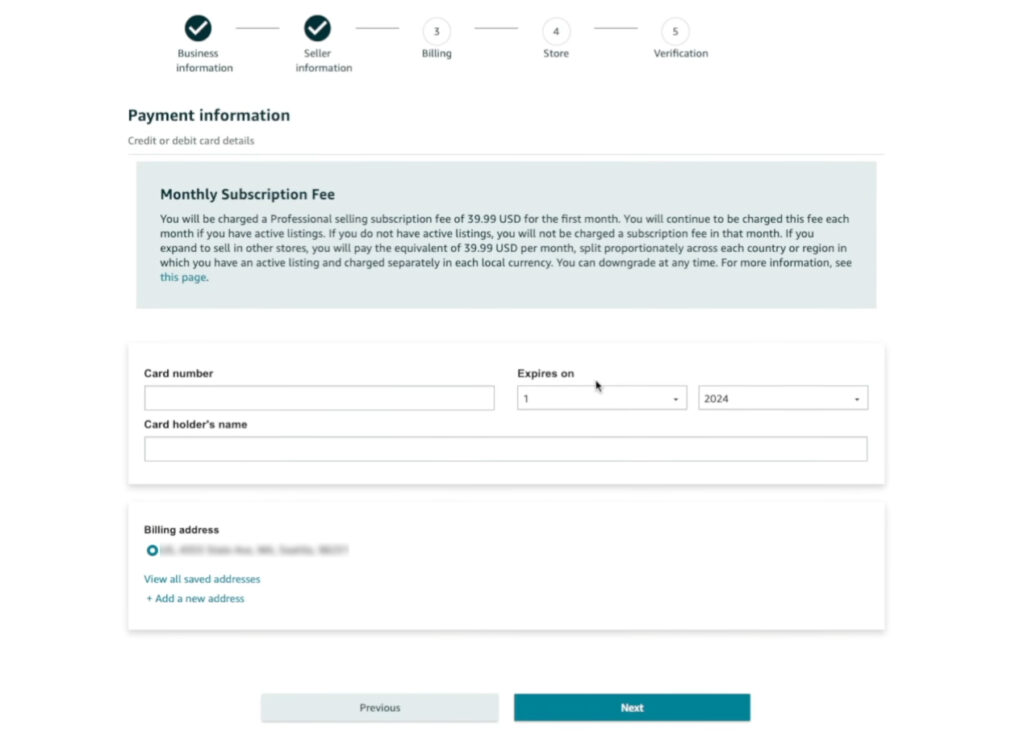
After entering your bank details, provide a valid credit card. This card is used to cover monthly subscription fees (if you’re on the Professional plan) and any outstanding charges.
You are not able to use a debit card for this step unless it can also function as a credit card (Mastercard or a Visa debit card).
Once you’ve reviewed everything for accuracy, submit the information. With your payment details in place, there’s only a couple of steps to go.
Step 5 – Enter Your Store and Product Information
In the next step, you will need to provide Amazon with information about your store name and the products you plan to sell. If you don’t currently have any products, that’s completely ok, just fill out the information based on your business plans.
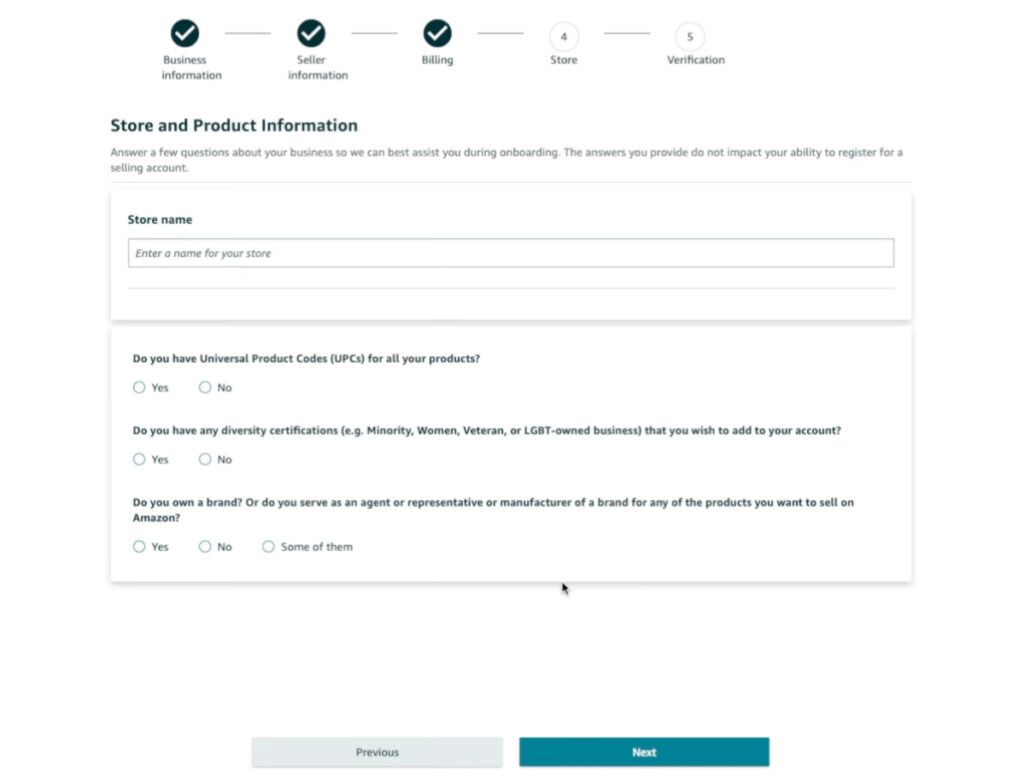
First, enter your store name, this is what customers will see when they browse your listings. If you have a registered business name, it’s best to use that for consistency. However, you’re free to choose any available name. If your preferred name is already taken, Amazon will prompt you to select a different one. Don’t worry, you can change this later if needed.
Next, answer whether you have UPCs for your products. A UPC (Universal Product Code) is a barcode used to identify products. If you’re selling retail or online arbitrage products, the UPC is already on the packaging. If you’re launching a private-label brand, you’ll need to purchase your own UPCs. Either way, you should answer “yes” to this question.
After that, you’ll be asked about diversity certifications and brand ownership. If you own a brand or plan to sell private-label products, select “Yes” when asked if you own a brand. If you’re unsure, select “Some of them.” If you do own a brand, you’ll also be asked if it has a registered trademark. A trademark isn’t required to sell on Amazon, but it is necessary for enrolling in the Amazon Brand Registry, which offers added protections and marketing tools for brand owners.
Once you’ve completed this section, double-check your entries and submit the information. With this step done, you’re almost finished setting up your Amazon seller account!
Step 6 – Verify Your Seller Information
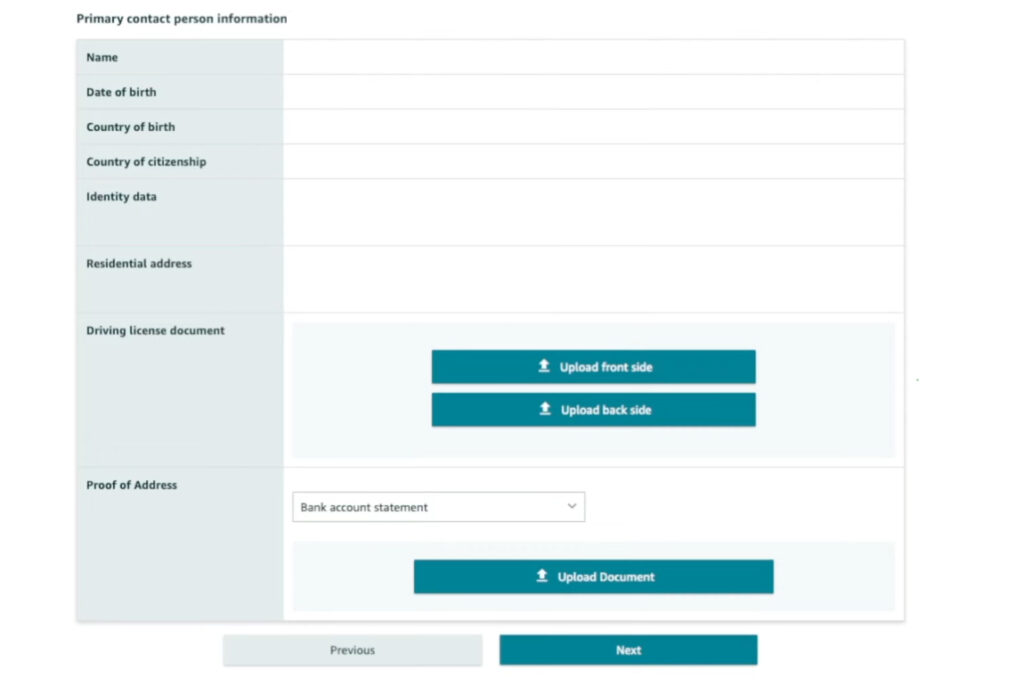
Before your Amazon seller account is approved, you’ll need to verify your identity and business details. Don’t just skip over this step, take the time to double-check everything and make sure it’s correct. Even simple mistakes can cause huge delays so make sure the information you provided is accurate.
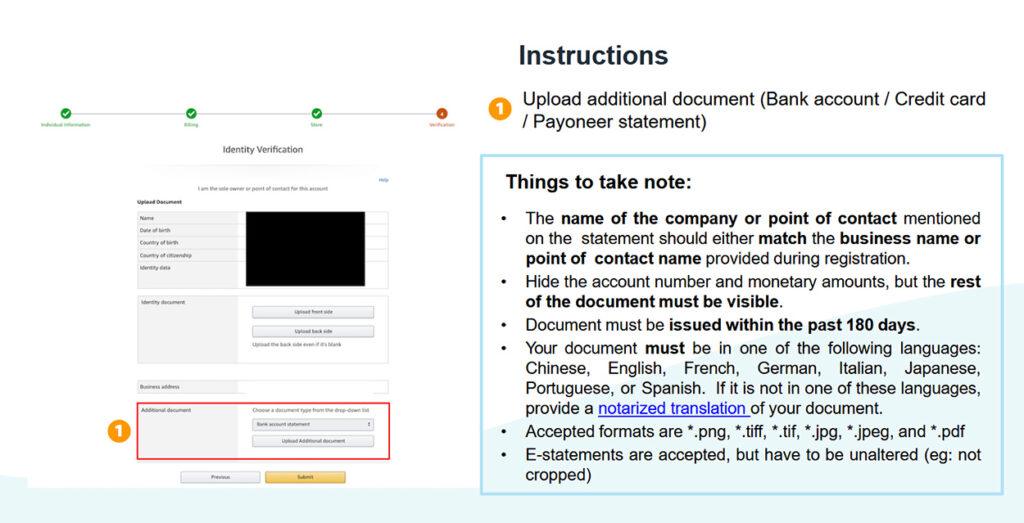
Next, you’ll need to upload proof of identity and address. Amazon requires a government-issued ID, such as a passport or driver’s license, along with a recent bank statement or credit card statement. These documents must be clear, unaltered, and show your full name as it appears on your account. If the document is blurry or cropped, Amazon may reject it, forcing you to start the process again.
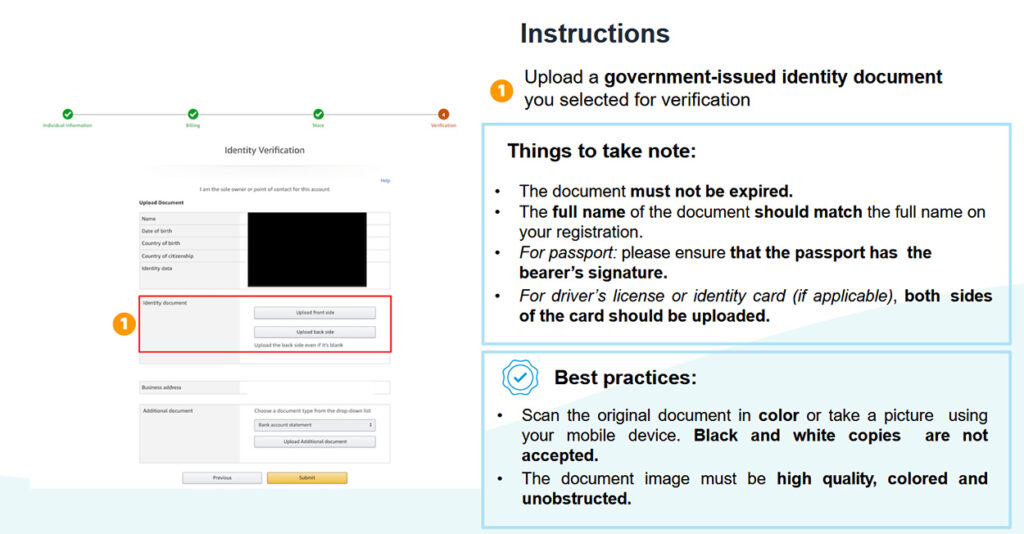
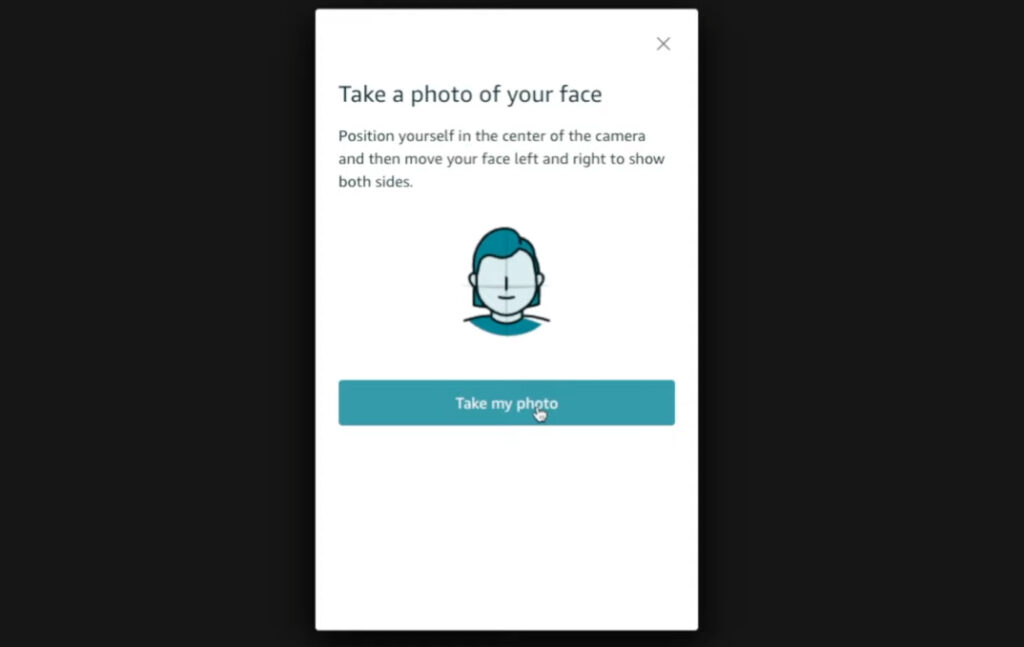
To complete the verification process, Amazon will ask you to confirm your identity through either a live photo submission or a video call. The choice is up to you, but we recommend the live photo as it is typically much faster than the video call, which can take around a week. After choosing the photo submission you’ll need to follow the onscreen prompts to first take a picture of your photo ID and then a photo of your face.
Once you’ve completed these steps, your application will move to the final review stage. If everything checks out, you’ll soon have full access to your Amazon Seller Central dashboard and can officially start selling.
Step 7: Wait for Approval
After completing verification, your application enters Amazon’s review process, which can take anywhere from 48 hours to a few weeks. In some cases, Amazon may send a physical letter to your address with a verification code that you must enter into your account. This mailing process can take several weeks, so be patient.
How Much Does It Cost to Sell on Amazon?
A common question I get asked is, “What percentage does Amazon take?” The truth is that there are a lot of factors that determine what costs and fees each seller has to deal with, but here is a quick overview of some of the costs that come with starting an Amazon business.
The first cost, that we discussed earlier, is your seller plan. Depending on whether you chose the Individual or Professional plan you will either need to pay $0.99 per sale or a flat rate of $39.99/month. Beyond the seller plan, Amazon charges a referral fee on each sale—typically 8% to 15%, depending on your product category. Think of this as Amazon’s cut for letting you sell on its platform.
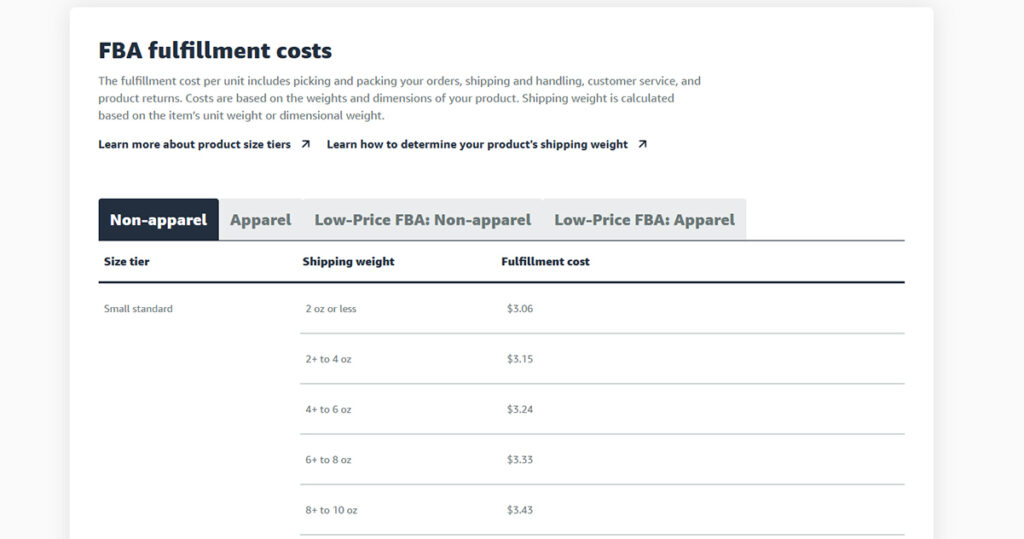
Additionally, you will have to deal with fees related to the fulfillment method you choose. When selling on Amazon you have the choice between FBA (Fulfilled by Amazon) and FBM (Fulfilled by Merchant). We won’t go into details here, but in basic terms, FBA means that Amazon will pack and ship all of your orders to customers and FBM means that you take responsibility for packing and shipping your products directly to each customer. With FBA Amazon charges you several fees for things like shipping, packing, and storing your inventory. Likewise, with FBM you’ll need to account for things like the cost of boxes, packing supplies, shipping fees, etc.
For more information on fulfilled by Amazon and fulfilled by merchant please see our guide on FBA vs FBM.
Lastly, you’ll need to keep in mind extra expenses like advertising, software, third-party warehouses, and more. Ultimately, the exact fees and expenses that come with selling on Amazon will change drastically depending on what kind of business you plan on creating and the fulfillment method you choose to use.
For more information on Amazon fees, including a breakdown of all major seller fees check out our full guide: How Much Are Amazon Seller Fees? Complete Breakdown for 2026.
Frequently Asked Questions (FAQ’s)
Can I create an Amazon seller account for free?
Yes, you can create a free Amazon seller account by signing up for the Individual Seller plan. Instead of paying a monthly fee, like with the Professional plan, you will be charged $0.99 each time you make a sale.
While this can be a great way to get started, for serious sellers or anyone selling more than 40 items a month, the Professional plan at $39.99/month is a better option.
Do I need a business license to sell on Amazon
No, you don’t need a registered business or business license to start selling on Amazon. Simply choose “I am an individual” when creating your seller account to sign up without a business license.
If you decide to register a business later—whether it’s a sole proprietorship, LLC, or corporation—you can easily update your seller account with your business details. Just keep in mind that changing your business information may trigger another verification process with Amazon.
How long does the verification process take?
The verification process typically takes anywhere from a couple of days to a couple of weeks. In some cases, Amazon may physically mail you a verification code – this can add significant time, as the mailing process alone may take anywhere from one week to over a month.
Do I need a bank account to sign up as an Amazon seller?
Yes, Amazon requires a valid bank account when you register as a seller. The account must be in your exact legal name (or your registered business name if applicable). Amazon will verify this during the application process.
What are the requirements for opening an Amazon seller account?
To open an Amazon seller account, you’ll need several items. First, a valid government-issued ID like a driver’s license or passport that matches your registration details. Second, a bank account in your exact legal name – Amazon will verify this against your application. You’ll also need a chargeable credit card (not a debit card unless it functions as credit) for monthly fees. Finally, you must provide a working phone number and email address for verification purposes.
Conclusion
Creating an Amazon seller account is the first step to building a successful business on the world’s largest e-commerce platform. Now that you know which seller plan to choose, what documents you need, and how to complete the registration process, you’re ready to move forward with confidence.
Once your account is set up and verified, the real journey begins—listing products, optimizing for sales, and growing your business. Whether you plan to create a convenient side hustle or build a full-scale brand, Amazon is a great place to start your e-commerce journey.
Now, it’s time to take action. Get started with your seller account today and take the first step toward your e-commerce goals.
Recommended Articles
- How to Buy from Alibaba and Sell on Amazon (Beginner’s Guide)
- Amazon FBA vs FBM: Which Fulfillment Method is Right for You?
- Brand Registry on Amazon: A Comprehensive Guide for 2026
Levi Adler is an experienced Amazon seller, e-commerce specialist, and the founder of Levi’s Toolbox. With over a decade in the trenches selling on Amazon and managing his own Shopify stores, Levi writes from his own experience. Sharing what worked, what flopped, and the strategies he wishes he’d known sooner. When he’s optimizing listings or managing ad campaigns, you’ll find Levi hitting mountain bike trails or hanging out with his two huskies, Emma and Scout.