
You’ve found a product idea, done your research, and now you’re sitting there trying to figure out how to actually launch it. For many new Amazon sellers, this feeling is all too common. In 2026, Amazon competition is fiercer than ever, ad prices have skyrocketed, and even a few bad decisions can turn your launch period into a disaster.
That’s why I’ve created this article. It’s a step-by-step Amazon product launch guide to help new and intermediate private label sellers get their business off the ground. We’ll start by going through product validation and competitor research so you don’t wind up sinking money into a losing idea. Then we’ll move through the entire process of optimizing your offer, creating a launch-ready product listing, organizing your inventory, gathering early reviews, and designing a PPC campaign for your launch week.
My goal here is simple. By the time you finish reading, you should know exactly what to do from the second you find a promising product idea, all the way through your first months of sales. Instead of copying random advice from forums or social media, you’ll have a clear launch checklist, created by a seller with over 10 years of experience.
How Amazon Product Launches Work in 2026
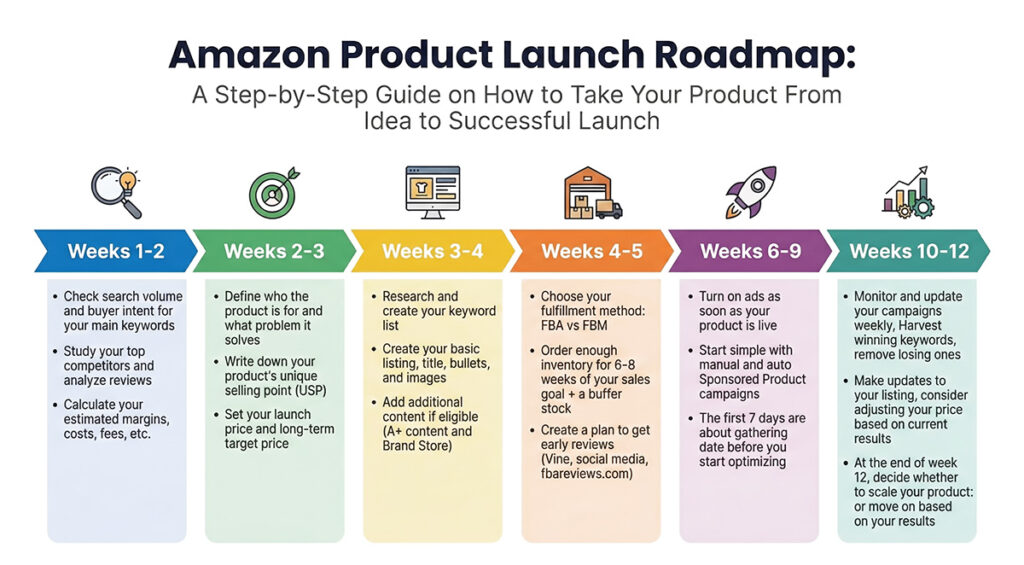
In 2026, a successful Amazon product launch has four major pillars. These are an optimized product listing, a competitive pricing strategy, a method of getting early, legitimate reviews, and a well-structured PPC campaign to drive traffic to your listing. Without any one of these pillars, your chances of success are extremely low, given how competitive Amazon has become in recent years.
But the goal for your launch is not just to make sales; it’s much more important than that. The real goal is to gather enough sales velocity to push your product onto page one of organic search results.
You can think of a product launch like pushing a stalled car. At first, you have to push incredibly hard (expensive ad campaigns) just to get it moving. But once you get some momentum, the engine kicks in, and the car starts to move on its own. In Amazon terms, that “engine” is your organic search ranking.
Since the majority of shoppers never click past the first page of results, a product stuck on Page 7 is basically invisible. This is why your launch period is so important. It’s essentially an upfront investment to buy the data and sales history you’ll need to secure your spot in prime real estate where your most profitable sales will happen.
The Most Important Amazon Ranking Factors for 2026
If the goal of your launch is to get your product to rank well in search results, it helps to know exactly what factors Amazon considers when it decides where your listing should show up in search results. In 2026, the algorithm prioritizes real customer behavior and consistency more than ever.
Here are the most important metrics that Amazon measures during your launch to decide where you’ll rank:
- Sales Velocity: This is by far the biggest factor. Amazon wants to see consistent daily and weekly sales growth. A spike on day one followed by a period of no sales is a red flag. This is why advertising has become such a big factor in creating a successful product launch.
- Conversion Rate (CVR): This measures how many people buy your product after clicking on an ad or finding your product in the search results. Driving a lot of traffic with low sales signals to Amazon that your product isn’t relevant to shoppers, which hurts your rankings.
- Click-Through Rate (CTR): This is the percentage of shoppers who click on your product in search. This metric signals to Amazon whether your main image and price are attractive enough to win attention in a crowded search result.
- Relevance: Amazon will scan your title, bullets, and backend keywords to check that you are indexed for the right search terms and that your product is not misleading to shoppers.
- Customer Satisfaction: Returns, negative reviews, and poor seller feedback can really hurt your launch. If customers are unhappy, your organic rankings will suffer as Amazon will prioritize products that offer a better experience for shoppers.
For the first 30-45 days after your launch, Amazon tracks all of these metrics with extra intensity, during a time many sellers call the “Honeymoon Period.”
During this phase, Amazon’s algorithm is a bit more forgiving. It will try to show your product to more customers in order to gather more data. If your metrics (especially conversion rate and sales velocity) look good compared to your competitors, you can climb the rankings much faster than an older product could.
Step 1 – Decide If the Product Is Worth Launching
With the basics out of the way, it’s time to start going through the exact process of actually launching your product. Before you even think about ordering inventory and creating a listing, you need to validate your product idea. This means studying demand, analyzing the current competition, and running the numbers to estimate profit margins, ROI, and more.
Even if you think you’ve found a great product, it’s important that you don’t skip this step. Launching a new product is a big investment in both time and money, so you’ll want to make sure you get it right.
We’ll cover the basics here, but I recommend reading our Guide to Amazon Product Research for a more detailed breakdown of how to find and validate product ideas.
Validate Product Demand and Analyze the Competition
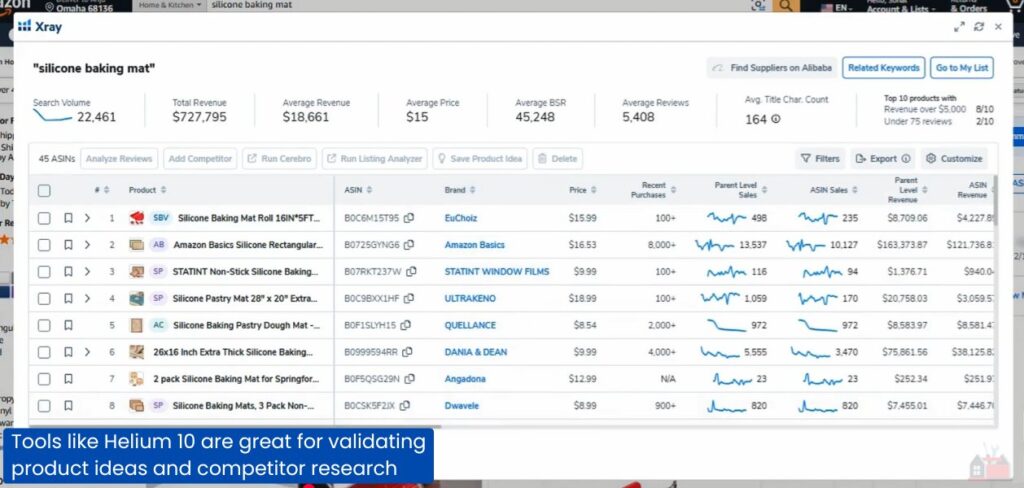
One of the best ways to start validating a potential product is to brainstorm the main phrase or search term that shoppers would use to find your product. Once you come up with it, run it through your product research tool and make sure you see a healthy number of monthly searches. You also want to check if the volume is consistent, year-round. While there’s nothing wrong with selling seasonal products, if you’re a beginner, I recommend sticking with evergreen product ideas.
Next, move over to Amazon and try searching for your main keyword there as well. Ask yourself: Do the listings that come up match the product I plan to sell at roughly the price I want to charge? If the search results are full of different products or very different prices, you might have chosen the wrong keyword or the wrong offer.
Take a closer look at the competition. Look at the number of reviews for each of the page one listings. A page with a mix of listings that have a few dozen reviews and some with a few hundred is a great sign. Meanwhile, a search results page where every top result has 1000+ reviews and high-quality images is going to be much more difficult to break through.
Read over the most helpful positive and negative reviews for several of the top products and look for repeated, specific complaints that you can address with your own product, such as poor materials, sizing issues, or simple design fixes.
By the end of this step, you should be able to describe in one clear sentence how your product will be different from what is already on page one. If you can’t do that, it’s usually a good idea to move on before things move too far.
Estimate Potential Profit and Margins
Once you verify that there is a healthy demand for your product and your competition looks manageable, it’s time to run the numbers. Your goal is to calculate per-unit profit considering all the main costs that come with selling on Amazon in 2026.
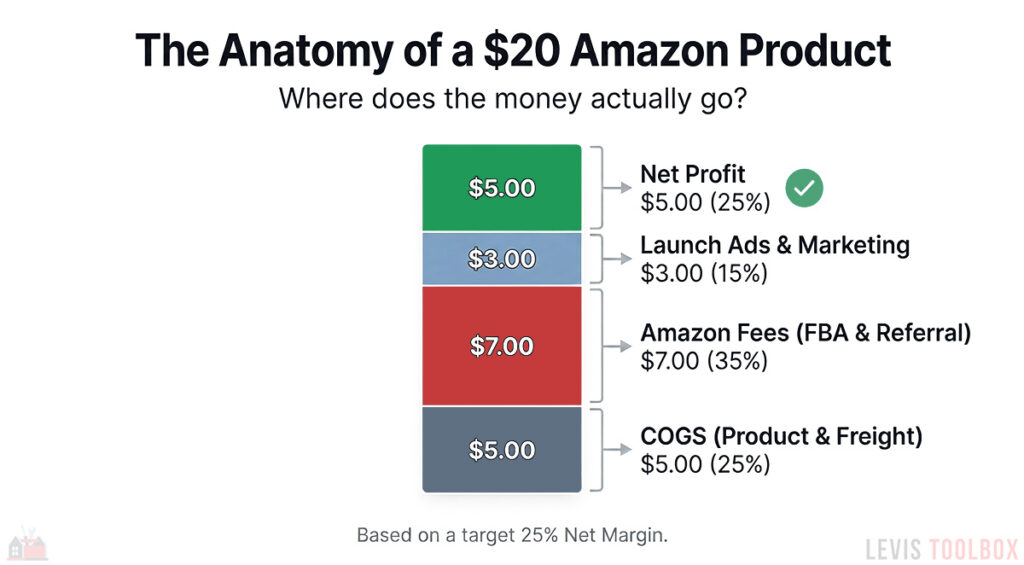
At minimum, include product and packaging, freight and duties, FBA fulfillment fees, referral fees, and a realistic cost for PPC and marketing averaged across each unit.
For a first private label product, I recommend treating 20% net margin as the floor and 25-30% as a healthier target.
Of course, you don’t have to work this all out by hand; there are many great profit calculators available. In fact, we have our own 100% free Amazon FBA Profit Calculator that I encourage you to try. Just remember, if you can’t reach at least 20% net margin using your best estimates, treat that as a big red flag for your product idea.
Set Your Product Launch Budget
The last step of this section is deciding how much money you are willing to risk on this product. That includes both your initial inventory and the cost of marketing and ads for your launch.
For a typical private-label product in the $20-$30 range, it’s common for the first order plus freight and duties to land somewhere between $6000-$10000. On top of that, it’s common to invest roughly 20-30% of your first order value into advertising and launch promos during the first 60-90 days.
Rather than try to guess an exact budget number, set two clear boundaries. Decide the maximum you are comfortable tying up in this product for the first few months, and what percentage of your first order value you are willing to reinvest into the PPC and promos you’ll need to get early sales.
If the product fails to hit your margin and sales goals after you have reached those limits, you cut ties, clear out your stock, and move on instead of investing more money into a sinking ship.
Step 2 – Positioning, Offer, and Target Customer
Step one was all about validating your idea and making sure that the product numbers make sense. This step focuses on dialing in the offer itself and your target market. You want to build a clear picture of who you are serving, why your product is the right choice for them, and how your product price fits within your margins.
Define Your Target Audience and Buyer Persona
Start by creating a simple buyer persona. Give your buyer a short description: what problem they are trying to solve and where they will use your product. Then think about how that person would search for your product. Which phrases would this person actually type into Amazon, and what results would they find?
This is another step where product reviews come in very handy. Read through top competitor reviews, both good and bad. Which benefits and features do customers mention most? What are the common objections or issues that they bring up? Using reviews in this way is a goldmine for finding out what buyers care the most about in your niche and can help you properly position your product before launch.
Define your USP and launch offer
Once you understand the buyer, list out the specific ways that your product is different, what separates it from the competition. This might be new features, better materials, or an improved design.
For example, imagine you’re launching a new yoga mat. This is a super competitive category, but you notice most products are quite thin and come with no extras. A unique selling point for your product could be “8mm joint-friendly yoga mat with a convenient carrying strap and pose guide.” When a shopper compares you to the existing results, it’s easy to spot the difference in just a few seconds.
When you’re designing your offer, consider these questions:
- Can a shopper see what makes my product different in under five seconds?
- Does the offer line up with the main problem my target customer is trying to solve?
- Would buyers feel comfortable paying for my product even if it’s not the cheapest option on page one?
Then decide how strong your launch pricing and discounts need to be to earn early clicks without doing too much damage to your margins.
Launch Pricing vs. Long-Term Pricing Strategy
Pricing is where step one and step two meet. Your early competitor research should give you a clear idea as to the average price for your category, and your own math should tell you the minimum price that still leaves you a healthy margin after considering fees and ad costs.
You’ll want to use that information to set two prices: a temporary launch price and a more profitable target price point.
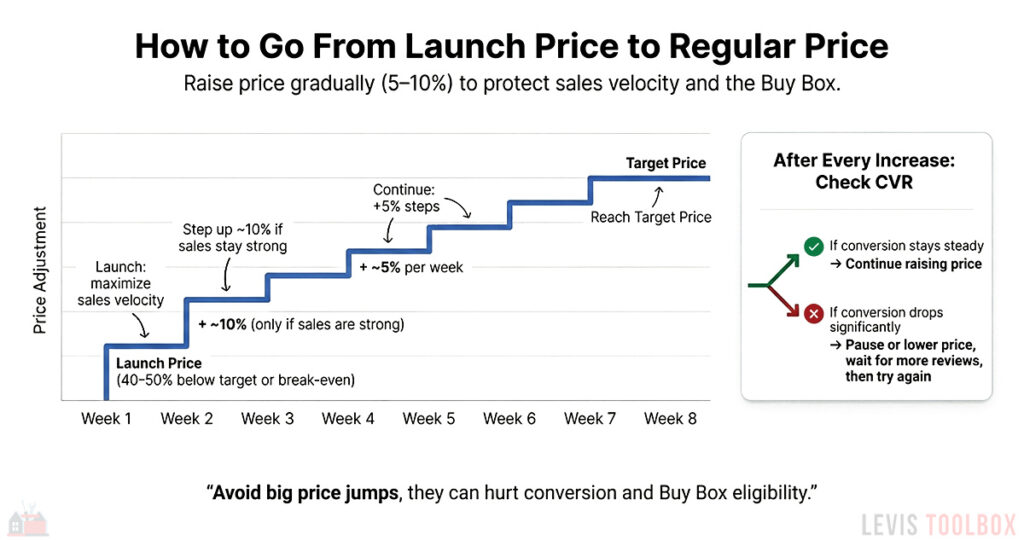
The launch price should be low enough that it feels like a good deal to shoppers while you build up your early reviews, but not so low that you’re bleeding cash on every sale. As you gather data during the first few weeks, you can gradually bump up your price towards your long-term price while monitoring the impact these changes have on your sales.
From my own experience, separating your pricing into these two stages, launch and long-term target, keeps you from overreacting and making panicked changes that can hurt your launch.
Step 3 – Build a Launch-Ready Listing
At this stage, we are ready to design our fully optimized product page to convert shoppers into buyers. With so much riding on a successful product launch, it’s important that we make sure every click has the best chance possible of becoming a sale.
We’ll go over all of the basics in this section, but for a more detailed guide, check out our tutorial on Amazon Listing Optimization, where I go much more in-depth on each topic.
Research and Create Your Keyword List
Keywords are the foundation for your entire product listing. If your listing is missing important keywords, Amazon won’t know when to show your product to shoppers, regardless of how great your images are or how amazing your product is.
By taking the time to build an optimized keyword list, you’ll have a much easier time ranking in search results and building successful ad campaigns. If you’re not sure where to start with keyword research, I encourage you to check out my guide on How to Find Long-tail Keywords for Your Amazon Listing. It will teach you everything you need to know, from choosing an Amazon keyword tool to optimizing your list.
Once you’ve created and optimized your list, I recommend sorting your keywords into three different groups:
- Primary Keywords – The 3-5 main search terms that are the most important for your product
- Secondary Keywords – phrases with good search volume and buyer intent, but not as critical as your primary search terms
- Long-tail Keywords – longer, specific phrases that describe how, when, or by whom the product is used
We’ll include the primary keywords in your title and early bullet points. The secondary keywords will be used in later bullets, your product description, and A+ content. And finally, the long-tail keywords work best in your backend search terms and A+ content, where you have more room to write.
Write an Optimized Product Title
Your product title, along with your main image, is the most important part of your listing. It needs to contain your primary keywords, and it must follow Amazon’s set of strict guidelines. This includes keeping it under 200 characters, not repeating single words more than twice, and avoiding promotional jargon like “Best Seller” or “Premium.”

Even though the limit is 200 characters, it’s important to remember that roughly 70% of Amazon shoppers are on mobile, where titles get cut off after roughly 80 characters. For this reason, I recommend placing your Brand name, main keyword, and top benefit at the very front of your title.
A good title formula I recommend is: Brand + Product Type + Key Benefit + Specs.
For example:
“Bob’s Brand Extra-Thick Non-Slip Yoga Mat, 8mm Cushion, Joint-Friendly, Carrying Strap Included”
For the second half of your title, you’ll want to try to weave in as many secondary keywords as possible. These help you show up for more search terms, which drives more traffic to your listing. Just try to include them naturally, without ruining the readability of your title.
When you read your title out loud, it should sound like it makes sense, not a string of gibberish.
Craft Benefit-Focused Bullets
Bullets are great for two main reasons. One, they give you a lot of room to include more keywords and search terms to help improve your organic SEO, and two, many shoppers will skim through your bullets before they scroll anywhere else on the page.
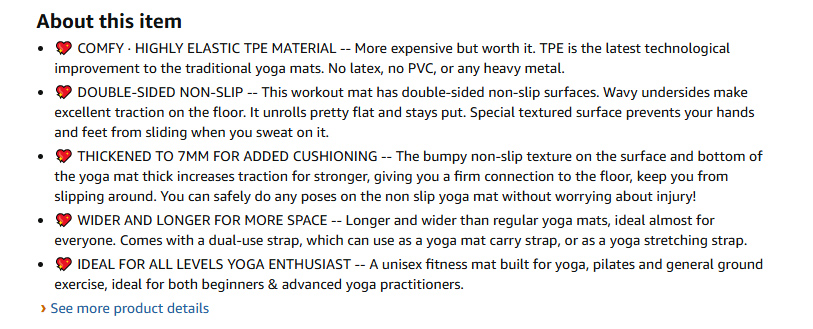
For this reason, your bullets need to answer the question, “What does this product do for me?” first, and then back up that statement with the relevant features.
The structure would look like this:
Benefit, then feature, then one supporting detail or keyword.
A real-life example would be something like,
“Protects your knees and wrists with 8mm high-density foam, designed for Pilates, yoga, and home workouts.”
You’ll want to try to thread in as many secondary keywords here as possible, without hurting readability or wrecking the flow of each sentence. Always use the maximum number of bullet points and make sure that each one covers a different benefit, such as comfort, durability, ease of use, cleaning, and any support or guarantees your company offers.
Use Video and Product Images to Sell Your Product
In most cases, buyers will see your main image before anything else. Along with your title, it is the most important part of your listing, and it plays the biggest role in getting shoppers to click on your listing. Along with your main image, you’ll also want to add several secondary images that give shoppers a clear picture of your product and help to overcome any objections they may have.
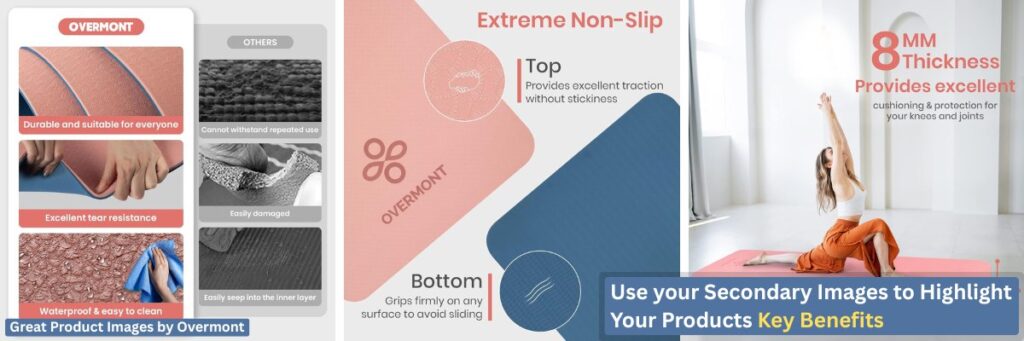
Some of the types of images I recommend including are:
- A lifestyle image that shows your product in use in a real-life setting
- An image that highlights key features or benefits using simple callouts
- A sizing image that clearly shows your product’s dimensions or fit
- A “what’s in the box” shot, which shows buyers exactly what they get
If you have the budget, I also highly recommend adding a short product video. Even a 20-40 second demo that shows shoppers how your product is used in real life can dramatically improve your conversion rate and keep people on your listing longer, which can play a role in your search ranking.
We barely scratched the surface on product images here, so if you’d like a more detailed look at the type of images I recommend and how to optimize each one, please read our article on Amazon Image Tips and Photography Requirements.
For Brand-Registered Sellers: Add A+ Content and a Brand Story
If you’ve already signed up for the Amazon Brand Registry, you have access to two more powerful features to include in your product listing: A+ Content and a Brand Story.
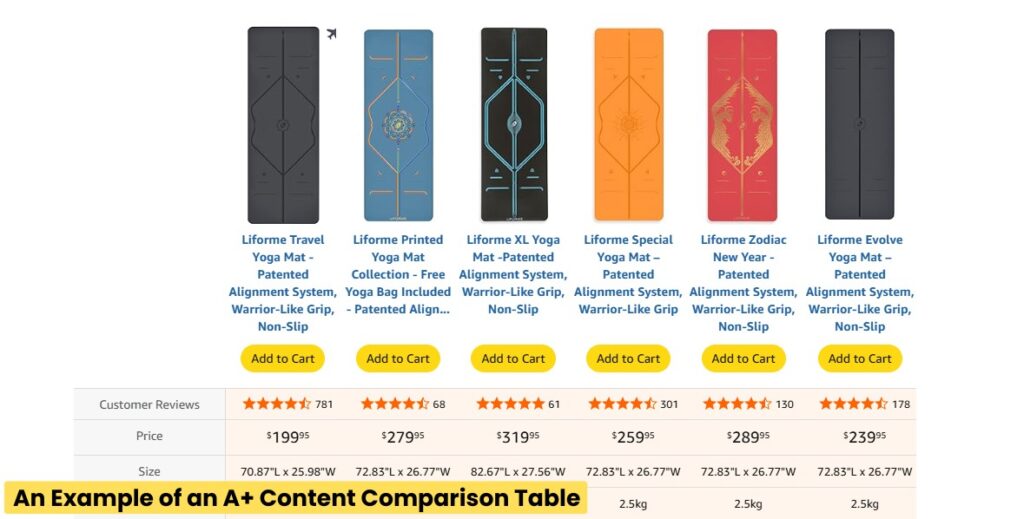
A+ Content replaces the generic text-only description with a rich, visual layout where you can show off lifestyle photos, product videos, comparison charts, interactive shoppable images, and more. This part of your listing is great for discussing additional benefits, overcoming common buyer objections, and even upselling shoppers on your other products.
There are a lot of options when it comes to A+ Content, and if you’d like to learn more, I recommend checking out our full guide to A+ Content, which includes tips, tricks, and a step-by-step walkthrough on how to create an A+ content section for your listing.
When you’re creating your A+ Content, don’t forget about your Brand Story. As someone who has coached many sellers over the years, I’m always surprised by just how many completely forget about this important feature.
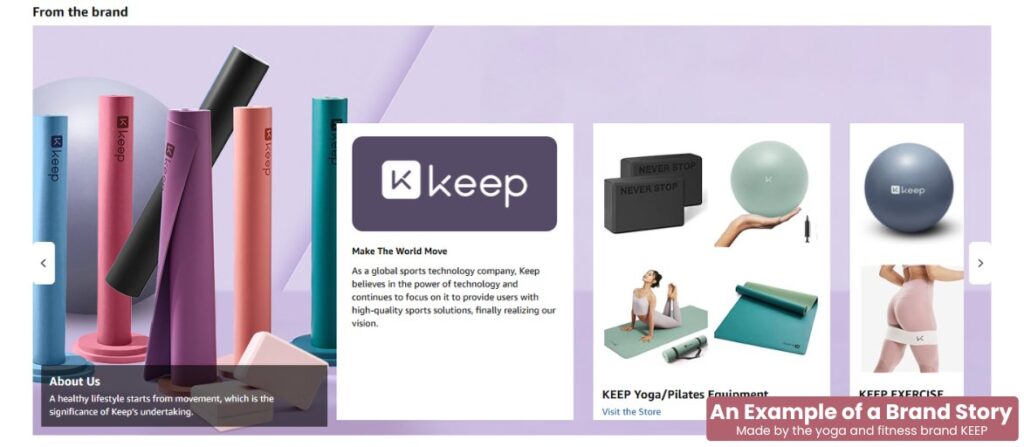
The Brand Story is positioned directly above your A+ Content. It’s a scrollable carousel that can educate shoppers about your brand, showcase other products you sell, and most importantly, link directly to your Brand Store. Even if you don’t have a big brand or many products to sell, I still recommend adding a Brand Story to every listing. At the very least, it pushes competitor ads further down the page and keeps shoppers looking at your products and not someone else’s.
Step 4 – Pre-Launch Setup (2–4 Weeks Before Go-Live)
Now that your listing is complete, it’s time to make sure we’ve got all the essentials in place so you don’t waste your launch window. This means ordering enough stock, creating a review plan, and trying to direct as much “warm traffic” as possible to your listing.
Choose a Fulfillment Method (FBA vs FBM)
If you haven’t already, it’s time to make a final decision on your fulfillment method. Do you plan to ship orders yourself or have Amazon do it for you? FBA is usually best for private label because Prime shipping and the Prime badge can significantly boost conversion rates.
FBM can also work, and is a particularly good choice if your product is bulky, fragile, or very low-margin. I also know some sellers who use FBM when they’re testing new product ideas, and they don’t want the hassle of setting up FBA for just a small product batch.
Use the sales estimates from your product research to pick a realistic daily sales goal for your first 6–8 weeks. You don’t need to match the top sellers in your niche. Aim for a number that fits your budget and feels achievable, then order enough inventory to meet that sales goal, along with a small buffer to prevent possible stockouts during your honeymoon period.
One tip I have is that if you work with a prep center or you have extra space at home, consider keeping a small inventory reserve outside of Amazon. This way, if sales figures are higher than you expect, you can quickly top up your FBA inventory levels without the lead time of an overseas supplier.
Have Reviews Ready for Day 1
One of the biggest mistakes that new sellers make when it comes to Amazon product launches is not having reviews ready for day 1. Reviews have a huge impact on conversion rate, and shoppers rely on them to decide if they can trust a new brand. It’s not a stretch to say that every review you earn in the first few weeks of your launch will make your ads more efficient and your organic clicks easier to convert.
| Number of Reviews | Expected Conversion Rate |
|---|---|
| 0 reviews | 0.5–1% |
| 1–5 reviews | 3–6% |
| 5–10 reviews | 5–10% |
| 10+ reviews | 8–15% |
If you’re a brand-registered seller, one option you have available is the Amazon Vine Program. Enrolling in Vine lets selected Amazon reviewers test your product and leave honest feedback, which can get you up to 30 high-quality reviews before your product goes live.
Another option is to use Amazon-compliant review sites like FBA Reviews. These sites have groups of product testers that will search for your product on Amazon, purchase it, and then leave honest feedback on your listing. There are several services like this; just make sure that the one you choose follows Amazon’s TOS with no contingencies tied to leaving a review.
Finally, if you already have an audience, from an email list or social media, make sure to let them know about your upcoming product launch and encourage them to purchase your product and leave a review. As long as they buy normally, pay with their own money (no giveaways), and you don’t promise them a reward, this is completely acceptable and an easy way to get reviews from shoppers already familiar with your business.
Step 5 – Launch Campaign: First 30 Days
By this stage, all of your prep work is done. Your product is ready, your listing is built, and your inventory should be ready to ship. Your job now is to go live, use PPC to drive traffic, and make adjustments based on how shoppers respond.
Just a heads up, this step is all about setting up and optimizing your Amazon ad campaigns. If you’re not familiar with the basics of advertising on Amazon, I encourage you to check out our starter guide: What is Amazon PPC? – A Beginner’s Guide to Advertising on Amazon.
Create Your First Ad Campaigns
Amazon advertising can get very complicated, and there are many different campaign structures and ad types that you could potentially use for your product launch. However, for new sellers, managing 5+ different campaigns can be a nightmare.
That’s why for your first launch, I recommend a simple three-campaign structure. This will cover all of the basics, without the headache. The strategy uses three different Sponsored Product Campaigns organized like this:
- Auto Campaign: The purpose of this campaign is to find new profitable keyword ideas. Amazon’s algorithm tests your product against many different search terms to see what works.
- Manual Broad or Phrase Match Campaign: Think of this as “widening your net.” You pick the keywords, but you let Amazon find related variations.
- Manual Exact Match Campaign: This is your targeted campaign where you’ll put your most important and best-performing “hero” keywords.
When setting up your budgets, allocate the highest percentage to your Exact Match campaign. I’d also recommend setting your initial bids for these main keywords to $15-$20 above Amazon’s suggested bid. Your goal should be to win the top of search spots as much as possible to drive as many sales as possible.
| Campaign Type | Goal | Bidding Strategy |
|---|---|---|
| Auto Targeting | New keyword discovery. Let Amazon find new keywords for you. | Conservative (Close to suggested bid) |
| Broad/Phrase Match | Find variations of your main keywords. | Conservative (Close to suggested bid) |
| Exact Match | Scale & improve your organic rankings for your best keywords | Aggressive (Up to 15–20% above suggested bid) |
For your Broad/Phrase campaign, try to stick closer to the suggested bid. These campaigns are your “discovery” buckets, designed to find new search terms you haven’t thought of.
Remember that having a high ACoS (Advertising Cost of Sales) is completely normal during your launch. You are paying for data and search rankings; it’s not about immediate profit. Many sellers I’ve spoken with, myself included, are comfortable accepting an ACoS between 35% and 50% for the first month as long as sales are trending in the right direction.
Week 1: Monitor Your Campaigns and Gather Data
For the first 7 days after your ad campaigns have gone live, try to avoid making any major changes. Instead, confirm that your ads are getting impressions and clicks, but leave the rest alone. If you find a campaign has very low impressions after at least 48 hours, try bumping up your bids by 10-15%.
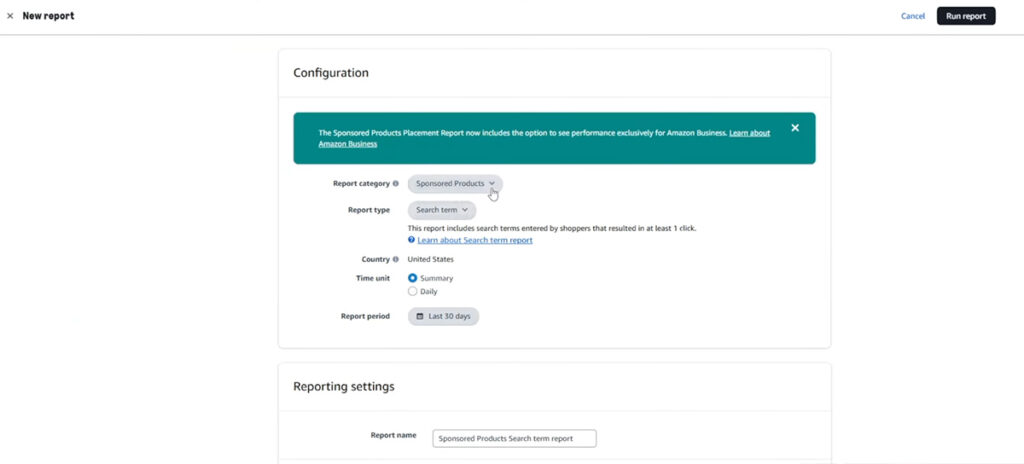
During this time, you should also start checking the Search Terms report for any obvious wasted spend. Auto, phrase match, and broad match campaigns all have the potential to use keywords unrelated to your product, so you’ll want to find these and add them as negative keywords immediately. For example, if you sell a water bottle and you see that Amazon has started showing your product when shoppers search for “plastic cups,” you’ll want to add that search term as a negative.
Otherwise, this week is all about gathering data. The biggest mistake new sellers make is killing keywords too early or making drastic changes without giving their ad campaigns any time to optimize. A keyword with 10 clicks and no sales is not a failure; it’s just statistically insignificant. You need 25–30 clicks before you can confidently say a keyword won’t convert.
Weeks 2–4: Harvest Winning Keywords and Optimize Your Bids
By week two, you should have enough data to start making decisions. Your main goal now is “harvesting” winners. Look for search terms in your Auto or Broad/Phrase campaigns that have generated sales at an acceptable ACoS.
Take those winning terms and add them to your Exact Match campaign with a competitive bid. This gives you direct control over that specific term. It’s also very important that you add that same term as a “Negative Exact” keyword in the original campaign. This stops you from bidding against yourself and forces the traffic to your optimized Exact Match campaign.
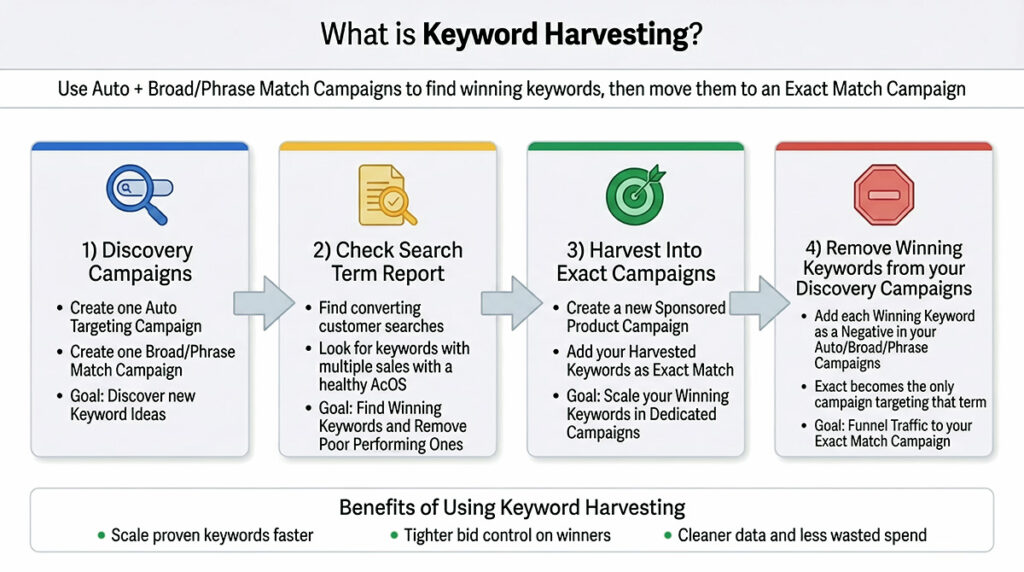
During this period, you can also start to “trim the fat.” Any keywords that have more than 25-30 clicks with zero sales can be paused or have their bids significantly lowered.
By the end of your first month, you should have a growing list of winning keywords in your Exact Match Campaign, a long list of negative keywords, and a steady flow of sales fueling your organic rank. You should also be making the necessary pricing adjustments each week to move your initial launch price to your target long-term price.
Step 6 – Post-Launch Optimization (Weeks 5–12)
At this stage, you should keep running the same weekly PPC routine you started in Step 5: review your Search Term Reports, update your negative keyword list with underperforming terms, and continue moving winning keywords into your exact match campaigns. Your product price should also be at, or close to, your target price after making consistent pricing adjustments over the past month.
This is the final step in your launch, and it is where you can start using the sales and advertising data you’ve gathered to improve your listing, make any final price adjustments, and make the decision whether to keep scaling your product or to sell through your inventory and move on.
Use Data to Update Your Listing and Product Price
Once you know which search terms from your ad campaigns are driving most of your sales, compare those phrases with the keywords you used in your title, bullet points, and A+ content.
If you notice that buyers keep using phrases that don’t appear in your listing, or they’re searching for phrases that only appear halfway down your product page, it’s a sign that your listing needs to be updated. Move your top-performing keywords into your title and top bullet points, and make sure your most important benefits are visible right away.
Even low-conversion keywords can be helpful to optimize your listing. Look through your search term report to find searches that mention size, material, color, or a specific use case. Ask yourself if your product page clearly displays this information to shoppers. If not, consider adding new images or updating your listing to make this information easier to find.
Lastly, if your product has been getting steady, high-quality clicks but your overall conversion rate is low, test a modest price drop or a coupon campaign and monitor how your conversion rate and TACoS change over the course of a week or two. On the other side, if your conversion rate is strong, your review count is healthy, and you’re already hitting your target margins, consider testing a small price increase to see if you’re able to keep those numbers at a higher price point.
Decide if You Should Scale or Walk Away
By the end of week twelve, you should have all of the information you need to decide whether you should continue with this product: TACoS, organic rankings, review count and rating, and net margin after ad spend. At this stage, your TACoS should be trending downward (meaning your organic sales are improving), search rankings should be steadily improving for your main search terms, and your review count should be growing steadily without any major quality control issues.
If your product passes these tests and your margins are well inside your target range, it’s a great sign that you’ve found a product you can scale. If you have the budget, consider increasing the budget on your exact match campaigns, try testing more related keywords, and continue raising your price slowly until you reach your desired price point.
However, if after nearly three months of testing, your TACoS is still high, your rankings have flatlined, your review count is low, and margins are thin, you are at an important crossroads. You can try changing your offer or updating your prices (if your budget allows), or you can choose to sell through your remaining stock and walk away.
It’s important in this final step to let the data do the talking. Whatever you decide, try to base your decision on the data, instead of dragging a losing product along based on stubbornness or a “gut feeling.”
Frequently Asked Questions (FAQs)
How much does it cost to launch a product on Amazon in 2026?
The cost of launching a new product on Amazon can range quite a bit, depending on many factors like inventory cost, ad costs, and more, but most private label sellers should expect to spend between $1500-$5000 to launch a product in 2026, with $3000-$5000 as a comfortable range.
That usually covers 200-300 units of inventory, shipping, branding, and 1-2 months of PPC. Pricier or more complex products can push your launch budget closer to $10,000.
What is the Amazon honeymoon period, and why does it matter for launch?
The Amazon honeymoon period refers to the short time after a new listing goes live when Amazon gives it extra visibility in search results to see how shoppers respond and determine how it should rank. It usually covers up to the first 30 days after a product is launched. During this time, your product can appear more often in search results even with fewer reviews, so strong performance here can help you get a higher organic search rank that is much harder to reach later if you start slowly.
Do I need reviews to successfully launch a product on Amazon?
Although you don’t technically need reviews to launch your product or get your first sales, I highly recommend you do so. Conversion rates are much lower for products with zero reviews, so plan to get at least 10-20 in the first few weeks by using Amazon’s Vine program or the manual request review feature.
Having reviews for your launch will lead to higher conversion rates for both your PPC and organic traffic.
When should I turn on PPC during a new product launch?
I strongly recommend turning on Amazon PPC as soon as your listing is live and your inventory is available for sale. Advertising early gives Amazon data on which keywords convert best and can help you start ranking right away. The only reasons to wait on ads are if you have obvious listing issues, like broken images or a missing Buy Box.
Is Amazon still a good place to launch a new product in 2026, or is it too saturated?
Amazon is still viable for product launches in 2026, but it’s not as cheap or easy as it used to be. There is more competition, higher fees, and rising ad costs to deal with, but traffic and buyer demand are also still growing.
If you have a great product that stands out, healthy margins, a reasonable budget, and an optimized launch strategy, it can still be a great platform for new sellers.
Additional Tools & Resources for Amazon Sellers
To make this launch playbook easier to use, here are the free tools I built and use when launching new products.
- Free Amazon FBA Profit Calculator – For testing product ideas, modeling fees, and setting launch pricing and PPC targets.
- Amazon PPC Calculator – For planning launch budgets, target ACoS or TACoS, and checking whether your bids make sense with your margins.
- Amazon Search Term Report Analyzer – For turning messy search term reports into clear winners, losers, and negative keyword ideas in Step 5.
- Amazon Product Image Checker – For validating image size, format, and basic requirements before you publish or update your listing.
- 19 Best Tools for Amazon FBA in 2026 (Free & Paid Options) – Our master list covering the best software for Amazon sellers, covering keyword analysis, product research, analytics, and more. Updated regularly.
- What is Amazon PPC? The Beginner’s Guide to Advertising on Amazon – If you’re not sure where to start when it comes to advertising on Amazon, this guide covers all the basics, explains the different ad types, and gives you a step-by-step guide to launching your first campaign
- Amazon Long Tail Keywords: An Easy Guide for New Sellers – Learn how to create an optimized keyword list to use in your PPC campaigns and in your product listing
- Brand Registry on Amazon: A Comprehensive Guide for 2026 – If you want to create a Brand Store or use Sponsored Brand Ads, you’ll need to be a part of the Brand Registry. This guide walks you through the process, step by step.
Levi Adler is an experienced Amazon seller, e-commerce specialist, and the founder of Levi’s Toolbox. With over a decade in the trenches selling on Amazon and managing his own Shopify stores, Levi writes from his own experience. Sharing what worked, what flopped, and the strategies he wishes he’d known sooner. When he’s optimizing listings or managing ad campaigns, you’ll find Levi hitting mountain bike trails or hanging out with his two huskies, Emma and Scout.
