
Most shoppers never read your full Amazon listing. Instead, they skim your images, scan the price, and decide within seconds whether your product is worth buying. If your photos don’t instantly communicate quality and relevance, it doesn’t matter how good your reviews or bullet points are. You’ve already lost the sale.
That’s why understanding Amazon’s photography requirements isn’t just about avoiding a suppressed listing. It’s about learning how to use your product images to educate shoppers and better sell your product.
In this guide, I’ll explain exactly what Amazon expects from your photos and share practical tips to help you stand out, boost your click-through rate, and convert more shoppers.
What Are Amazon’s Photography Requirements
Amazon has a long list of requirements for all product images. While there is some grey area, it is important to understand that Amazon states that they may suppress or remove images that do not meet Amazon photography requirements.
Below is a breakdown of both general image requirements and main image guidelines. This information comes directly from Seller Central’s Image Requirements page.
Technical Requirements for All Amazon Images
Amazon wants product images to be clear, professional, and zoomable. Each listing must have at least one image, but I strongly recommend using all nine slots whenever possible.
- Each product must include at least one image, with Amazon recommending six images and one video per product.
- Images should measure between 500 and 10,000 pixels on the longest side, with over 1,000 pixels preferred for zoom functionality.
- The recommended file format is JPEG (.jpg or .jpeg), but TIFF (.tif), PNG (.png), and non-animated GIF (.gif) are also acceptable.
- Images must be clear and free of pixelation or jagged edges to ensure professional quality.
- Accurately represent the product being sold.
- Match the product image to its title.
- Avoid nudity or sexually suggestive visuals, including both models and drawings.
- Display children’s clothing flat without using a model.
- Exclude images of customer reviews, five-star ratings, or promotional claims like “free shipping.”
- Avoid text or pricing details in non-swatch images.
- Do not include Amazon logos, trademarks, or similar variations (e.g., “Amazon,” “Prime,” “Alexa,” or Amazon Smile).
- Exclude badges or labels resembling Amazon’s, such as “Amazon’s Choice,” “Best Seller,” or “Top Seller.”
Main Product Image Requirements
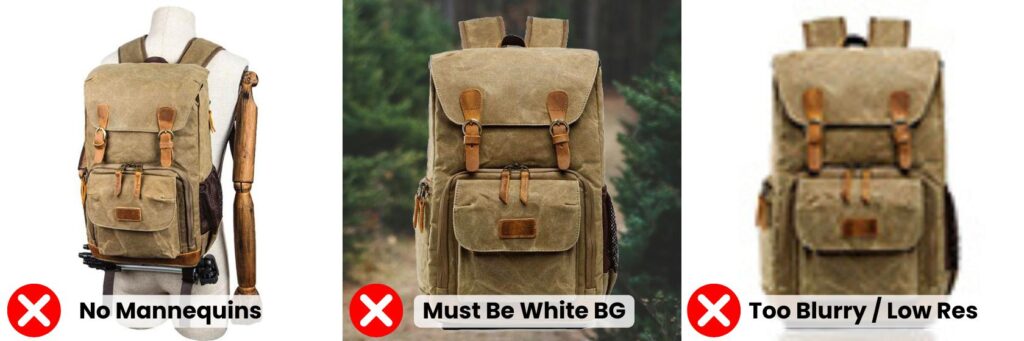
The main image is the one that shows up in search results and at the top of your product detail page. This photo has the strictest rules because it appears in search results and sponsored product ads.
- Display the Product Accurately: Show the actual product with realistic, professional-quality images that match its color, quantity, and details.
- Use a White Background: Ensure a pure white (RGB 255, 255, 255) background to create a clean, consistent shopping experience.
- Frame the Product Fully: Include the entire product in the frame without cutting off any part.
- Avoid Placeholders: Do not use temporary or generic placeholders. The first image defines the product’s identity and must meet compliance standards.
- Show Only the Product: Avoid using unrelated accessories or props that could confuse customers about what’s included.
- Focus on a Single Unit: Display only one product per image unless it’s a multipack or assortment, which requires its own specific guidelines.
- Highlight the Product: Ensure the product fills at least 85% of the image frame.
- Avoid Graphics or Text: No text, logos, watermarks, borders, or color blocks should appear over the product or in the background.
- Packaging Restrictions: Do not show packaging unless it is a key feature, such as a carrying case or gift basket.
To quickly check if your images meet Amazon’s basic requirements, like file size, file type, zoomability, and more, consider using our Free Amazon Product Image Checker. There’s no email signup or account creation required; just drop in your product images and see the results.
Clothing Specific Image Requirements
In addition to Amazon’s general image rules, clothing listings have their own set of category-specific requirements. These help keep listings consistent across the marketplace, reduce confusion for shoppers, and ensure a clean, professional look, especially when using models.
Here are the key requirements that apply specifically to clothing:
- Adult clothing must be shown on a live model for the main image (exceptions include accessories, children’s clothing, and see-through items, which should be laid flat or worn over other clothing).
- Transparent garments on models must fully cover intimate areas. Models should wear clothing underneath to avoid exposing breasts, buttocks, or genitalia.
- Models must appear neutral and professional. No suggestive poses or facial expressions. Arms should rest naturally, eyes should be open, and the mouth should be closed.
- Visible mannequins, hangers, and folded products are not allowed in main images for adult clothing.
- Thongs and panties must be photographed from the front in the main image. Rear views can only be used in alternate images.
- Erotic or adult-themed clothing must be flagged using the “is_adult” setting in your listing.
- No retouching to hide exposed skin and no graphics (like censor bars) are allowed to cover intimate areas.
For children’s clothing, images must be shown flat (not on a model) and meet Amazon’s resolution requirements (at least 1,000 pixels on the longest side).
What Happens If You Don’t Follow Amazon’s Image Requirements
If you don’t follow Amazon’s photography requirements, your listing can take a serious hit. Non-compliant images may trigger listing suppression, meaning your product disappears from search results until the issue is fixed. Amazon usually flags these problems in Image Manager with a red alert icon, but if you’re not checking regularly, you might not even realize your listing has vanished.
Even if your images don’t get you flagged, sloppy or low-quality photos can make your product look cheap. A weak main image can cut your click-through rate in half. It’s the first thing shoppers see, and if it doesn’t stop the scroll, they’ll move on. Smaller image sizes, misleading visuals, or anything that looks off-brand can also damage trust and hurt your conversions.
On top of that, unclear or inaccurate photos can lead to more returns, negative reviews, and wasted ad spend. If customers buy based on an image that doesn’t match the product, you’ll pay the price in return fees and lost sales. In my experience, taking the time to get your photos right upfront saves you from a lot of problems later.
How to Optimize Your Amazon Product Photos for Sales
Meeting Amazon’s photo requirements keeps your listing active, but good images do more than that. If you want to actually drive clicks and convert shoppers, your photos need to tell a clear, compelling story about your product. In this section, I’ll share some of the best tips and strategies I’ve found for optimizing your product images.
Make Your Main Image Impossible to Ignore
Your main image is the single most important part of your Amazon listing. It’s the first thing shoppers see in search results, and it heavily influences whether they click through or scroll past. With so many competitors just a scroll away, getting your hero image right is critical.
Think of it as your product’s billboard. It needs to pop, draw the eye, and sell your product in under five seconds. Even if your product is fantastic, a weak main image can cost you the sale before a shopper ever visits your listing.
At a glance, your main image should:
- Grab attention with bold contrast, clean composition, and visual clarity
- Stand out from competitors using color, scale, or unique product traits
- Show the full product clearly and professionally, with no distractions
- Convey value by including all components if it’s a bundle or set
A vibrant color, unique shape, or recognizable feature can act as a “pattern interrupt,” helping your image jump out in a search result. Just make sure your photo follows Amazon’s rules: a pure white background, no added text or logos, and only the product itself (with limited exceptions, like packaging or variations).
If your product comes in multiple sizes or colors, it’s worth testing whether you can subtly show that variety in the image. For bundled products, show every included item clearly and neatly arranged to communicate full value upfront.

Above all, your image needs to be clear. Use sharp focus, realistic color, and professional lighting. Avoid clutter, awkward shadows, or busy backgrounds that take attention away from the product. The goal is instant recognition and confidence.
Once your image is live, keep testing. Run A/B experiments to see what draws the most clicks. Try alternate angles, compositions, or even background brightness levels. Over time, this kind of optimization can significantly boost your CTR, and every extra click brings more potential sales.
Your main image gets the customer in the door. The rest of your images can tell the full story. But if your hero image doesn’t stop the scroll, the rest may never be seen.
Use Lifestyle Images to Show the Product in Action
Lifestyle images help customers picture your product in real life. Unlike the main image, which must be on a white background, lifestyle images show your item being used in a relevant setting, building trust and emotional connection.
These photos should highlight your product’s key benefits. Show the product in action or solving a problem. A dog bed with a happy pet curled up inside says more than a technical spec ever could.

Use models or props that match your audience. If you’re selling kids’ toys, show children playing. If it’s a fitness product, use someone who looks like your target buyer. You don’t always need to show faces, but the scene should feel relatable, and shoppers should be able to envision themselves in the same scenario.
Size references also matter. A lifestyle image can make scale instantly clear by showing your product next to a person or a familiar object.
Remember to keep the quality high: clean lighting, accurate colors, and high-resolution images (1000+ pixels) are essential. Done right, lifestyle images aren’t just decoration; they drive conversions.
Use Infographics to Communicate Key Features
An infographic is a product image that combines visuals with short bits of text to highlight key features, explain benefits, or answer common customer questions. Instead of making shoppers dig through your bullet points, infographics deliver the most important info at a glance.
They’re perfect for showing what your product does and why it matters. Whether you’re explaining how a feature solves a problem or showing a side-by-side comparison with a competitor, a good infographic makes that information instantly digestible to potential buyers.
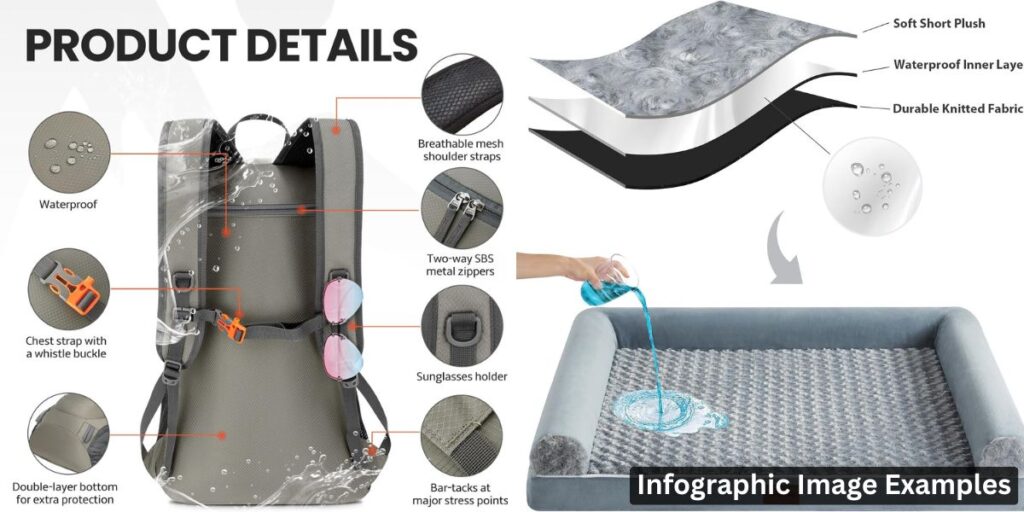
Use icons, illustrations, and bold headers to call out your most important features. Prioritize what buyers actually care about, like size, fit, durability, or ease of use, and avoid long paragraphs or cluttered layouts.
Infographics are also great for showing scale or usage instructions. If your product requires assembly, installation, or has multiple use cases, walk the customer through it visually with your images.
I highly recommend using 1-2 infographics on your product listings to both educate potential buyers as well as to build trust and increase conversion rates.
Add a Product Video to Boost Conversions
If you’re not using video on your Amazon listing, you’re likely missing out on a powerful conversion tool. While not technically a product image, videos are uploaded in the exact same way and are now available to most sellers on Amazon.
A short, well-made video can do what static images can’t: show your product in motion, in context, and in use. This helps customers quickly understand how it works, what problems it solves, and why it’s worth buying, without scrolling through your entire listing.
Your video doesn’t need to be long. In fact, 15–30 seconds is ideal. Focus on benefits over setup, and show the product in a real-life setting. Think of it as a quick explainer that builds trust and creates a stronger emotional connection.
If you’re already using all nine image slots, it’s still worth replacing one with a video. A well-made video can explain more in a few seconds than a static image ever could.
Split-Test Your Images to Maximize Performance
Every image on your Amazon listing plays a role in attracting, educating, and converting customers, so they shouldn’t be treated as static assets. Treat your product images the same way you would treat an advertising campaign: always test, always optimize.
Start with your main image. It has the biggest impact on click-through rate (CTR) and should be your top priority for A/B testing. Simple changes, like adjusting color, angle, or composition, can lead to noticeable gains in traffic. You can also test showing product variations, cleaner packaging, or props that hint at use cases (as long as they comply with Amazon’s rules). After that, test your supporting images to improve your conversion rate.

To run A/B tests, you can use Amazon’s built-in Brand Experiments tool if you’re brand is registered. It lets you compare image variations directly on your listing and track the performance over time. For faster feedback or pre-launch testing, platforms like PickFu and Product Pinion are great options. PickFu runs instant polls with targeted consumers, while Product Pinion provides you with very useful feedback through screen recordings and head-to-head comparisons.
Whichever method you choose, it’s important to isolate one change at a time, run the test long enough to gather meaningful data, and make sure your image performs well on both desktop and mobile. Over time, small improvements across your image stack can add up to major gains in sales.
Speak to Your Target Audience
Your images should feel like they were made for your customer. That means understanding who they are, what they care about, and how they use your product. Start by identifying your buyer’s age, lifestyle, and goals, then reflect that in your visuals.
Show the benefits that matter to them. For example, if you’re selling a blender, instead of highlighting features like “triple titanium blades,” show how quickly the blender can make a smoothie. Use before-and-after shots or real-life scenarios to illustrate how your product solves a specific problem. This builds trust and helps shoppers imagine using it themselves.

Use lifestyle images with models that match your target demographic. If you’re selling a toy for toddlers, don’t show an adult holding it; show a happy kid playing with it. The same goes for fitness gear; if your product is aimed at women in their 50s, avoid using a 20-something model in your lifestyle images.
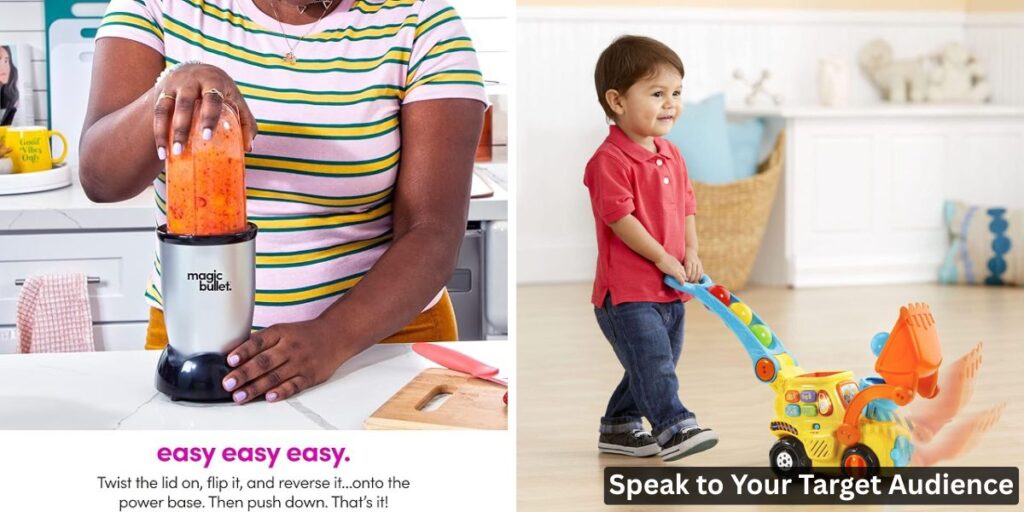
Finally, align your visual style with customer preferences. Use clean, well-lit images, choose colors that appeal to your audience, and keep your image stack consistent. A cohesive presentation helps your product feel credible and can help build brand trust.
Optimize Your Images for Mobile Shoppers
With over 60% of Amazon shoppers browsing on mobile, optimizing your images for small screens is essential. On mobile devices, customers often only see your title and image stack before deciding to click or scroll away. That means your images have to carry more weight and communicate your product’s value instantly.
Start by keeping things clean. Avoid cluttered images or walls of text that are hard to read on a phone. If you’re using infographics, make sure the text is short, clear, and easy to scan. Focus on one or two key benefits per image, not a full product manual.
It’s also smart to use vertical images when you can. They take up more screen space, especially on mobile. Always upload high-resolution files (at least 1,600 pixels on the longest side) so Amazon’s zoom feature works. That lets shoppers examine the product up close and gives them more confidence to buy.
You should also think about image flow. Mobile users swipe quickly, so each image should lead naturally to the next. Consistent branding and design make the whole listing feel more professional and trustworthy.
Should I Hire a Professional Photographer?
Hiring a professional photographer can feel like a big step, especially if you’re just starting out with a limited budget. But for many products, it’s one of the smartest investments you can make. Your product images are often the first (and sometimes only) impression a shopper gets. If your images fall flat, so do your chances of converting that browser into a buyer.
Professional photography helps your listing stand out by delivering crisp, well-lit, and compelling visuals that not only meet Amazon’s technical requirements but also speak directly to your customer. This can significantly improve your click-through rate, reduce negative reviews, and ultimately boost your conversion rate.
That said, if you’re on a tight budget, you can produce decent images yourself, especially with today’s smartphone cameras and free or low-cost editing tools. But be honest about your skills. Blurry, cluttered, or poorly lit images can cost you far more in lost sales than you’ll save upfront.
If you do hire a photographer, make sure you understand your product’s key benefits, pain points, and target audience. A strong creative brief will help your photographer produce images that actually drive conversions, not just look pretty.
Common Product Image Mistakes to Avoid

Before we wrap up, I want to quickly cover some of the most common image mistakes I see new sellers make. Since your images carry so much weight on your listing, even small missteps can lead to lost sales. Here are a few of the issues that come up most often:
- Violating Main Image Requirements: Avoid adding text, logos, watermarks, or props that aren’t part of the actual product. Remember, your hero image needs a pure white background with the product occupying at least 85% of the frame—no exceptions.
- Poor Quality and Resolution: Blurry, pixelated, or poorly lit images can make your brand look unprofessional and hurt your credibility. Always invest in high-resolution photos (at least 1,000 pixels on the longest side, ideally 1,600 or more) that allow customers to zoom in and see details clearly.
- Failing to Address Buyer Concerns: There should always be a clear purpose behind each image you add to your listing. If scale is important, include a size reference. If there are multiple items or variations, show them all clearly. Remember, your images should be able to sell your product on their own.
- Overcrowding: It’s tempting to jam as much information and detail into each image as possible. However, including too many graphics or using too much text just leads to more confusion and makes your images much harder to comprehend for mobile shoppers.
- Technical and Strategic Missteps: From incorrect file formats and naming conventions to not using all your image slots effectively, even small technical errors can harm your listing’s performance. And don’t overlook the overall flow, each image should add a new layer of information or build confidence about your product.
Frequently Asked Questions (FAQ’s)
What is the best image size for Amazon?
The best image size for Amazon is typically 2000 x 2000 with a 1:1 aspect ratio. Make sure your image is at least 1600 pixels on the longest side, which enables the zoom function and ensures you have crisp, clear images across all devices.
Make sure your images are a minimum of 500 pixels and do not exceed 10000 pixels or 10 MB in file size. Also, make sure your product fills at least 85% of the image frame to comply with Amazon’s requirements.
What are Amazon’s image file naming requirements?
Amazon image files must follow this format: [product identifier].[file extension]
Use a valid product identifier such as an ASIN, ISBN, EAN, JAN, or UPC. Do not include any spaces, dashes, or special characters. For example: B01N1SE4EP.jpg
If you’re submitting multiple images, you can add a 4-character code (like MAIN, FRNT, LEFT, etc.) after the product ID. Accepted file types include .jpg, .jpeg, .png, .tif, .tiff, and .gif (Animated GIFs are not supported).
How many product images can I upload?
Amazon allows sellers to upload up to nine product images per listing. However, keep in mind that for most categories, only the first seven images are visible to shoppers. It’s highly recommended to use all available slots to showcase multiple angles, features, and image types. If you include a video (which occupies one slot), you’ll effectively have space for six visible images plus the video.
Can I use infographics on Amazon?
Yes, in fact we highly recommend using infographics on Amazon. Just keep in mind they can only be used in your secondary images, not in the main image.
Infographics are an excellent way to highlight key product features, explain how the product works, and address common customer questions visually. They help shoppers understand your product quickly by combining short text with clear visuals.
What are the image size requirements for Amazon A+ content?
Amazon A+ Content image sizes vary by module. For example, comparison charts use smaller images (150 x 300px), while the standard image header module requires larger dimensions (970 x 600px). For higher-quality results, always double the minimum size requirements (e.g., 300 x 600px instead of 150 x 300px).
Next Steps: Level Up Your Product Photography
Every image on your Amazon listing plays a role in selling your product. Whether it’s showcasing important features, answering common questions, or helping to overcome objections, visuals often do the heavy lifting before a shopper ever reads your description or bullet points.
Take the time to carefully plan which images you’ll use. Make sure to use every image slot, and don’t hesitate to invest in professional help when it makes sense. Your product photos are one of the most powerful assets you have on the platform; treat them like it.
Recommended Articles
- How to Start an Amazon FBA Business in 7 Simple Steps (Beginner’s Guide)
- Amazon Listing Optimization in 2026: A Complete Guide
- Amazon Backend Keywords: The Ultimate Guide for 2026
Levi Adler is an experienced Amazon seller, e-commerce specialist, and the founder of Levi’s Toolbox. With over a decade in the trenches selling on Amazon and managing his own Shopify stores, Levi writes from his own experience. Sharing what worked, what flopped, and the strategies he wishes he’d known sooner. When he’s optimizing listings or managing ad campaigns, you’ll find Levi hitting mountain bike trails or hanging out with his two huskies, Emma and Scout.
