
It’s still possible to start an Amazon business in 2026 with a small budget, and Amazon online arbitrage is one of the best ways to do it. I started with this model more than a decade ago, back when I was still in college, and it continues to be a great starting point for new sellers.
In this guide, I’ll show you how I approach online arbitrage step by step, from finding products and running the numbers to listing them on Amazon and sending inventory into FBA. Along the way, I’ll point out the pros and cons of this business model, the best sites to source products from, and some common mistakes I see new sellers make.
By the end, you’ll have a clear picture of how online arbitrage works. Whether you’re hoping to make some extra money on the side or eventually grow it into a full-time business, my goal is to give you the information you need to get started.
What is Amazon Online Arbitrage?
Online arbitrage is a business model where you buy discounted products from online retailers and resell them for a profit. You find deals on websites like Walmart, Target, or Kohl’s, then list those items on Amazon at a higher price.
What makes online arbitrage a great option for new sellers is that it has a very low barrier to entry. Since you don’t have to deal with bulk orders or product development, it’s one of the most budget-friendly business models for beginners. While I recommend a starting budget of $1500 – $3000, it’s completely possible to start your business with just a couple of hundred dollars.
Is Amazon Online Arbitrage Legal?
Yes, online arbitrage is completely legal and allowed on Amazon. In the U.S., this is due to something called the First Sale Doctrine. In simple terms, once you buy a product, you have the right to resell it, whether you got it from Walmart, Target, or any other retailer. As long as the product is authentic and in new condition, Amazon allows you to list and sell it.
That said, there are limitations to what products and brands you can sell on Amazon. Some brands try to restrict resellers through IP complaints or brand gating on Amazon. While this doesn’t make arbitrage illegal, it does mean you need to be mindful of which brands you sell.
What Is the Difference Between Retail Arbitrage and Online Arbitrage?
A common question I get asked by new sellers is, “What’s better, online or retail arbitrage?” The truth is that both business models are very similar in that they both involve buying discounted products to resell on Amazon. The only difference is where you get your inventory.
Retail arbitrage means physically visiting stores like Target, Walmart, or Marshalls to hunt for sales and clearance items. Online arbitrage, as we discussed earlier, shifts that process to the internet, where you search e-commerce sites for profitable listings.
| Factor | Online Arbitrage | Retail Arbitrage |
|---|---|---|
| Start-up Cost | Slightly higher, since you often must meet minimum order requirements to qualify for free shipping or discounts. | Cheaper to start. All you need is a phone with the Amazon Seller App and cash for inventory. |
| Scalability | Easier to scale. You can source from hundreds of sites and automate or outsource large parts of your business. | Harder to scale. You’re limited to local stores and the time it takes to physically source products. |
| Profit Margins | Moderate. Deals are easier to find, but higher competition = lower prices. | Can be higher on individual products, especially with local clearance or discontinued items. |
| Time to Market | Slower. You need to wait for items to ship to you or a prep center before sending them to Amazon. | Fastest. You buy in-store and can ship products to Amazon the same day. |
| Flexibility | High. You can work from a laptop anywhere with internet. You also have the option of outsourcing product research and sourcing. | Low. You have to physically visit stores and source product directly. |
| Competition | Higher, since everyone has access to the same online deals. | Lower in some cases, local stores may have products that are hard to get in other areas. |
If you’re on a tight budget, retail arbitrage is often the better place to start. This is because the margins tend to be a bit higher, and you won’t have to deal with minimum order requirements like you do with online arbitrage. I’m talking about things like “Free Shipping over $100” or sales like “Save $50 when you spend $200.”
Each business model comes with its own advantages and disadvantages. For example, online arbitrage tends to be a bit more hands-off, since you don’t have to spend time driving from store to store, and you can do most of your work from a laptop. On the other hand, retail arbitrage is the better choice if you’re on a tight budget since you don’t have to deal with minimum order requirements to make a profit (things like Free Shipping on Orders over $200).
In this article, we’ll talk specifically about OA, but if you’re interested in learning more about retail arbitrage, check out my in-depth guide on How to Start a Retail Arbitrage Business on Amazon.
Pros and Cons of Amazon Online Arbitrage
Starting a business is a big commitment, so before we go any further, I want to discuss the pros and cons of OA on Amazon. There are a lot of different ways to get started in e-commerce, from private label to wholesale, and it’s important to choose a business model that fits your lifestyle and long-term goals. Let’s break down the advantages and disadvantages of online arbitrage.
Pros
One of the biggest reasons so many sellers, like myself, get started with Amazon online arbitrage is the low startup cost. You don’t need to buy in bulk or negotiate with suppliers. Many sellers begin with just a few hundred dollars and slowly build their business over time.
Convenience is a second major advantage. Since sourcing happens online, the entire business can be run from a laptop. You can search for deals during a lunch break, while traveling, or in the evenings after work. If you have the budget for a prep center, you don’t even have to handle packing and shipping yourself.
Another big advantage of online arbitrage is how easy it is to scale once you have the right systems in place. Most of your daily workload comes from product research, and that’s a task you can automate or delegate. With tools that quickly flag profitable items and virtual assistants handling the repetitive searching, you free up hours each week. That time can go back into your business by testing new products and growing your sales without overwhelming yourself.
Finally, this model doesn’t require creating new products or building a brand from scratch. Since you’re reselling items with proven demand, there is much less risk compared to private label.
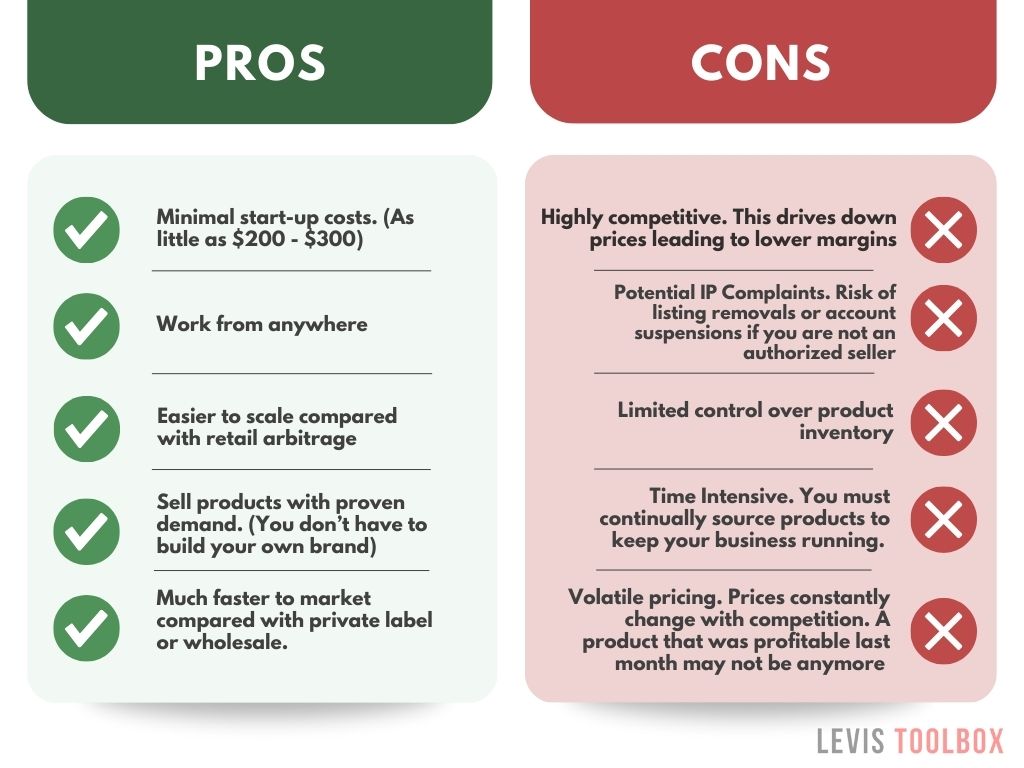
Cons
One of the downsides of having such low start-up costs is that this business model tends to be highly competitive. Many sellers use the same sourcing tools and websites, so prices can drop quickly as more people list the same item. Profit margins often fluctuate, and products that are profitable today may not be tomorrow.
Another drawback is the time commitment. Deals sell out quickly, and trends change often. Most successful online arbitrage sellers spend time researching products nearly every day. Without a prep center, you’ll also be handling the packing and shipping yourself, whether that’s sending shipments to Amazon or fulfilling orders directly to customers. This can be a lot of work, especially if you have other commitments, a full-time job, family, etc.
There’s also a lack of control. Since you’re reselling other brands, your business depends on their product availability and policies. Order cancellations from retail websites are common, and delays with FBA receiving can slow down sales.
Recommended Tools for Online Arbitrage
Online arbitrage is one of the most budget-friendly ways to get started on Amazon, but it’s not completely free. While it’s technically possible to start your business without any software or tools, you’ll save a ton of time and set yourself up for better success by investing in a few necessities.
The two tools I always recommend for beginners, Keepa and SellerAmp, are both affordable at around $20 per month each and will give you everything you need to find profitable products.
| Tool Type | What It’s Used For | When to Get It | Typical Cost |
|---|---|---|---|
| Keepa | Tracks sales rank and price history. Shows how often products sell, Buy Box behavior, seasonality, and product price trends. | Day one. Very important. You shouldn’t source products without checking Keepa first. | 19 € / month (About $22/month) |
| Product Research Tools | Helps you find profitable products faster. Shows ROI, fees, gating restrictions, and competition. Tools like SellerAmp or Seller Assistant are popular choices. | Day one. These tools can save hours of manual research and help you avoid IP complaints, gated products, etc. | $20–$40/month |
| Repricers | Automatically adjust your prices to win the Buy Box more often. Tools like Aura, BQool, and Profit Protector Pro are popular choices. | Once you’ve got at least 10 active ASINs or consistent sales. | $25–$100+ depending on tool and plan |
As your business grows and you start listing more products, I also recommend investing in a repricer to help you win the Buy Box more often and increase your sales.
Keepa

I included Keepa in its own category because it’s the first tool I tell every new seller to invest in. It tracks price history, sales rank, and Buy Box changes over months or even years. Amazon’s product page only shows you what’s happening today, but Keepa lets you see the entire history of the product on Amazon.
With Keepa, you can check whether a product is seasonal or evergreen, if it’s trending up or down, the number of competitors, how Amazon treats the listing, and much more. I cannot count the number of times I have found a product that looks great at first glance, until I check the Keepa chart to see that it’s trending in the wrong direction, that Amazon is on the listing, or any other number of red flags.
At about twenty dollars a month, it’s inexpensive compared to the money it protects you from losing. I highly recommend it, and if there were only one tool I could use to help me run my Amazon business, it would be Keepa.
Product Research Tools

Keepa is great for validating product ideas and avoiding red flags, but with so much time going into product research, speed is also a priority. Manually comparing store prices to Amazon’s listings will wear you out fast. That’s where product research tools come in.
These tools take a lot of the guesswork out of sourcing. Instead of opening dozens of tabs and doing math by hand, the tool pulls everything together in one place. It shows you the profit margins, sales rank, and even possible IP complaints or if the product is gated on your account.
Personally, I use SellerAmp because I like the UI and it’s very easy to use. That said, I’ve heard good things from other sellers about tools BuyBotPro and Tactical Arbitrage. My advice is to choose one tool that matches your budget, learn it inside and out, and make it part of your routine. The right research tool should cut down your time at the computer and point you straight to products that are worth selling.
Repricing Software
After you’ve sourced great products and your listings are live, pricing is where the real battle begins. Prices on Amazon update dozens of times a day, and if you don’t keep up, you’ll either miss out on sales or underprice and lose profit. A repricer takes care of that for you.
Repricers are valuable because they take the guesswork and manual effort out of pricing. Instead of checking listings all day, you can set rules and let the software react to changes in real time. This keeps you in constant competition for the Buy Box without racing to the bottom, since you can set floor and ceiling limits to protect your margins. For online arbitrage, where competition is extremely high, a repricer helps you make more sales while still holding on to healthy margins.
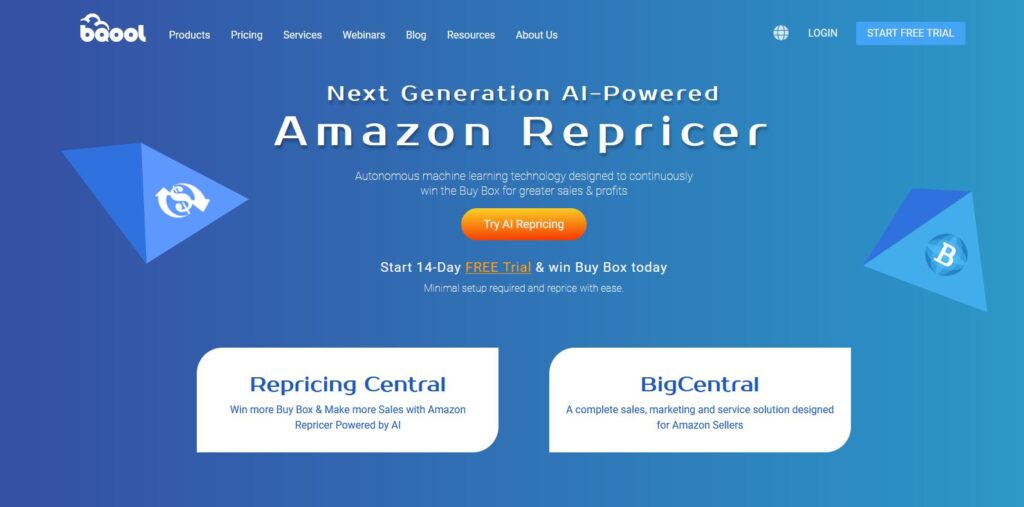
There are a ton of great repricers out there to choose from. I personally use Seller Snap, but it can be a bit expensive if you’re new. Other great options are Aura, BQool, and Profit Protector Pro. Each of these comes with very budget-friendly plans and all of the features you’ll need in a repricer.
For more information on repricers, including the ones I’ve mentioned here, check out our full guide: 7 Best Amazon Repricers to Win the Buy Box in 2026.
How to Start Amazon Online Arbitrage in 2026
Before we go through each step, I’m going to assume you’ve already signed up to Seller Central and have a Professional Seller Account. If you don’t have a seller account and are not sure where to start, check out my guide: How to Create an Amazon Seller Account.
Now, let’s break down the key steps to launching your online arbitrage business.
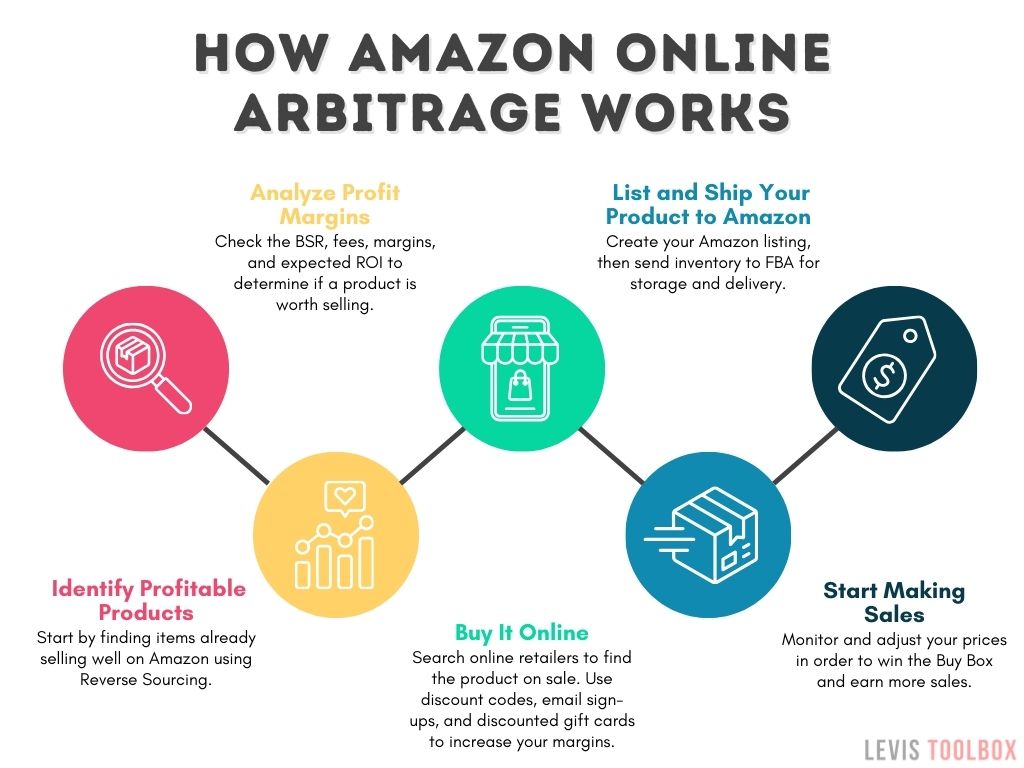
Step 1: Find Products Using Reverse Sourcing
A lot of beginners think online arbitrage is just about finding clearance items or discounted products and listing them on Amazon. And while you can sometimes get lucky doing that, it’s not a recipe for long-term success. You may find that the product doesn’t sell well on Amazon, you’re restricted from selling it, or there is too much competition.
That’s why I recommend starting with reverse sourcing.
Instead of digging through random discounts, you begin with products that are already selling well on Amazon. From there, you work backward to figure out where those items are being bought for less. This method is not only reliable it can also save you a ton of time on product research.
A good way to start is by searching for popular retail brands on Amazon. Think of everyday names like Hasbro, Centrum, or Nike. These listings are often sold by arbitrage sellers, which makes them a good starting point for your research.
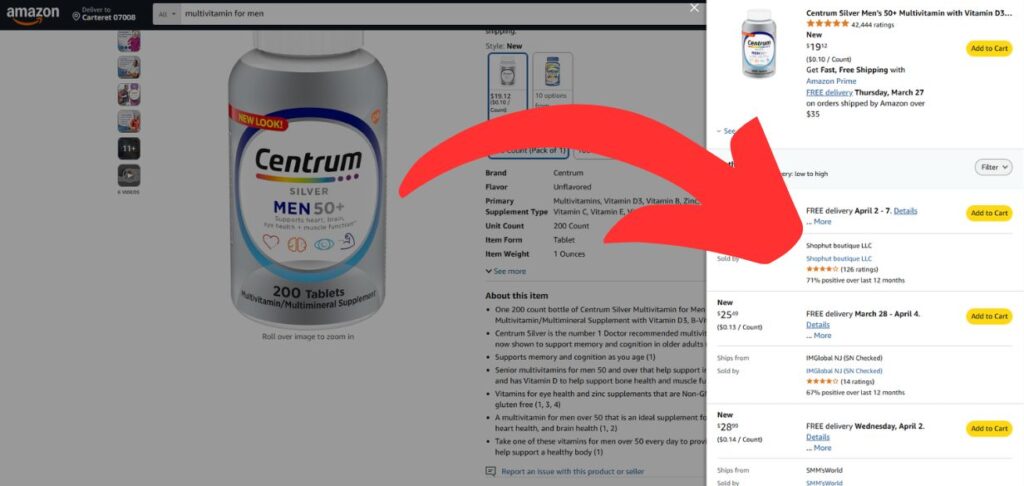
Once you’ve pulled up a product page, scroll down to the “Other Sellers on Amazon” section. Here you’ll see the different sellers offering that item. Pay close attention to the number of seller ratings. I recommend looking for sellers with between 20 and 150 reviews. If a seller has too few, they’re likely new and still figuring things out. On the other hand, sellers with 500 or more reviews are often larger businesses with wholesale accounts and access to exclusive prices, which makes them tougher to compete with.
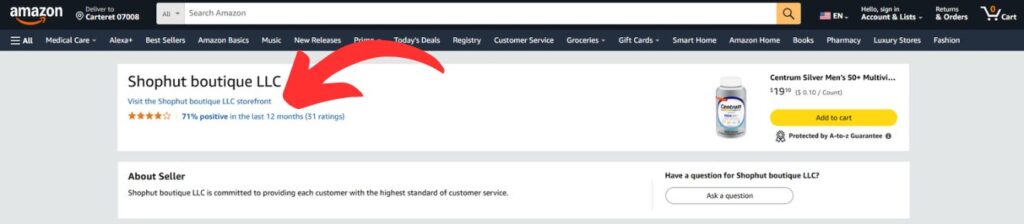
When you spot a seller worth checking out, click their name. This brings you to their profile, where you’ll see the option to Visit Storefront. Opening that storefront gives you access to all the other products they’re selling.
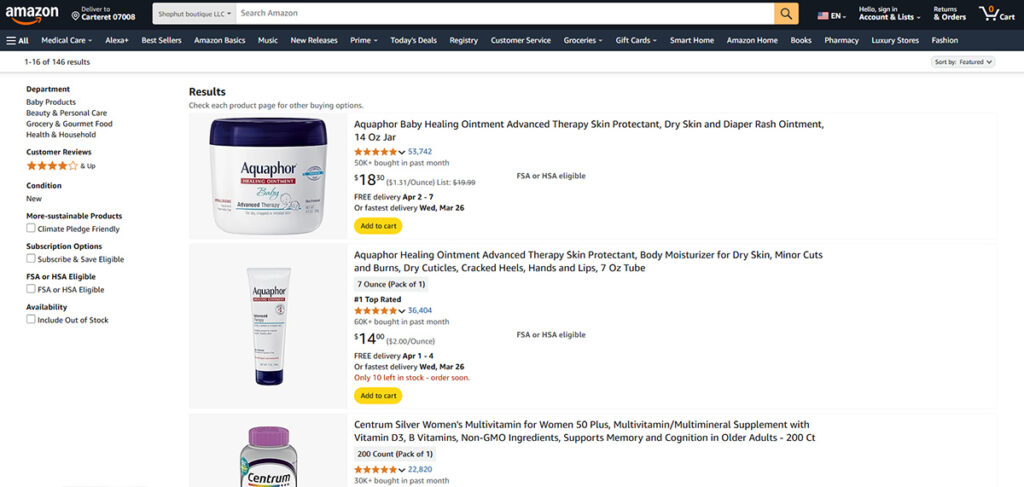
From there, start building a list of products that look interesting. At this stage, don’t worry about crunching numbers or analyzing fees. That comes in the next step. For now, the goal is to create a list of potential products directly from sellers who already know what sells on Amazon.
Step 2: Analyze the Product for Profitability
Once you’ve built a list of leads, your next step is figuring out which ones are actually worth buying. This is where you’ll want to use your product research tool.
The first thing I always check is whether the product actually sells well on Amazon. Best Seller Rank (BSR) gives you a quick sense of how often an item sells. Lower is better, but a single snapshot doesn’t tell the whole story. Use Keepa to check the 90-day history. If the rank has been steady, you’re likely looking at an evergreen product with consistent sales. If it jumps all over the place, the product might be seasonal or driven by short-term trends.
After that, you’ll need to check its profitability. Too many new sellers only compare store prices to Amazon prices, but you also need to account for referral fees, FBA costs, shipping, and sales tax. My rule of thumb is a minimum of $3–$5 profit per unit and at least 30% ROI. When you’re just getting started, I recommend aiming for closer to 35% to give yourself a bit of margin for error. An easy shortcut is to target products you can buy for about half of their current Amazon price. Check out our free Amazon Profit Calculator if you need help estimating your margins.
To make things easy, here is a list of everything I look at when validating a product. Most product research tools include all of these metrics, so it should only take you a couple of minutes to go through each product on your list.
- BSR: Under 200,000 is workable, but I try to find products under 30,000.
- Profit & ROI: $3–$5 minimum net profit per unit and 30%+ ROI.
- Price Range: I prefer products that I can price between $15–$100.
- Reviews: At least 4 stars with steady review activity. Good reviews = lower returns, and steady reviews signal that the product is selling consistently
- Size & Weight: Small and light is better since FBA costs are much lower. Oversized items can work, but only if margins are very strong.
- Number of Sellers: Look for 3–15 sellers. Too few can mean there are restrictions or possible IP issues, too many leads to price wars.
You’ll also want to check whether Amazon is on the listing, and if they are, how often do they win the Buy Box. It’s no secret that Amazon doesn’t play by the rules, so if you see that Amazon wins the Buy Box at least 50% of the time on a product listing, I recommend moving on.
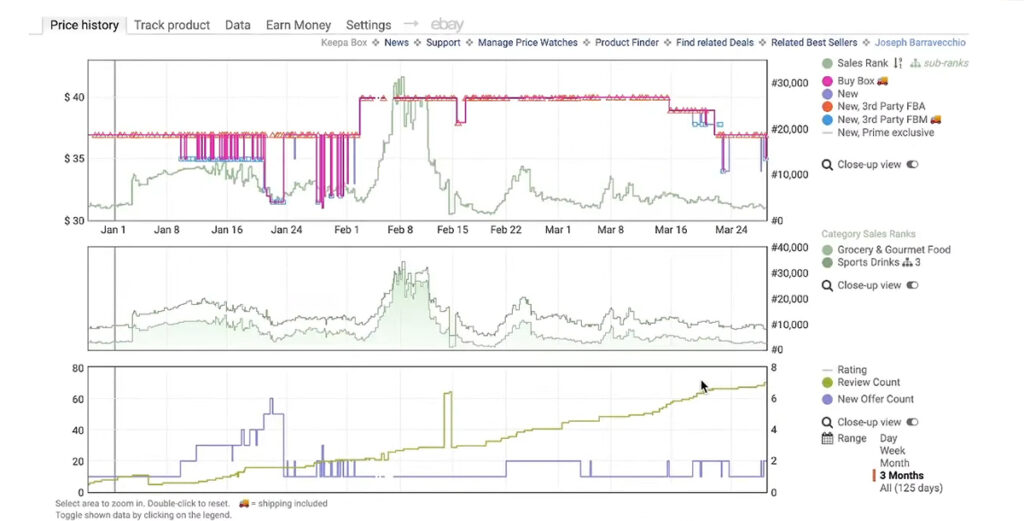
Finally, circle back to price history. Keepa is the easiest way to see if today’s Buy Box price is stable or just a temporary spike. I always calculate my margins using the lower average price, not the peak. That way I’m working with realistic numbers.
Step 3: Watch Out for Gating and IP Complaints
A product can look perfect on paper, have great ROI, consistent sales, and healthy reviews, but it doesn’t matter if you’re not allowed to sell it. Amazon restricts many brands and categories, and learning that you’re not allowed to sell a product after you’ve already bought the inventory can be incredibly frustrating and very costly to your business.
Most product research tools, like Seller Amp, alert you if you’re not eligible to sell the product you’re currently looking into. If that’s the case, you’ll need to apply and go through the ungating process before you’ll be able to list the product on Amazon.
If your tool doesn’t include gating checks, you can quickly check yourself inside Seller Central. Go to “Add a Product,” enter the ASIN or UPC, and see if a “Request Approval” button appears. If it does, you can click that button to see what ungating steps you’ll need to follow. In most cases, you’ll need an invoice and product photos, which can be a bit of a hassle. I go over the full ungating process in our ungating guide.
IP complaints are another risk that you’ll need to watch out for. Brands like Nike and Disney rarely allow third-party sellers, and selling their products without authorization almost always leads to problems. Even genuine products can trigger complaints if the brand decides they don’t want resellers. I’ve learned to stick with brands that have a track record of being reseller-friendly and to always keep my invoices handy.
Step 4: Source the Product and Purchase from a Retailer
Once you’ve validated a product’s profitability and confirmed you can sell it, the next step is actually buying it. This part might seem simple, but a smart sourcing strategy can make or break your margins.
There are a ton of sites you can source products from, but I recommend sticking with trusted retail sites. Walmart, Target, Walgreens, and Best Buy are all good options, but it’s worth branching out to smaller retailers, too. Not only can you sometimes find better deals on these smaller sites, but you’ll also find products with much less competition compared to giant, well-known retailers. I’ve included a list of some great sites for online arbitrage a bit later in this guide.
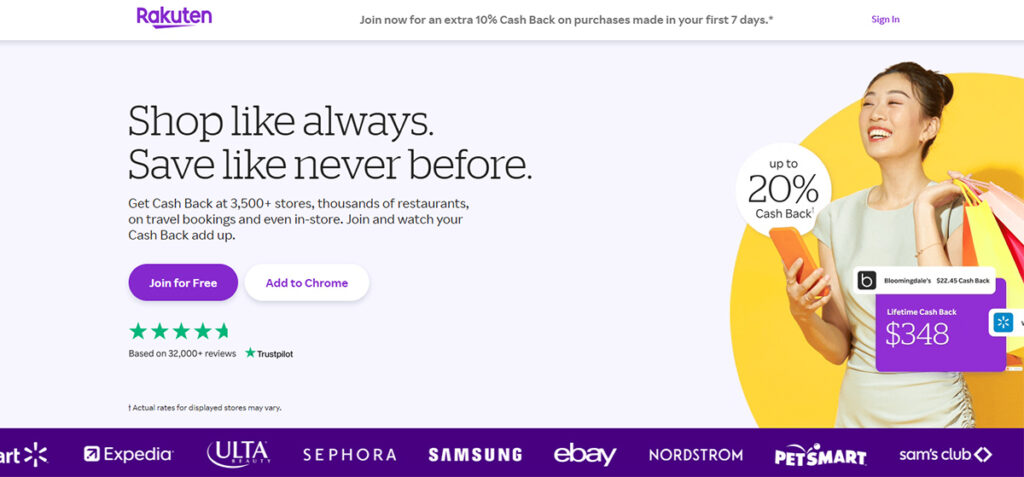
Before placing an order, take a moment to maximize your savings. I always check for available coupon codes using browser extensions like Rakuten or Honey. Many stores also offer first-time customer discounts if you sign up for their newsletter, which is why I recommend creating a throwaway email to grab those deals without cluttering your main inbox.
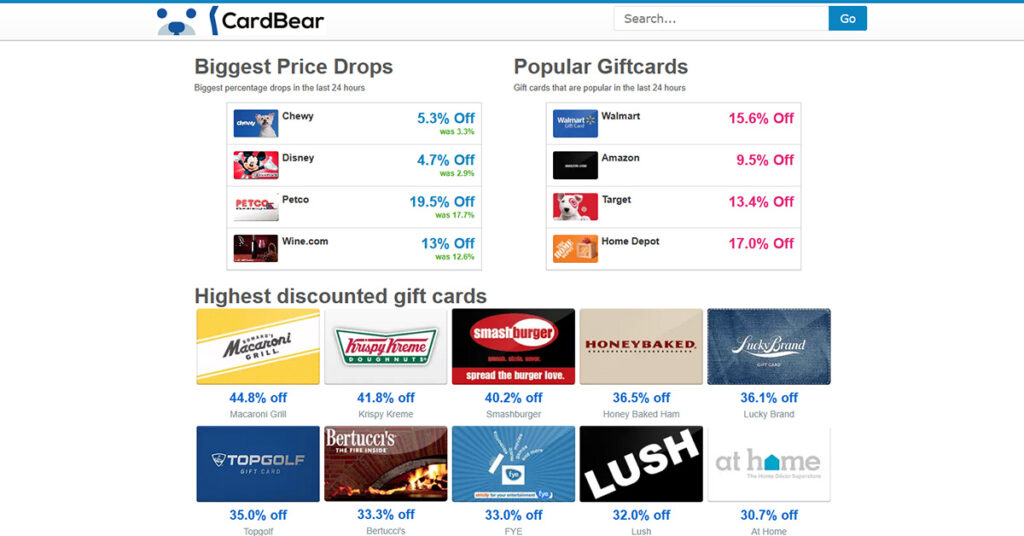
Gift cards are another way to increase your margins. Sites like Raise or CardBear sell discounted gift cards, which can sometimes save you up to 20-30%. For example, a $100 gift card might cost you $93. Stack that with a 5% cashback credit card and a 15% off coupon, and you can take a product that is barely break-even and make a nice profit on it.
Lastly, it’s very important to plan ahead. Some of the best sales and sourcing opportunities come right after major holidays or at the end of a retail season. I’ve picked up toys in March that sold great in Q4, and I’ve stocked up on outdoor gear in early fall to flip in the spring. If you plan your purchases around these cycles, you’ll find better margins and less competition.
Step 5: Decide on a Fulfillment Method
Once you’ve purchased your inventory, the next question is simple: how are you going to get it to the customer? On Amazon, that means choosing between Fulfilled by Amazon (FBA) or Fulfilled by Merchant (FBM).
With FBA, you ship your products to Amazon’s warehouses and let them handle everything, including storage, packing, shipping, customer service, and even returns. You will have to pay FBA fees, but in exchange, you’re getting better conversion rates, Prime shipping, and a lot more free time.
FBM trades more work for a lot more control. You store products yourself, ship them out as they sell, and handle all the customer service. It’s especially useful when testing new products, since you can list and sell them as soon as they arrive without waiting for Amazon to receive and check in your inventory.
For new online arbitrage sellers, my recommendation is to start with FBA. It takes a lot of the manual labor off your plate and makes it easy to grow your business, even if you’re working a full-time job or juggling other responsibilities. FBM has its place (it’s especially good in Q4), but FBA is what gives most sellers the freedom and lifestyle they’re looking for.
If you want a deeper dive into the differences between these two models, I’ve written a full guide called Amazon FBA vs FBM: Which Fulfillment Method is Right for You? This goes into a lot more detail and explains how you can use both methods successfully in your business.
Step 6: List Your Product on Amazon
At this point, you’re ready to add your product to Amazon’s catalog. With online arbitrage, you almost always list against an existing product page rather than creating a new one. To do this, head into Seller Central, select “Add a Product,” and search using the ASIN, UPC, or product name.

You’ll want to make sure your item matches the listing exactly: same size, same version, same packaging. Once you find the right page, click “Sell This Product” and Amazon will guide you through the listing details. For the condition, you’ll be selecting “New.” Then you’ll enter your price, quantity, and choose your fulfillment method.
Once the listing is complete, your product will appear in your Seller Central inventory dashboard. From there, the next step is preparing and shipping your units to Amazon’s fulfillment centers so your listing can go live and you can start making sales.
Step 7: Send Your Inventory to Amazon FBA
Once your listing is live, go into Seller Central under “Manage Inventory,” select your items, then click on “Send/Replenish Inventory.” This is where you’ll choose the condition of your products, the quantity you want to send, and generate the FNSKU labels. Print these and apply them directly to each unit.
Make sure the FNSKU label fully covers the manufacturer’s barcode so Amazon attributes the sale to your account and not a shared inventory pool. Make sure each label is applied smoothly on a flat surface to avoid wrinkles or air bubbles, which can prevent scanners from reading it properly.
When you create your shipment plan, Amazon will give you the option of sending units to multiple warehouses or to a single location. If you choose a single location, you will have to pay an inbound placement fee; however, depending on shipping costs and convenience, it may be worth it.
When you’re packing your shipment, remember that each box you send needs two labels: the FBA Box ID label and the carrier’s shipping label. Place them on the side of the box, not across seams, so they don’t get damaged in transit. Also, double-check your box size against Amazon’s packaging requirements. Amazon recommends keeping all dimensions under 25 inches to avoid delays or processing issues when your shipment arrives at the warehouse.
Once your boxes are ready, you can schedule pickup or drop-off with any of Amazon’s partnered carriers, which usually offer discounted rates. After you ship, you’ll need to wait for Amazon to receive and check in your shipment. This process can take anywhere from a few days to a couple of weeks, depending on the season.
Once your shipment is checked in, your listings will show as Prime-eligible and your products will be available for purchase.
Best Websites for Online Arbitrage
There are literally thousands of websites you can use for online arbitrage. Below, I’ve collected some of the most common retail and deal aggregator sites to help you source profitable products for your OA business.
Major Retailers
- Walmart – Frequent sales and a strong clearance section make this a great sourcing site. Stick to items sold and shipped by Walmart to avoid third-party issues. You can also upload a resale certificate to skip sales tax.
- Target – Great for seasonal clearance, toys, and home goods. Weekly promos plus discounted gift cards can turn already decent deals into very profitable products.
- Home Depot & Lowe’s – Useful for tools and home improvement products. Their clearance sections can be hit or miss, but it’s definitely worth checking
- Kohl’s: Good choice for clothing, small appliances, and home items. Stack Kohl’s Cash, coupons, and gift cards to get better discounts.
- Walgreens.com: A go-to for health and beauty. Weekly online deals and rewards points make some products surprisingly profitable.
- BestBuy.com: Good for electronics and accessories. Watch for open-box deals and short-term sales on small tech items.
- Costco & Sam’s Club – Membership required, but bulk pricing can work well if you’re confident in the product.
Online Marketplaces
- eBay – Great for finding below-retail prices, especially on seasonal items or multipacks. I’ve sourced a lot of great products from sellers clearing out extra stock.
- SlickDeals – A community-driven deal site where real buyers upvote the best discounts, making it easier to spot verified opportunities.
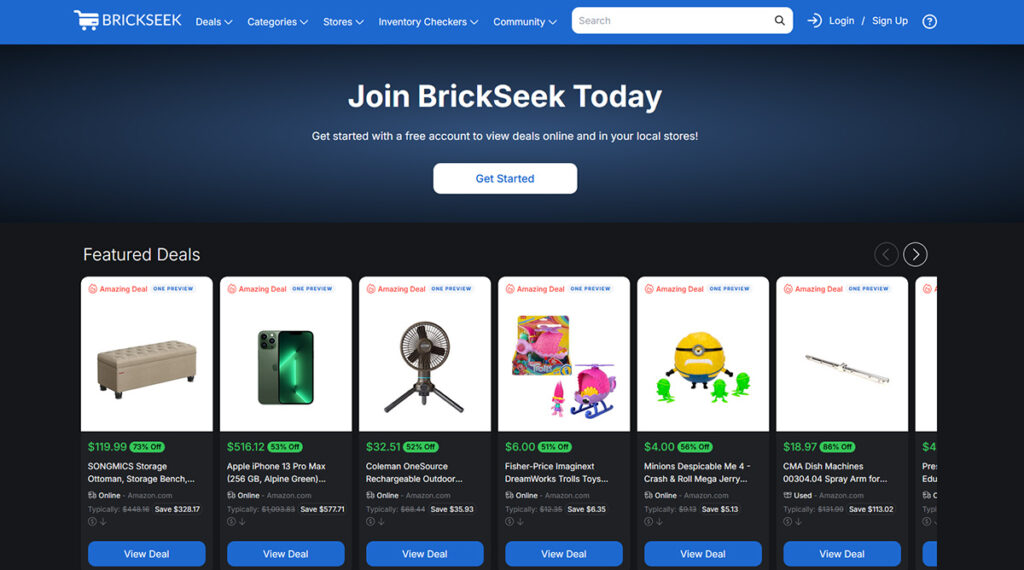
- Brickseek.com: Tracks discounts from major stores like Walmart and Target. Good for both online and in-store sourcing.
- Slickdeals.net: User-posted deals from all kinds of retailers. The community upvotes the best ones, so it’s easy to spot good deals
- Woot.com: Amazon-owned site with daily flash deals. Most items are limited quantities, so you’ll need to move fast when something looks good.
Specialty and Niche Sites
- Webstaurant & KaTom – Restaurant supply stores with unique items you won’t find at big box stores. Good for finding products with lower competition.
- Vitacost & FragranceNet – Great for health, wellness, and beauty categories. Smaller, lightweight items here can be especially profitable.
- Ulta.com: One of the best sites for beauty and skincare. Make sure to sign up for their rewards program and always check for promo codes.
- Factory Direct Craft: A great site to find home decor, craft products, and seasonal items
Frequently Asked Questions (FAQs)
Is online arbitrage allowed on Amazon in 2026?
Yes, online arbitrage is allowed on Amazon in 2026. You can buy products from online retailers and resell them on Amazon as long as the items are genuine and listed correctly.
Some brands and categories are restricted, so you may need to apply for approval before you can sell them. Amazon also takes product authenticity seriously, which means holding onto invoices and documentation is important if questions ever come up.
How can I get approved to sell in more categories on Amazon?
To get approved to sell additional products and categories, you’ll need to request approval in Seller Central. Go to Inventory > Add a Product, search the item, and click Show Limitations. If it’s restricted, click Request Approval and follow Amazon’s instructions. Often, Amazon will require invoices from authorized suppliers, or in some cases, a letter of authorization directly from the brand.
What’s the difference between online arbitrage and dropshipping?
Online arbitrage (OA) means you purchase products upfront from online retailers and resell them on Amazon. You own the inventory, which can be sent to FBA or shipped yourself, and you decide how it’s priced and prepared.
Dropshipping, on the other hand, is when you list products without holding any inventory. Once a customer orders, you buy from a supplier who ships directly to them. Amazon does allow dropshipping, but only if you’re the seller of record on all invoices, packing slips, and return labels.
How can I win the Buy Box as an online arbitrage seller?
To win the Buy Box on Amazon, you’ll need to price your products competitively and have strong seller account health. I also suggest using FBA as your fulfillment method since Amazon heavily favors FBA, and you can often price slightly above FBM sellers and still win the Buy Box. Using a repricer helps you stay in rotation without constant manual changes.
I also recommend avoiding listings dominated by Amazon itself. Focus on products where the Buy Box is shared among third-party sellers with consistent pricing and demand history.
Is it still profitable to start an online arbitrage business in 2026?
Yes, it’s still possible to find success starting an online arbitrage business in 2026, but it’s not as easy as it once was. Competition is heavier, fees are higher, and margins are tighter. That said, I know sellers in 2026 still hitting $5,000–$10,000 monthly profit by focusing on the right products.
Success today depends on making smart sourcing decisions, using discounts like cashback and coupons to increase your margins, and mastering tools like Keepa to avoid red flags and find profitable products.
Wrapping Up: How to Build a Profitable Online Arbitrage Business
If you’ve made it this far, you should have a clear plan for how to start your online arbitrage business, from finding profitable products to listing them on Amazon and sending them into FBA.
My advice? Start simple. Use reverse sourcing to find products that are already selling well on Amazon, then track down a retailer where you can buy them at a profit. You don’t need to focus on everything right away. Just choose a few products and start learning the basics of e-commerce.
What separates the sellers who succeed isn’t luck or a “winning product”. It’s consistency, making smart buying decisions, and knowing how to stack small discounts like coupons, gift cards, and cashback, to increase your profit margins.
Recommended Articles
- Amazon Retail Arbitrage: The Ultimate Guide to Profitable Reselling
- How to Get Ungated on Amazon: A Step-by-Step Guide
- How to Win the Buy Box on Amazon: The #1 Key to More Sales
Levi Adler is an experienced Amazon seller, e-commerce specialist, and the founder of Levi’s Toolbox. With over a decade in the trenches selling on Amazon and managing his own Shopify stores, Levi writes from his own experience. Sharing what worked, what flopped, and the strategies he wishes he’d known sooner. When he’s optimizing listings or managing ad campaigns, you’ll find Levi hitting mountain bike trails or hanging out with his two huskies, Emma and Scout.
