You don’t get many second chances on Amazon. If your listing doesn’t grab attention right away, shoppers scroll past, and they’re not coming back. Most sellers pour time and money into paid advertising, yet completely overlook the real sales engine: the listing itself.
I’ve seen it again and again. Sellers have great ads and a strong product, but they’re not making sales. Nine times out of ten, it’s because their listing isn’t doing its job. Their title is missing important keywords, their images are weak, and their bullets read like they were copied straight from the manufacturer.
In this guide, I’ll share the exact approach I use for Amazon listing optimization. You’ll learn how to write titles that rank, build image stacks that get clicks, and craft copy that converts. Let’s get started.
TL;DR – Amazon Listing Optimization 2026
Here’s a quick checklist of everything we’ll discuss in this article.
| Section | What to Do | Why It Matters |
|---|---|---|
| Audit | Compare your title, images, and keywords to your top 3 competitors. Look for missing keywords or weak spots. | You can’t fix what you don’t see. A good audit shows exactly where you’re losing clicks and sales. |
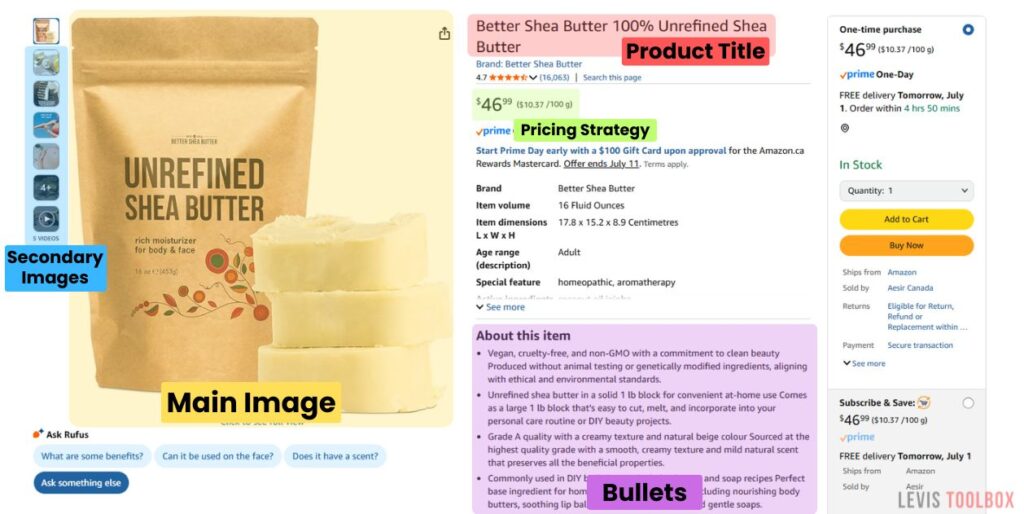
| Title | Put your main keyword first. Keep it under 150 characters. Format clearly: Brand, Product Type, Key Features, Size. | Your title and main image are the two most important parts of your listing. If your title doesn’t grab attention and include the right keywords, shoppers will never even see the rest of your content. |
| Bullet Points | Lead with benefits over features. Use all five bullets. Address common objections found in reviews. | Bullets are your quick sales pitch. Shoppers skim, so clarity and relevance win. |
| Main Image | Use a white background, 1600px+ resolution, and fill at least 85% of the frame. Show important packaging text if printed. | Your main image is as important as your title. It’s what stops shoppers from scrolling past. A strong main image is often the difference between no sales and a winning listing. |
| Secondary Images + Video | Use every image slot. Add lifestyle shots, infographics, size comparisons, and a short (30-60s) authentic video. | Secondary images and video build trust, answer questions, and move shoppers closer to buying. |
| A+ Content & Brand Story | Add new visuals, comparison charts, and clear, benefit-focused copy. Don’t just repeat your bullets. | A+ Content converts hesitant buyers. Brand Story builds credibility and sells other products. |
| Pricing | Use coupons for badges to increase CTR. Add realistic list prices for strikethrough deals. | Your price positions your product in the shopper’s mind and influences buying decisions. |
Other Ways to Improve Your Product Listing
- Reviews: Your goal should be 100 reviews with at least a 4.5★ average. Using Amazon’s “Request a Review” tool to increase your feedback count.
- Q&A section: Post common shopper questions if none exist yet, then answer them clearly using long-tail keywords. Include video answers when possible.
- External traffic: Drive clicks from social, email, blogs, or influencers. A10 loves external traffic, and it will further improve your organic rankings.
- User-generated video: Upload authentic customer videos showing your product in real use. These build trust way faster than sleek, marketing-style ads.
What is Amazon Listing Optimization (and Why Does it Matter)?
Amazon listing optimization is the process of improving your product page so it ranks higher in Amazon’s search results and convinces more shoppers to buy. Think of it as fine-tuning your Amazon listing to match exactly what customers and Amazon itself are looking for.
Why does this matter so much? First, less than 30% of shoppers scroll beyond the first page of Amazon search results. If your product isn’t showing up high in results, most buyers won’t see it at all. By optimizing your listing, you can get your product to show up where shoppers are more likely to click on it.
Second, optimized listings also have a huge impact on your conversion rate. A listing that’s carefully structured and filled with useful, trustworthy information helps turn casual browsers into committed buyers, boosting your sales and further reinforcing your search ranking.
Understanding Amazon’s A10 Algorithm in 2026
When sellers talk about Amazon’s A9 or A10 algorithm, they’re referring to the system Amazon uses to decide which products show up first when shoppers search. Think of it like Google’s search engine, but for products.
Back when I started selling, the search algorithm was pretty straightforward. If you packed your title and bullets with the right keywords, you could rank well. The algorithm mostly cared about keywords and sales velocity, and PPC ads played a huge role in pushing listings up the ranks.
But things have changed. Today, Amazon uses its A10 algorithm. It’s a smarter, more customer-focused system that looks at more than just keywords and sales numbers. A10 wants to see listings that genuinely help shoppers: clear titles, informative bullet points, strong images, and detailed content that answers common questions that customers may have.
Understanding the difference between A9 and A10 is key for any seller in 2026. If your listings aren’t built to match how Amazon ranks products today, your rankings and profits will suffer.
Key Differences Between Amazon’s A9 and A10 Algorithms
Starting in early 2019, Amazon made significant updates to its search algorithm, which most sellers refer to as A10. The A10 algorithm is all about customer engagement and trust signals. The algorithm still cares about keywords and sales, but it also measures how shoppers interact with your listing. Do they spend time reading your content? Are they watching your videos, clicking into your A+ Content, reading Q&A, or leaving reviews? All of these show Amazon that your product is useful and relevant.
A10 also values external traffic far more than A9 ever did. If your product brings shoppers in from Google, TikTok, Instagram, or YouTube, Amazon rewards you with a better ranking. Good seller metrics matter too. Things like fast shipping, low return rates, and strong reviews all feed into your listing’s ranking.
The bottom line is that in 2026, Amazon’s search algorithm rewards sellers who build listings that genuinely help shoppers make confident buying decisions. If your Amazon listing optimization strategy is still stuck in 2010, it’s time to update it for what works in 2026.
How to Optimize Your Amazon Listing
Most sellers think listing optimization is just about sprinkling in a few extra keywords or swapping out an image. It’s not. True optimization means looking at every part of your listing with fresh eyes and making sure each piece is built to convert.
This guide breaks down my exact process into 7 easy steps so you can create listings that rank higher, earn more clicks, and actually drive sales. Let’s start with auditing your current product listing.
Step 1: Audit Your Current Listing
Before you tweak a single word or image, take a step back and audit what you already have. Most sellers jump straight into rewriting titles or swapping images without knowing what’s actually holding them back. A good audit shows you where you’re losing clicks and conversions, and where you’re leaving easy wins on the table. Ask yourself:
- Are you targeting the right shoppers?
Check your keyword data. Are you ranking for terms that buyers actually use, or are you targeting low-intent vanity keywords? Use a keyword tool like Helium 10’s Cerebro or Jungle Scout’s Keyword Scout to show you exactly which keywords your competitors rank for and which drive revenue in your niche. - Is your content aligned with shopper intent?
Read through your product title from the perspective of a potential buyer. Does it clearly communicate what your product is and why it’s better? Are your bullets leading with benefits instead of generic features? Go through your entire listing this way to spot any obvious issues. - Does your listing build trust?
Scroll through your images. Do they just show product angles on white backgrounds, or do they show real use cases, benefits, and context? Check your reviews and Q&A for repeated complaints or points of confusion. This is direct buyer feedback telling you what your listing isn’t communicating well enough.
Something I always recommend is comparing your listing side-by-side with your top three organic competitors. Note what types of images they use, how their titles are structured, and what phrases show up repeatedly in their reviews. You’ll often spot easy wins or missed keywords that can immediately strengthen your listing.
Don’t rush through this step. Before you move on to the next optimization step, know exactly what needs improvement so every change you make triggers actual results.
Step 2: Create an Optimized Title
Your title is the first thing shoppers see. It tells shoppers what they’re looking at and signals to Amazon’s algorithm when to show it in search. If your title misses either of these jobs, you’re CTR and sales will suffer.
Before making any changes to your title, check what’s already working in your niche. Pull up the top three competitors, note which keywords appear at the front of their titles, and see how they structure product type, features, and variants. Top-ranking listings almost always start with exact match keywords because Amazon’s algorithm, including Rufus AI, prioritizes them for relevancy.
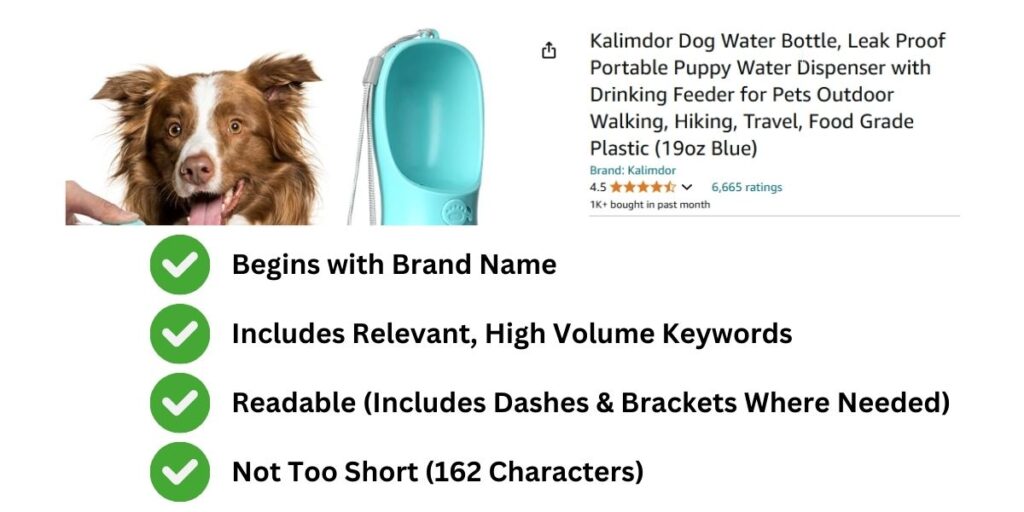
Here’s a quick checklist for optimizing your title:
- Keep it tight. As of 2026, Amazon caps most titles at 150 characters. Some categories want even less. Don’t waste your space. Make sure you’re using your most important keywords.
- Front-load what matters. The first 80 characters are critical. That section shows up on mobile and influences your canonical URL, which affects SEO on both Amazon and Google.
- Follow a clear structure. I typically use Brand, Product Type, Top Features, then Size or Variant. If your brand isn’t a selling point, place it later in the title and lead with what customers actually care about.
- No Keyword Stuffing: Keyword stuffing doesn’t work anymore. In 2026, Amazon only allows the same word twice in a title (except for prepositions, articles, and conjunctions). I still see titles like “Yoga Mat for Women Non-Slip Yoga Mat with Strap Thick Yoga Mat for Home Workout.” Repeating “yoga mat” over and over makes it awkward and hard to read. Include your main keyword once or twice, use variations naturally, and place extra terms in your bullets or backend fields.
It’s also important to know that the first few keywords in your title influence your product’s canonical URL, which is the web address Amazon creates for your listing. Including your main keyword near the start helps your product rank better on both Amazon and Google. While Amazon generates the canonical URL automatically, your best chance to control it is by structuring your title properly before publishing, since changing it later doesn’t always update the URL.
Step 3: Write Bullet Points That Convert
Think of your bullet points as a rapid-fire sales pitch. Since most shoppers skim listings, it’s important that these lines grab attention quickly by pointing out the key benefits your product provides. Bullet points are also indexed by Amazon’s algorithm, making them important for both your organic ranking and conversions.
When optimizing your bullets, focus on these five principles:
First, lead with the benefit. Buyers don’t care about a product’s features in isolation. Instead of writing “12-hour battery life,” explain what it means: “Stream all day without recharging.” Benefits grab attention because they answer the real question buyers have: what does this do for me?
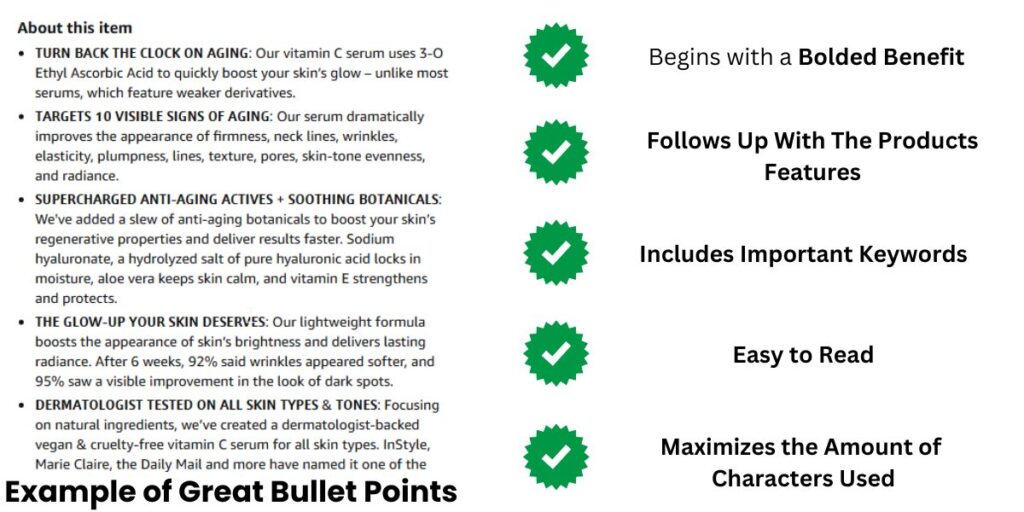
Second, anticipate customer objections. Read your reviews and competitor reviews. What confuses buyers? What complaints come up repeatedly? Address these directly in your bullets. For example, if shoppers worry about sizing, include fit guidance. If they’re unsure about materials, specify exactly what’s used and why it matters.
Third, integrate keywords naturally. Amazon’s algorithm doesn’t reward repeating the same keyword over and over. Include your primary keyword where it fits naturally, then weave in secondary or long-tail terms naturally. Rufus AI now looks at the overall meaning and context of your bullets, so write them like you’re speaking directly to a shopper, not just ticking off keywords for indexing.
Fourth, keep formatting clean. Capitalize the first letter, use numerals instead of spelling out numbers, and avoid punctuation at the end. Skip promotional phrases like “best seller” or subjective words like “fantastic” as they’re against Amazon’s TOS.
Finally, an easy one: use all five bullet points. Amazon gives you up to five, and each one is a chance to highlight a specific benefit or feature. With Amazon being as competitive as it is, it’s important to use all the space that you’re given. This is true for image slots, A+ content, and in this case, bullet points.
If you need help optimizing your bullets and the rest of your listing, check out our guide to the Top 7 Tools for Amazon SEO in 2026.
Step 4: Choose a Main Image That Stops the Scroll
Your main image is the first thing shoppers see. This is what appears in search results, Sponsored Product ads, and it’s what makes shoppers stop scrolling and click on your product. Along with your title, this is the part of your listing that does the heaviest lifting, so it’s important to take the time to get it right.
Start with the basics. Use a pure white background, and make sure your image is at least 1600 pixels on its longest side so it looks sharp and is zoomable. Your product should take up at least 85% of the frame, with just a little white space around the edges. If you want a quick way to check if your image meets these requirements, check out our 100% Free Amazon Image Checker. Just upload an image and immediately see if it meets a lot of Amazon’s basic rules for product images.
Next, you should be looking for ways to stand out. Scroll through your top competitors in search results. If everyone uses the same straight-on angle, test a slight tilt or a different perspective to catch the eye. For consumables, show both the packaging and what’s inside so customers immediately understand what they’re buying.
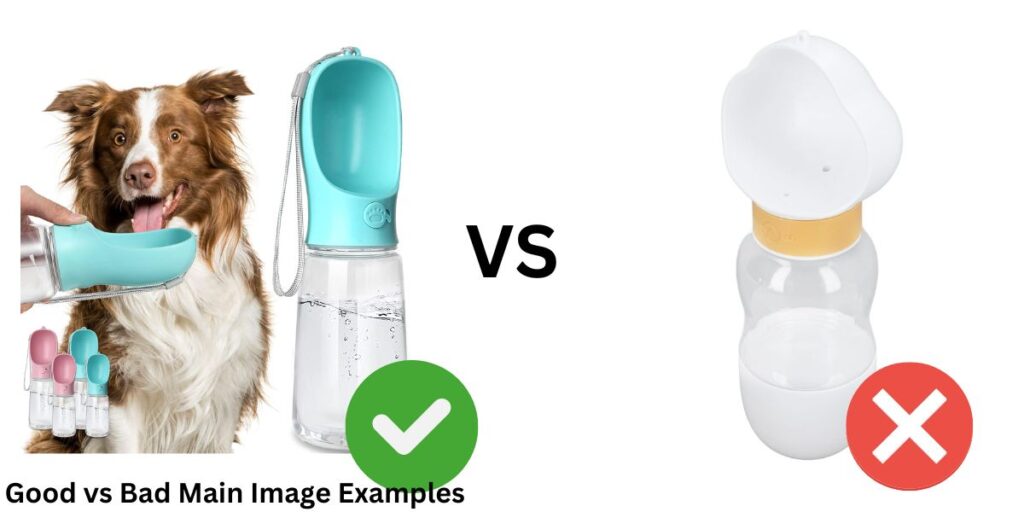
Another strategy I’ve had a lot of success with is adding key benefits directly to the product packaging, like “sugar-free” or “BPA-free.” Since these are printed on the label itself, they’re compliant with Amazon’s image policies and, in my experience, boost CTR.
Finally, I highly recommend split-testing your main image. Even small tweaks, such as cropping closer, changing the lighting, or adjusting the angle, can improve click-through rates. Use Amazon’s Experiments or tools like Pikfu to see which version gets the best results. For something as important as your main image, it’s worth the extra effort.
For more information on technical requirements, compliance rules, and advanced strategies to maximize your listing’s visuals, check out my complete guide on Amazon photography requirements.
Step 5: Add High-Converting Secondary Images & Video
Once your main image earns the click, your secondary images move shoppers closer to buying. They educate customers by answering questions and helping shoppers visualize using your product in their own lives.
Amazon allows up to nine image uploads per listing, but only seven display on your page. Make sure to use every slot, and give each image a clear purpose. Your goal is to provide shoppers with a complete understanding of your product and answer any common questions that they have. Start with lifestyle images that show it in use, then add infographics to highlight key features and benefits. Include scale shots or close-ups to clarify details that matter to buyers. If sizing is a common question, for example, show the item held in someone’s hand or next to a familiar object so its dimensions are obvious at a glance.

Just like with your main image, make sure your secondary images are sharp, well-lit, and easy to view on mobile, with any text overlays large enough to read without zooming. Adding keyword-rich alt text to each image also improves accessibility and can support your organic ranking, as Amazon indexes these fields behind the scenes.
Why you should include a product video
In 2026, adding a product video to your image gallery has become almost essential. Videos build trust quickly by showing your product in action and helping shoppers understand exactly what it does, how it works, and why it’s worth buying. Most buyers prefer to watch rather than read, so seeing your product used in real life can have a huge impact on your conversion rate.
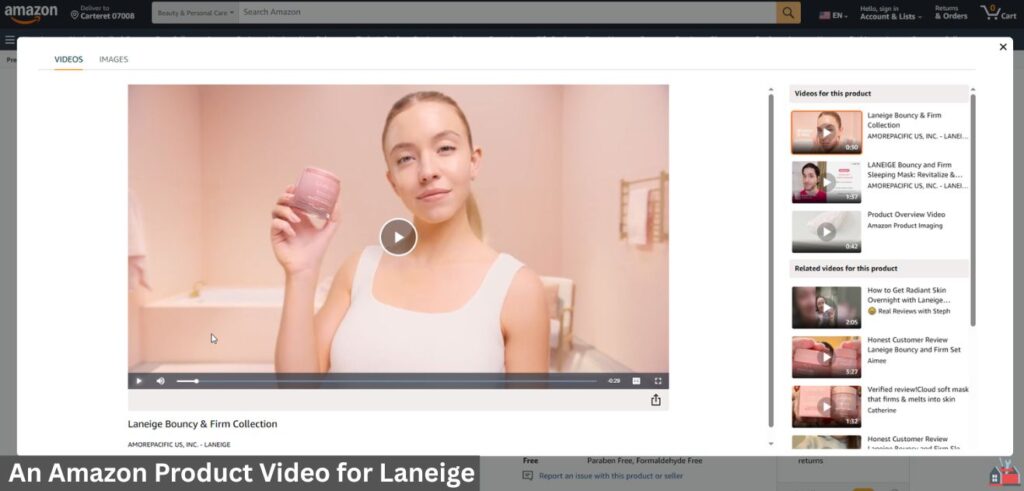
Videos can also improve your ranking by increasing shopper engagement. Amazon’s algorithm rewards listings that keep customers interested, and video does exactly that. Aim for a short, 30 to 60-second clip that is easy to follow. This could be a simple unboxing walkthrough, a quick demo highlighting key features, or a lifestyle clip showing your product solving a real problem.
Keep your videos simple and authentic. Shoppers tend to trust videos that feel real over polished marketing ads. A straightforward clip filmed in natural lighting, showing the product as it is, often converts better because it feels honest and relatable.
Step 6: Enhance Your Listing with A+ Content and a Brand Story
Think of A+ Content as an opportunity to convert shoppers who weren’t convinced by your bullets or product images. Its job is to reinforce the benefits you’ve introduced while giving shoppers a more immersive brand experience. Start with clean, high-quality visuals that highlight what actually matters to your customer. Use concise, benefit-focused copy alongside each image to keep it scannable, especially on mobile.
Next, don’t forget to optimize the alt text for your images. While it doesn’t directly impact Amazon’s internal ranking, it can help your products show up in Google search results, driving additional traffic to your listing. Treat alt text similar to backend keywords: write naturally, focus on relevance, and use keywords you couldn’t fit onto your product page.
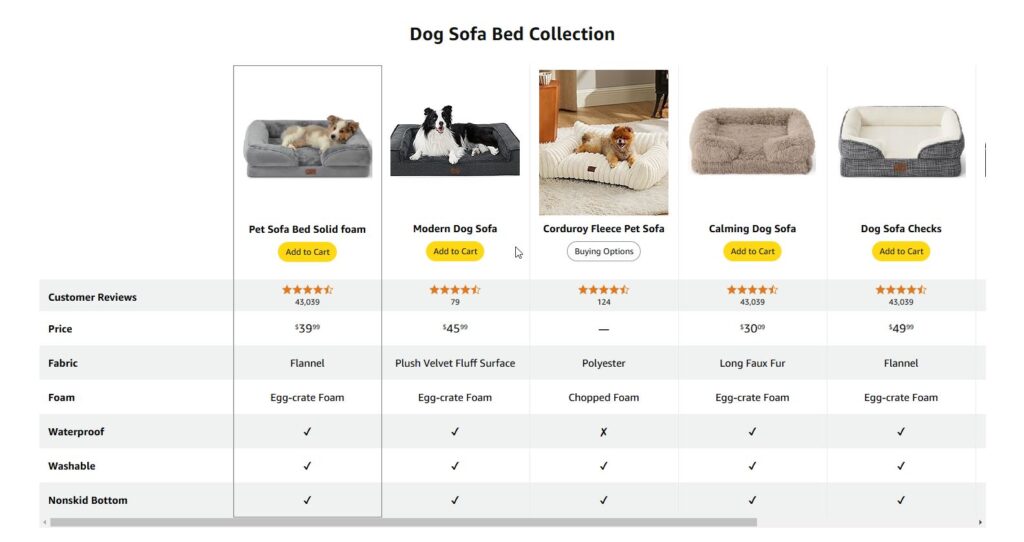
When choosing which A+ modules to include, think about what works best for your specific product and brand. However, if you sell multiple items, I highly recommend adding a comparison chart. This module lets shoppers quickly compare your products side by side, making it easier for them to choose the right option without leaving your listing. It also keeps them browsing through your own products rather than clicking away to a competitor.
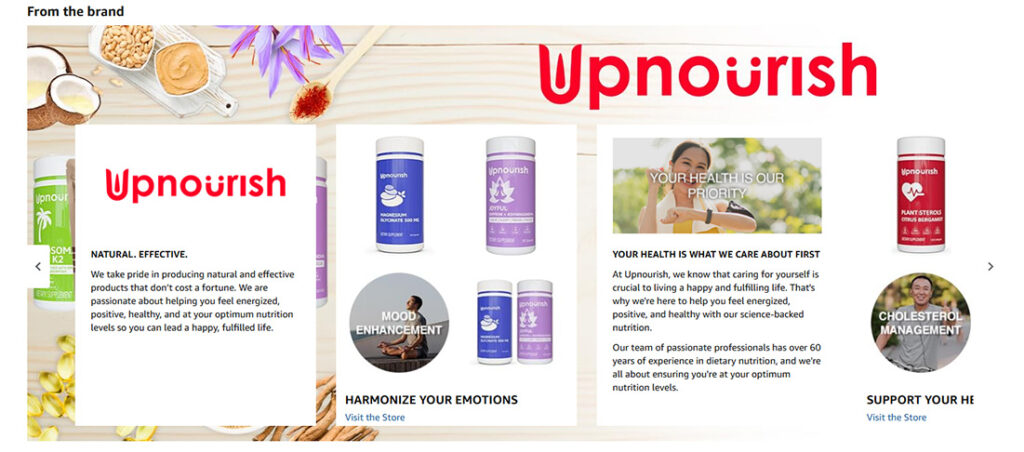
When it comes to your Brand Story, the first step is simple: actually use it. I still see far too many listings without one, wasting valuable space that could be used to boost your average order value and push competitor advertising further down the page. Use your Brand Story to link out to other products in your catalog, build credibility, and introduce your brand in a way that feels genuine rather than corporate.
If you want step-by-step guidance on building A+ Content, tips to improve existing modules, or what it takes to qualify for Premium A+, check out my full Amazon A+ Content optimization guide.
Step 7: Optimize Your Pricing Strategy
Pricing is the last piece that ties your entire listing together. It’s easy to overlook, but even small tweaks here can have a huge impact on your overall sales.
When you’re optimizing your price, start by asking: Does this number match the story my listing tells? If you’ve positioned your product as premium with strong images, clean branding, and better packaging, don’t undermine it by trying to be the cheapest option. I’ve priced products higher than similar competitors and still outsold them because shoppers believed they were getting better quality.
At the same time, discounts go a long way. In my experience, dollar-off coupons almost always outperform percentage discounts. Customers find them easier to understand, and they show up as green badges in search results, grabbing attention and boosting click-through rates. For example, listing your product at $25.99 with a $1 coupon will almost always convert better than just pricing it at $24.99. Plus, not everyone uses the coupon, so you’re still selling a good number at full price.
Another quick optimization is adding a list price to enable the strikethrough effect. If you’re selling at $19.99, setting your list price at $24.99 makes the deal look stronger. Just make sure it’s realistic; Amazon will remove it if it’s too inflated.
The main thing to remember is this: your price should reinforce your listing strategy, not fight against it. When your visuals, copy, and price align, shoppers buy with confidence.
Next Steps: More Ways to Improve Your Listing
Once your title, images, and copy are dialed in, there’s still more you can do. This section covers the tools I use to increase conversions, build trust, and send the right signals to Amazon’s algorithm.
Get More Reviews and Improve Your Star Rating
Reviews shape how shoppers see your product before they even read your bullet points or browse your images. They influence click-through rate, conversion rate, and your ranking in Amazon’s search results. Simply put, reviews build trust faster than any title or image ever can.
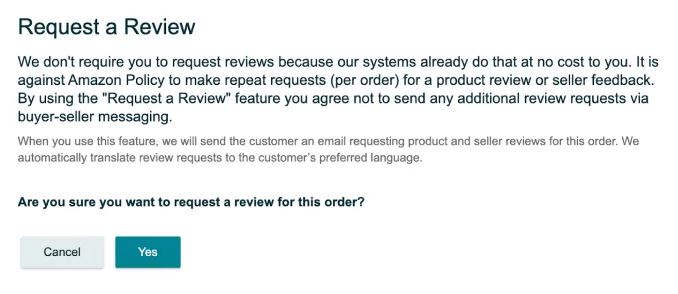
A strong benchmark to aim for is at least 100 reviews and a 4.5-star average. But if you’re just starting out, don’t stress about hitting that immediately. Reviews build over time. Focus on getting consistent reviews by using Amazon’s “Request a Review” button on every order. Many software tools will do this for you automatically, and it’s a quick and compliant way to boost your review count. You also have the option of including inserts with your products, asking for honest feedback. Just be careful to follow Amazon’s TOS by not offering incentives for positive feedback.
Reviews can also be a goldmine for your listing copy. Shoppers describe your product in real, relatable ways that polished marketing copy often misses. If a customer writes, “Fits perfectly in my small kitchen,” I’ll use that exact phrasing in my bullet points or description. It’s authentic language that speaks directly to what future buyers care about, and it consistently converts better than generic feature lists.
But negative reviews are just as valuable. They reveal where your listing might be falling short. I check them weekly, looking for any repeated complaints about sizing, unclear images, or features that didn’t meet expectations. Often, an update to your photos, bullets, or description can prevent future negative feedback and lift your conversion rate in the process.
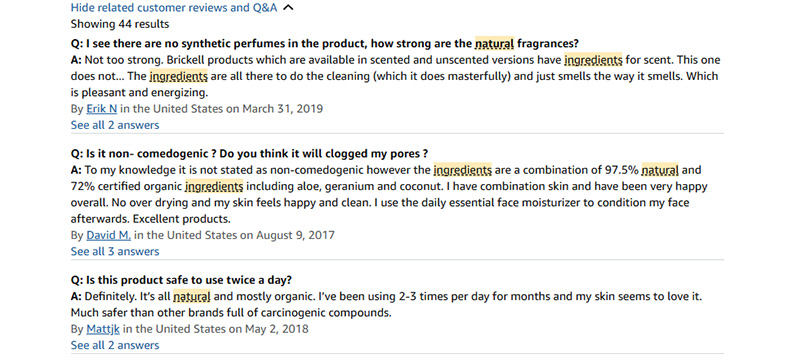
Optimize Your Listing’s Q&A Section
The Q&A section is one of the most underused conversion boosters on your listing. Buyers often scroll here to check compatibility, sizing, or other specifics before making a decision. If those questions are answered clearly and confidently, it can remove hesitation and close the sale.
Think of it as an extension of your SEO strategy. Every question and answer gets indexed by Amazon and sometimes even by Google, giving you extra keyword coverage without cluttering your title or bullets. It’s also a great place to include long-tail and conversational keywords that Rufus AI uses to recommend products based on buyer intent.
One tip I recommend is asking a friend or family member to post common questions if no one has asked them yet. Buyers want quick, clear answers before they purchase, and having these questions on your listing lets you provide that. Whether it’s “Will this fit a 16oz cup holder?” or “Is this safe for pets?”, you can write detailed, keyword-rich answers that educate buyers and remove doubts before they cost you the sale.
Also, don’t just stick to text. Amazon now allows video answers in the Q&A. Showing your product in use, explaining dimensions, or demonstrating assembly builds trust far quicker than text-based specs ever could.
Finally, just like I recommend using reviews to improve your bullets, you can also use them in your Q&A. Scan your reviews for recurring questions or issues, then answer those directly here. If people keep mentioning installation, sizing, or durability, address it clearly in a Q&A entry. This turns buyer feedback into content that removes friction and builds confidence right where shoppers need it most.
Drive Traffic from Email & Social Media
In 2026, external traffic is one of the most powerful ways to improve your organic ranking. The A10 algorithm prioritizes listings that attract buyers from outside platforms because it shows there’s genuine demand for your product from around the internet.
A good place to start is with your email list and social media. If you already have a small newsletter, use it. Your subscribers are warm leads who trust you. When launching a new product or running a sale, let your list know. Not only can this spike your sales, but Amazon also sees those conversions as coming from outside traffic, which is a huge bonus.
Your brand’s social media accounts work the same way. Even with a small following, consistent posts build brand recognition and trust. Share product tips, behind-the-scenes content, and customer reviews with your followers. When you drop links to your Amazon listings, followers are more likely to click because they’re already familiar with your brand.
Another option is to reach out to blogs or review sites. Getting featured on high-traffic blogs can drive high-intent traffic to your listing for months. Search Google for “[your niche] + best products” or “[your product type] reviews” to find blogs that rank. Then reach out with a clear pitch on why your product deserves a spot.
Increase Conversion Rates with User-Generated Content (UGC)
User-generated video content is one of the most powerful tools you can add to your listing. Based on recent studies, UGC-style videos can increase conversion rates by up to 18%, and they give your listing the kind of credibility that brand-polished content often can’t replicate.
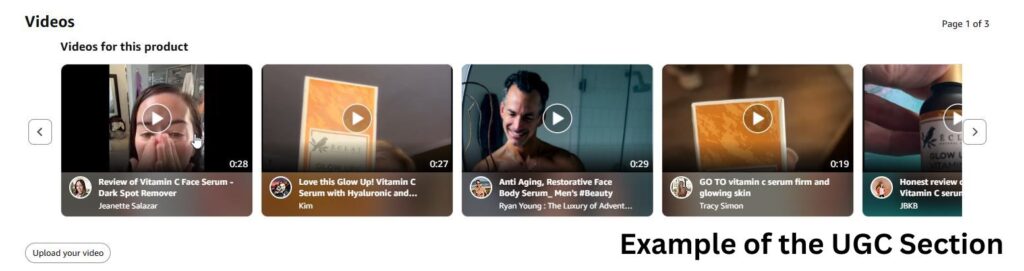
Amazon’s video carousel favors authentic content. When you upload a branded video, it can “pull up” customer-submitted UGC from the bottom of the page into the top carousel. That means videos from the “Videos from Creators” section, typically located near the bottom of your listing, get more visibility. When shoppers see real people using your product, the perceived risk drops, and buying confidence goes up.
The most effective UGC videos aren’t slick, overly produced marketing videos. Peer-to-peer style clips with natural lighting, minimal editing, and a casual tone often outperform polished brand videos. Whether it’s someone unboxing the item, demonstrating how it works, or just using it in context, that realism builds trust.
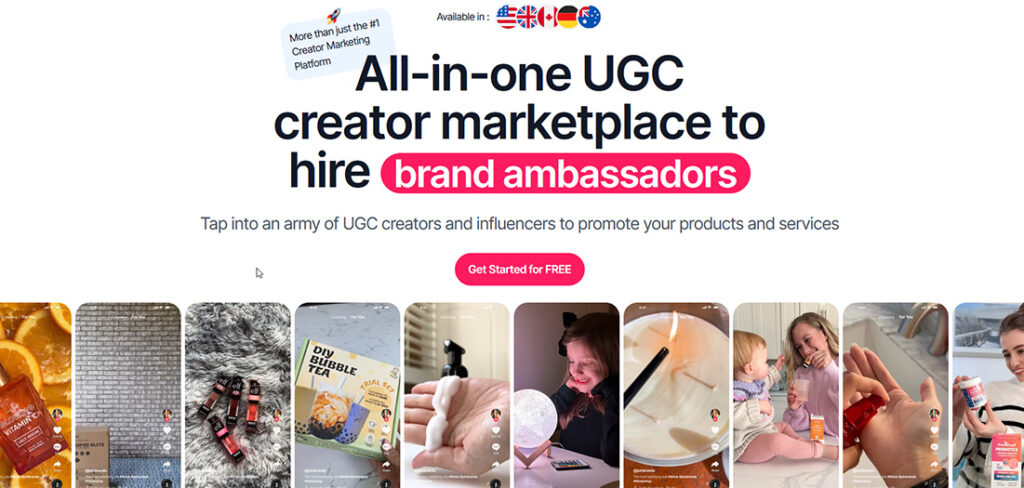
You can source UGC from influencer platforms like JoinBrands or directly through Instagram or TikTok. Just make sure you’ve got usage rights before uploading anything to your listing. If you don’t own the content, don’t use it.
User-generated content is even more important in 2026. This is because Amazon’s Rufus AI factors in contextual content like reviews and customer videos when recommending products. That means UGC doesn’t just help with conversions, it can push your listing higher in search, too.
7 Common Amazon Listing Mistakes to Avoid
Even good listings break down when one part doesn’t pull its weight. I see sellers obsess over their images or bullet points but miss simple fixes that would have made a bigger difference. If you’re not careful, these common mistakes can quietly cost you rank, conversions, or both.
- Keyword stuffing in titles: Overloading your title with repetitive keywords is one of the most common mistakes I see sellers make. Amazon’s 2025 guidelines cap keyword repetition, and the algorithm no longer rewards keyword stuffing the same phrase multiple times. Always lead with your primary keywords, but make sure your title is readable. Clean, clear titles are the way to go in 2026.
- Ignoring mobile image previews: Over 80% of Amazon shoppers are on their phones, and what looks good on desktop can be blurry or hard to read on mobile. Always design your images with mobile in mind: vertical framing, zoomable resolution, and no tiny text that gets lost on small screens. Your product should be instantly recognizable, even on the smallest mobile screen.
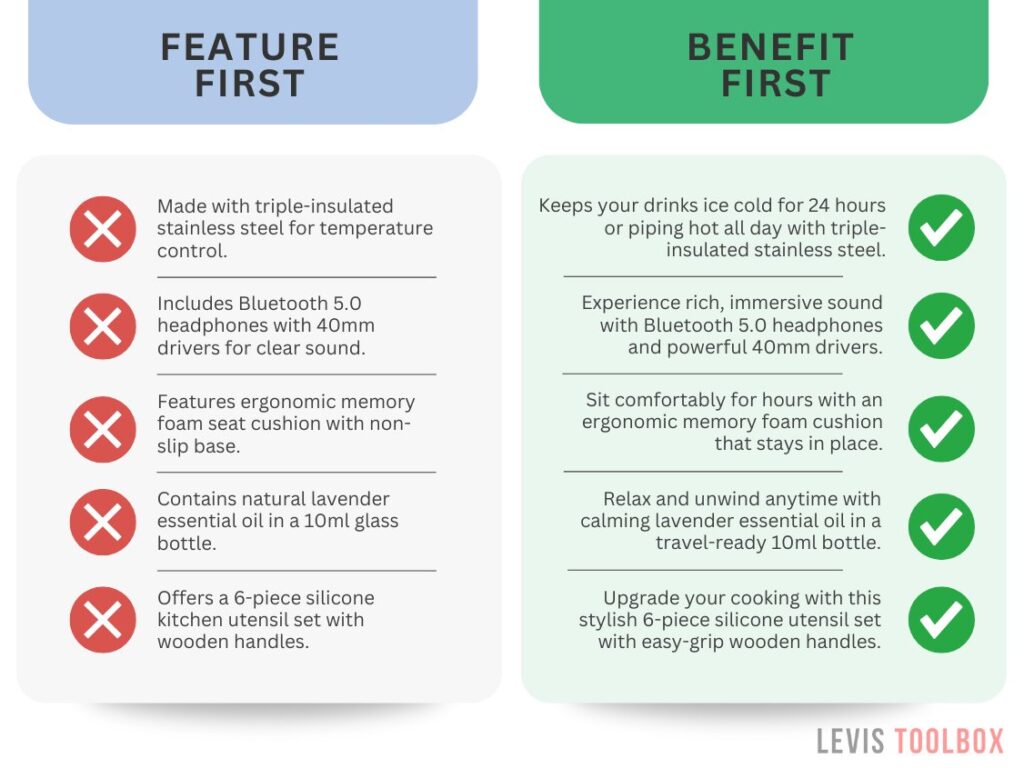
- Too much focus on features, not benefits: Customers don’t care about “fast charging technology” until they know it means “you’ll never leave the house with a dead phone again.” Always lead with the benefit, then back it up with the feature. This simple shift has boosted conversions on my listings more than any title tweak ever has.
- Repeating info in bullet points and A+ Content: If your A+ Content just repeats the same benefits as your bullet points, you’re wasting valuable space on your listing. Use the A+ Content section to convert customers who weren’t convinced by your product images and bullets: Highlight variations, show comparisons, or introduce new benefits.
- Not using video: Video is one of the most powerful tools available when it comes to creating a high-converting product page. I always add a short product demo or unboxing clip in the image stack for all of my products. Besides converting more customers, using video to show shoppers how to use your product can also reduce negative feedback and lead to higher review scores.
- Underutilizing image slots: This is an easy one to fix, but still needs to be stated. Amazon gives you nine slots for a reason; use them. Try to include a variety of image types like infographics, spec charts, size comparisons, lifestyle images, close-ups, and at least one image that shows someone using the product and looking into the camera. That image almost always boosts trust.
- No testing, no iteration: Your first version of a listing is just that, a first draft. It’s always a good idea to run A/B tests using Amazon Experiments or a third-party tool on everything from titles to images. Just remember to focus on one thing at a time. To start, the two most important things to test are your main image and your title.
Frequently Asked Questions (FAQ’s)
What are Amazon backend keywords, and how do I add them?
Backend keywords are hidden search terms used to help your Amazon listing rank for additional keywords without cluttering the visible content on your listing. To add them, go to Seller Central, click “Edit” on your product, then enter terms under the “Search Terms” or “Generic Keywords” field. Focus on including relevant phrases, synonyms, and try to use all available space (up to 249 bytes).
Which parts of an Amazon listing have the biggest impact on click-through rate?
The two biggest factors influencing click-through rate are your main product image and title. Your main image should be sharp, well-lit, and ideally help you stand out from your competitors. Your title should front-load the most important information, especially the main keyword and product type.
Pricing also plays a big part in CTR. Properly taking advantage of coupon badges and strike-through discounts can further help improve the number of shoppers who view your listing.
What is a good conversion rate for Amazon FBA listings?
A solid conversion rate on Amazon typically falls between 10% and 15%, but it ultimately depends on price point.
For listings priced around $20–$30, 20–25% is common. More expensive products may naturally have lower conversion rates, closer to 2–10%.
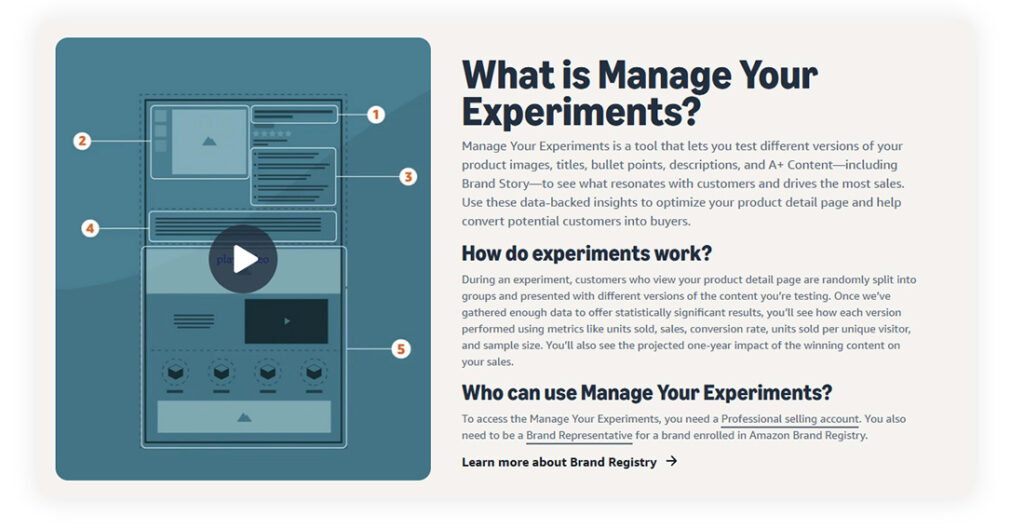
How do I run an A/B test on my Amazon product title?
You can run an A/B test using Amazon’s “Manage Your Experiments” tool if you’re brand-registered. Simply select the product you want to test, choose the title as the element, and submit two variations. Amazon will rotate them automatically and track performance over time.
If you’re not Brand Registered or you want faster results, paid platforms like PickFu and ProductPinion are great tools for getting feedback on things like your product titles, images, and branding.
How do I check if my Amazon listing is suppressed or inactive?
To check if your listing is suppressed or inactive, log in to Seller Central and go to the “Manage Inventory” page. Suppressed listings usually have a red or yellow alert with a message explaining what needs to be fixed.
Some common issues include title formatting errors, missing images, or policy violations. Inactive listings may also show a status like “Out of Stock” or “Inactive (Blocked).” Make sure to regularly monitor your Account Health dashboard to avoid hidden suppressions and keep your listings live.
Final Steps to Fully Optimize Your Product Listing
While there are many aspects to Amazon listing optimization, try to start with the major pieces first and work your way down the list. Your main image and title should be your number one priority, followed by your additional images and bullet points.
Once you’ve nailed down those topics, start focusing on improving your A+ Content, Brand Story, and possibly incorporating some UGC into your listing. The important thing is to take it a step at a time. Eventually, you’ll have a completely optimized listing with a great CTR and conversion rate.
One final piece of advice is to always be testing. The world of e-commerce is not an exact science. Try testing different main images, price points, bullet points, coupons, etc. Overall, I hope you found this article informative and helpful, and good luck with your Amazon Listing Optimization.
Related Articles
- 8 Steps to Stunning Product Images
- Amazon Long Tail Keywords: An Easy Guide for New Sellers
- Amazon A+ Content: Everything You Need to Know
Levi Adler is an experienced Amazon seller, e-commerce specialist, and the founder of Levi’s Toolbox. With over a decade in the trenches selling on Amazon and managing his own Shopify stores, Levi writes from his own experience. Sharing what worked, what flopped, and the strategies he wishes he’d known sooner. When he’s optimizing listings or managing ad campaigns, you’ll find Levi hitting mountain bike trails or hanging out with his two huskies, Emma and Scout.