
Getting ungated on Amazon can be one of the most frustrating and confusing experiences for new sellers. You do your research, find a great product, but when you go to list it, you’re met with a “Request Approval” message. Suddenly, you’re searching for answers about invoices, suppliers, and wondering if paying an ungating service is your only option.
After more than ten years selling on Amazon, I can promise you this: ungating isn’t impossible. In fact, once you understand how the system works, you’ll be able to sell in nearly any category or brand you set your sights on.
In this guide, I’ll share exactly how ungating works, why Amazon restricts certain products, and how to get ungated on Amazon using the same methods I rely on in my own business. Whether you want to sell groceries, beauty products, supplements, or brands like Lego and Marvel, you’ll walk away knowing exactly what to do next.
What Does Getting Ungated on Amazon Mean?
On Amazon, some product types fall into restricted categories, meaning you can’t sell those items, brands, or categories without special approval. Getting “ungated” is simply the process of gaining that approval so you’re allowed to list and sell those items.
For example, restricted categories include Grocery, Collectibles, and Health & Beauty because Amazon wants to protect customers from unsafe or counterfeit products. Big brands like Nike and Disney are restricted too, mainly to control who can sell their items, avoid counterfeits, and maintain brand reputation.
On the other hand, there are ungated categories that any seller can sell in, like Home & Kitchen or Sports & Outdoors, where you can list products without needing extra approval. These are great for beginners to build sales history before tackling gated products.
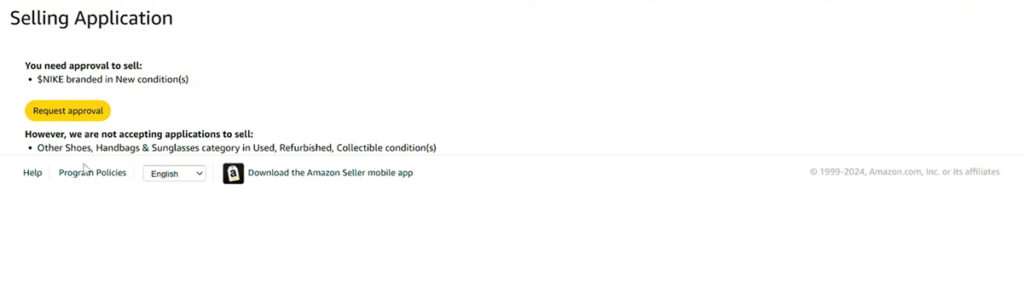
When you come across a gated product, you’ll see a Request Approval button in Seller Central. Sometimes, clicking it will approve you instantly in a process called auto-ungating. Other times, Amazon will ask for invoices and product photos to prove you’re sourcing your products from legitimate suppliers. I’ll walk you through each of these methods later in this guide.
Methods to Get Ungated on Amazon
Most sellers think ungating is always a complicated process, but the truth is that two of the three methods are quick and painless. Auto-ungating and quiz approvals take just a few clicks. It’s really only the invoice method that most sellers have issues with.
To see which method applies to the product you want to sell, click on the “Show limitations” button from the “Add Product” page in Seller Central.
Auto Ungating (Instant Approval)
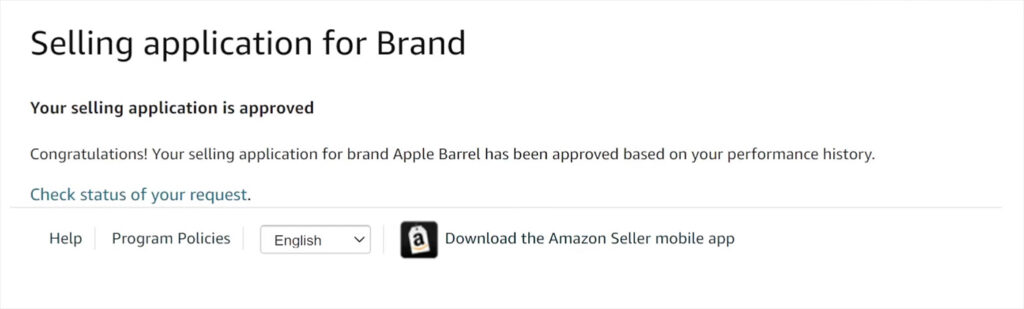
Auto-ungating is by far the simplest method. If you click “Request Approval” for a gated product and Amazon approves you instantly without asking for invoices or documentation, that’s auto-ungating. This often happens when your account has strong metrics like low order defect rates and consistent sales. As your account grows, you’ll notice more brands and categories open up automatically. Always check for auto-ungating first before spending time gathering invoices or paperwork.
Quiz-Based Approvals
Quiz-based approvals don’t show up often, but when they do, they’re simple. For certain products or categories, clicking “Apply to Sell” will take you to a short training video followed by a multiple-choice quiz about Amazon policies. Answer correctly, and you’re approved instantly. In the past, this method was common for items like pesticides or plush toys, but Amazon changes which categories use it from time to time.
Invoice & Photo Approval Method
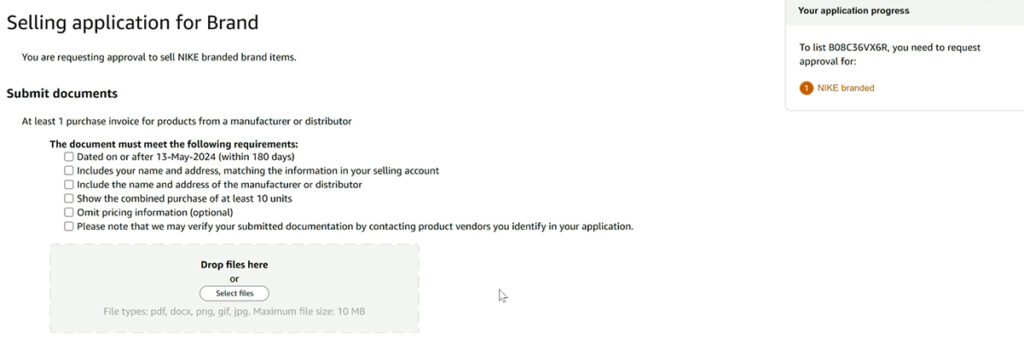
This is the standard and most involved ungating process. Amazon asks you to provide proof you’re buying from a legitimate supplier. It usually involves uploading an invoice showing your purchase, along with clear photos of the product, its packaging, and sometimes tracking details. Categories like beauty and grocery, as well as many top brands, require this method.
Later in this guide, I’ll walk you through exactly how to use the invoice method to get ungated and share some tips to increase your chances of getting approved.
Amazon Ungating Rule Changes in 2026
Over the past year, Amazon has tightened its ungating rules in two major ways. One of the biggest changes is the huge jump in unit requirements for certain big brands. Where it used to take just 10 units to get approved, some brands now want invoices showing 100 units or more. Garnier has been reported to require 300 units, while Babyganics might ask for 400. For most sellers, sinking thousands of dollars into a single ungating attempt just doesn’t make sense.
Another trend is the rise in hard gating. Hard gating isn’t new, but more brands are doubling down on it to keep random resellers out. When a product is hard gated, you can’t even submit an invoice or documentation for approval. Amazon simply blocks all applications for that brand or product. You’ll know a product is hard-gated if you see the message “Not Available” instead of “Apply to Sell” when trying to list a new product in Seller Central. Brands like Nike, Lego, and Puma are examples of brands that are currently hard gated in 2026.
Both of these changes come down to the same thing: big brands want tighter control over who sells their products. Some do it by shutting down applications altogether, others by raising their invoice requirements so high that only established sellers can get in.
My best advice is to focus on regional and local businesses instead of chasing big national brands with sky-high requirements. These brands will have far fewer hoops to jump through and can be just as profitable, without draining your budget.
Requirements Before Applying for Ungating
Before you start sending in invoices and applications, there are a few basics you need to have in place. Missing any of these will almost guarantee a rejection, no matter how perfect your paperwork looks.
- Professional Seller Account: First, you’ll need a Professional Selling Plan. Individual accounts simply don’t qualify for ungating applications. The Pro plan costs $39.99 per month and unlocks access to apply to sell in gated categories and brands. If you’re still on an Individual account, it’s worth upgrading. Not just for ungating but for growing your Amazon business long term. If you need help setting it up, check out my detailed guide on how to create an Amazon seller account.
- Good Account Health: Amazon wants to see that you’re a reliable seller before approving your ungating requests. They track your key performance metrics: Order Defect Rate (keep it under 1%), Pre-fulfillment Cancellation Rate (under 2.5%), and Late Shipment Rate (under 4%). You can check your account health directly in Seller Central. Just go to Performance → Account Health to view your current standing and see each metric in more detail.
- Some Sales History: Technically, you can apply for ungating with a brand-new account, but your odds are much better if you’ve made some sales first. I suggest building up at least $1,000 in sales from products you’re already allowed to sell. This will greatly improve your odds of getting approved.
How To Get Ungated on Amazon (Step-by-Step)
In this section, I’ll walk you through the ungating process one step at a time. Whether you’re aiming to sell groceries, beauty products, or popular brands, these steps will help you sell in whichever restricted category or brand you choose.
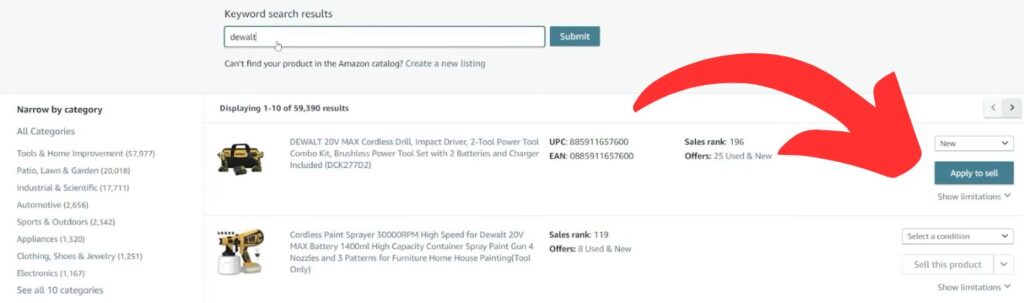
Step 1: Check if the Product, Category, or Brand is Gated
Before you spend money on inventory, it’s important to check if the product or brand you want to sell is gated. This simple step can save you from getting stuck with stock you can’t list on Amazon.

The easiest way to check is through your Seller Central account:
- Log in and go to Catalog > Add a Product.
- Search for the item using its ASIN, UPC, or product name.
- Make sure to select “New” as the condition.
If the product is gated, you’ll see a button that says “Apply to Sell”. Clicking it will show you whether Amazon will auto-approve you or ask for additional documentation like invoices and photos. If you’re greeted with a page asking for you to submit photos and a valid invoice, you’ll need to proceed with the next step.
Step 2: Source Products & Secure a Supplier Invoice
This is the most important part of the ungating process. Amazon wants to see that you’re buying from legitimate sources and not retail stores. Typically, you’ll want to use authorized distributors, wholesale suppliers, or purchase directly from a brand’s website. Retail receipts from stores like Walmart or Costco rarely work anymore, and using them usually leads to rejection.
Most categories require you to buy at least 10 units of the same product. However, starting in 2025, some larger brands started requiring much higher quantities. If you’re a new seller or working with a tight budget, it’s best to stick with products that only need the standard 10 units. Always double-check the exact quantity Amazon asks for before placing an order so you don’t end up with inventory you can’t sell.
When choosing what to buy, focus on finding cheaper items with proper labeling, especially in categories like grocery, beauty, or health products. Profit isn’t the priority here. The main goal is to get approved. That said, if you can find something that lets you break even or make a little profit, that’s a nice bonus.
When it comes to your supplier, the most important thing is that they can provide you with a perfect invoice. Make sure it includes:
- Your exact business name and address as listed in Seller Central. Even small differences (like “St.” vs. “Street”) can cause rejections.
- The supplier’s full contact details, including name, address, and phone number. Amazon may contact them to verify your order.
- A clear description of each product purchased, including quantities, prices, and any model or UPC codes. These details must match the product listing you’re applying to sell.
- Confirmation that it’s a finalized invoice, not a pro forma invoice, quote, or retail receipt.
- A recent date, ideally within the last 90 days, and no older than 180 days.
- Proof that the goods have been paid for. Unpaid invoices or pending payment terms may not be accepted.
- The invoice saved exactly as received, preferably as a PDF or high-quality scan, with no edits other than highlighting the relevant line items.
Take the time to double-check every detail. Getting this step right is what will make or break your application.
Step 3: Take Clear, High-Quality Photos of Your Products
Once you’ve found a supplier and purchased your products, it’s time to take photos for your application. Amazon typically asks for at least two photos showing your product and its packaging. However, my strong recommendation is to submit a minimum of four photos showing different angles of your product. There is absolutely no drawback to over-submitting, and it can only help increase your chances for approval.
Make sure to take clear photos of both the product and its packaging, using good lighting to keep everything easy to read. Avoid using supplier images or screenshots. Amazon wants to see real photos taken by you to confirm you actually have the products in hand.
Make sure your photos show:
- The front, back, top, and bottom of the product and packaging
- The brand name or logo clearly visible
- Any model numbers, UPC barcodes, or ingredient lists if you’re ungating grocery or beauty products
- Expiration dates, if they’re listed, especially for food, health, or beauty items
Personally, I’ve had a lot of success, including a photo of myself holding the product. Just make sure your hand isn’t covering any important details like branding or barcodes. Amazon reviewers like seeing that you actually have the item, and it adds an extra layer of credibility to your application.
Step 4: Submit Your Application
With your invoice and photos ready, it’s time to submit your application. Log in to Seller Central, click “Request Approval,” and follow the prompts to upload your documents.
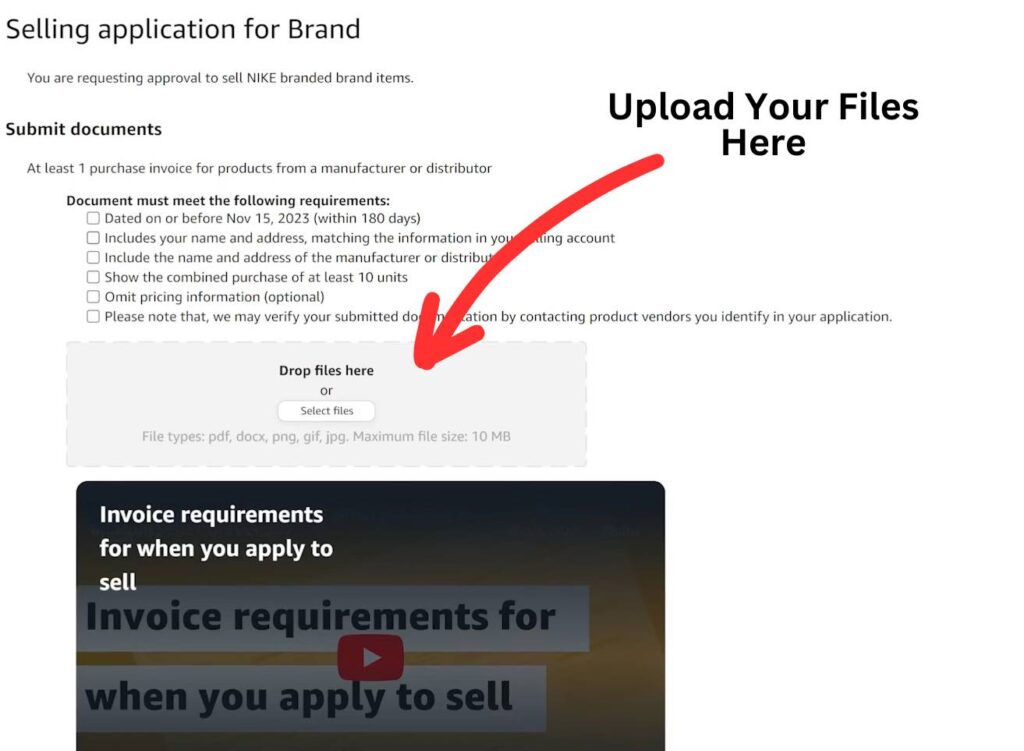
Make sure to:
- Select “Invoice from distributor/wholesaler” as the document type
- Upload your invoice as an unedited PDF file (highlighting line items is fine)
- Double-check that your invoice matches your Seller Central business name and address exactly, down to tiny differences like “St.” vs “Street”
- If you’re uploading photos, I recommend combining them into a single PDF file. However, this is optional.
Fill out every field in the form accurately. In the optional comment box, include a short, polite note to the reviewer explaining your submission. For example:
“Hi Amazon team, I’ve attached my invoice for [Product Name] from [Distributor Name]. I’ve highlighted the relevant item and included photos showing the product and packaging. Please let me know if anything else is needed.”
Once everything is attached and filled out, click Submit. Amazon usually replies within a few days, but sometimes it can take up to a week, depending on their queue.
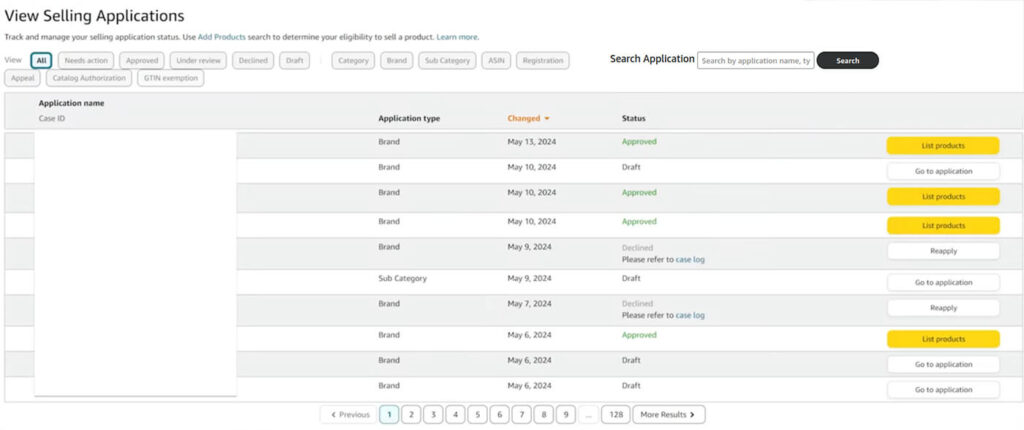
If you would like to check on your ungating requests, please go to the Seller Central main menu. From here, click “Catalog” and then click “View Selling Applications.” This will show a complete list of all of your ungating requests, along with whether Amazon ungated you for that product, denied your request, or you are still waiting for a response.
What to Do If Your Ungating Application Is Denied
If your ungating application gets denied, don’t panic. Rejections are not just common, they’re expected. This is especially true for new sellers with little sales history. In fact, many sellers, myself included, end up submitting the same application several times before finally getting approved.
It’s natural to assume a denial means something is wrong with your application, but that’s not always the case. Often, rejections happen simply because of an overworked or inattentive Amazon employee. If you know your documentation is correct, it’s perfectly fine to resubmit your application once per day using the exact same files. For example, there was a time when I got denied six times in a row, but on the seventh submission, without changing a single thing, I was approved in less than 24 hours.
That said, it’s a good idea to take a moment to double-check your invoice. Make sure it includes all the details Amazon looks for, like the correct branding, address, etc. If photos were part of your application, double-check that they’re clear and well-lit. Make sure they show all sides of the product and packaging, with branding, model numbers, and barcodes clearly visible. If you find you’re missing an angle or a type of photo, add it into your application before resubmitting.
As a last resort, if you’ve resubmitted multiple times without success, consider opening a Seller Support case. Politely ask them for specific guidance on what’s missing or how you can adjust your submission to meet their requirements.
Best Suppliers for Amazon Ungating by Category
Finding the right supplier is half the battle when it comes to getting ungated on Amazon. Over the years, I’ve tested dozens of distributors, wholesalers, and retail stores to see what actually works. Below, I’ve put together a quick-reference table of suppliers I recommend for each major restricted category.
You’ll also notice there are a few categories without recommendations. That’s because some, like Jewelry and Watches, have such complex requirements and high entry barriers that I haven’t personally tackled them in my own business and I would recommend avoiding them if you’re an inexperienced seller.
| Category | Recommended Supplier | Requirements & Details | Alternative Suppliers |
|---|---|---|---|
| Grocery & Gourmet Foods | Frontier Co-op | Business account required. Small membership fee. Best for products like Bob’s Red Mill, Stash Tea, Simply Organic spices. | UNFI, |
| Health & Personal Care | Frontier Co-op | Business account required. Small membership fee. | Price Master, |
| Beauty & Personal Care | Price Master | Business account required. Purchases often by the dozen. Still widely used for beauty ungating. | Frontier Co-op, |
| Clothing & Accessories | Royal Apparel | Business account required. Category requires strong Amazon account health. May require a scheduled Amazon call. | LA Showroom, |
| Luggage & Travel Accessories | Prima USA Travel | Business account required. | L&R Distributors, |
| Toys & Games | Entertainment Earth / EE Distribution | Business/reseller account required. | Alliance Entertainment, |
| Video, DVD & Blu-ray | Alliance Entertainment | Business account required. $1,000 minimum first order. Invoices widely accepted by Amazon. | Christianbooks.com |
| Automotive & Powersports | No recommended suppliers | Approval requires specialized category application, not invoice-based. Business verification and $100k+ annual revenue typically needed. | – |
| Jewelry | No recommended suppliers | Extremely high difficulty. Fine Jewelry requires $50k+ annual revenue, $5k entry fee, QA compliance. Fashion Jewelry still needs strong business credentials and documentation. | – |
| Watches | No recommended suppliers | Similar to Jewelry. Requires UPC manufacturer codes, product testing, brand authentication, and meeting strict performance targets. | – |
Are Amazon Ungating Services Worth It?
You’ve probably seen companies offering “Amazon Ungating Services” that claim they can get you approved to sell gated brands or categories for a fee. Do I recommend them? In most cases, no.
First, they’re expensive, often charging $200 to $1000+ per category for something you can do yourself.
Second, there’s a serious risk. Some services use fake or manipulated invoices. Submitting fake documents is one of the fastest ways to get your account suspended. Amazon often verifies invoices directly with suppliers, and if they catch fraud, your account could be permanently banned.
Finally, ungating isn’t as hard as it looks. You can get approved by sourcing from legitimate wholesalers and submitting proper invoices. I’ve never paid for ungating services myself. Every approval came from finding reputable suppliers, placing real orders, and applying on my own. It’s safer and saves thousands in the long run.
That said, there are rare situations where professional help makes sense, such as categories with strict legal compliance or brands requiring corporate approval. But for most sellers, ungating services aren’t worth the cost or risk.
Tips to Get Ungated Faster
Ungating can be one of the most frustrating parts of selling on Amazon. You submit your invoice, wait days for a response, and sometimes get denied without any obvious reason. But over the years, I’ve learned some practical tips to get ungated faster and with fewer rejections.
- Start with Grocery: If you’re a brand-new seller, focus on ungating the grocery category first. It’s usually easier and much cheaper than categories like Nike or Mattel, which often require big upfront purchases. Plus, there are thousands of products in this category, making it great for learning how to prep, ship, and list items before targeting more competitive brands.
- Focus on Increasing Sales: The number one way you can increase your likelihood of getting ungated is to simply make more sales. Amazon wants to see that you’re a consistent and reliable seller before approving you for restricted categories and brands. By building a track record selling in ungated categories, you’ll increase your chances of auto-ungating and make it more likely that your invoice applications get approved.
- Use One Invoice to Unlock Multiple Categories: Try to buy products for multiple categories or brands on the same invoice. For example, add grocery and toy items to one wholesaler order and use that invoice for both applications. I’ve done this to save on shipping and open up multiple categories without spending extra.
- Rename Your Files Before Reapplying: If your application is denied, rename your files (e.g., “brand_invoice_newdate.pdf”) before resubmitting. I’ve used this trick often as it helps avoid Amazon’s automated systems flagging your application as a duplicate.
- Stay Persistent: Finally, expect rejections. I’ve been denied for the same brand multiple times before getting approved with the exact same documents. Don’t get discouraged. Review your application, tweak if needed, and resubmit. Persistence really does separate quitters from those who are able to build a successful business.
Frequently Asked Questions (FAQ’s)
Can I use invoices from stores like Walmart or Costco to get ungated?
Amazon’s official policy is to require invoices from authorized wholesale distributors or manufacturers, not retail stores. I know some sellers have had success using online order confirmations from big retailers like Walmart or Costco, but it’s becoming less common as Amazon gets stricter with its rules. Personally, I always recommend buying from a real wholesaler or supplier to increase your likelihood of getting approved.
Do I need a Letter of Authorization (LOA) or just an invoice?
Most of the time, Amazon will only ask for an invoice from an authorized distributor or wholesaler to ungate a brand or category. However, some premium brands require a Letter of Authorization (LOA) directly from the brand owner giving you permission to sell. These are harder to get unless you have an established relationship with the brand.
How long does ungating usually take?
For standard ungating applications that require submitting an invoice and photos, most approvals take between 1 to 7 days. However, complex categories like Luxury Beauty, Fine Jewelry, or Watches can take several weeks or even up to two months.
The timeframe depends on the category, how accurate and complete your documents are, your seller account health, and the time of year you apply. From my own experience, approvals often take longer during Q4 compared to the rest of the year.
If I’m approved for one ASIN, am I approved for the entire brand or category?
It depends. If you’re approved for a category, you can usually sell any product in that category unless it’s individually gated. Brand approval generally unlocks all products under that brand. However, some individual ASINs have their own restrictions, so getting approved for one product doesn’t always cover everything else from that brand.
Can I buy items for ungating and then not sell them on Amazon?
Yes. Many sellers buy products just to get the invoice for ungating, especially if they’re inexpensive. You don’t have to sell them on Amazon. You can use them yourself, donate them, or sell them elsewhere, like on eBay or Facebook Marketplace. The main goal is to unlock the brand or category so you can sell profitable products later on.
Getting Ungated on Amazon Can Be Tough, But It’s Worth It
Learning how to get ungated on Amazon can feel like banging your head against a wall some days. The rejections come in with no clear reason, and it’s easy to start questioning if you’re doing something wrong. I’ve been there myself, and I know just how confusing and frustrating the process can be, especially when you’re a new seller.
If there’s one thing I want you to take away from this guide, it’s this: persistence is what wins. Getting denied doesn’t always mean your invoice or photos are wrong. Sometimes it just means you need to resubmit and catch a different Amazon rep on a better day. Keep applying and don’t let a few rejections make you give up on a profitable category or brand.
Related Articles
- How to Start an Amazon FBA Business in 7 Steps
- Amazon FBA vs FBM
- How to Win the Buy Box on Amazon: 5 Tips for Success
Levi Adler is an experienced Amazon seller, e-commerce specialist, and the founder of Levi’s Toolbox. With over a decade in the trenches selling on Amazon and managing his own Shopify stores, Levi writes from his own experience. Sharing what worked, what flopped, and the strategies he wishes he’d known sooner. When he’s optimizing listings or managing ad campaigns, you’ll find Levi hitting mountain bike trails or hanging out with his two huskies, Emma and Scout.
