
If you’ve ever opened your own product page and seen a wall of competitor ads sitting underneath it, you already know why building your own Storefront is so important. It creates your own, ad-free place where shoppers can browse your products without the risk of being pulled away by competing brands every few seconds.
I’ve been selling on Amazon for over a decade and have built Stores for my own brands and for clients. When your Storefront is set up properly, it becomes a great landing page for your own ad campaigns, email marketing, and social media links.
In this guide, I’ll walk you through how to create an Amazon Storefront step by step, from eligibility and setup to layout decisions, design tips, traffic strategies, and how to measure performance so you can keep improving your Store over time. Let’s start by learning exactly what an Amazon Storefront is.
What Is an Amazon Storefront?
An Amazon Storefront is a branded space inside Amazon where shoppers can browse all of your products in one place. It works like a “mini-website” for your brand that lives directly on Amazon. Sometimes it’s referred to as a Brand Store, while other times, it’s called a Storefront. Throughout this guide, I’ll use both interchangeably, but they always refer to the Store you build and manage from inside Seller Central.
Shoppers can get to your Storefront by clicking on your brand name on a product listing, clicking on a Sponsored Brands ad that leads to your store, or with direct links that you can share through social media or email. Once they land there, they can view your product catalog, take a closer look at specific collections, and learn more about your brand.
You can edit and build your store from the Store Builder inside Seller Central. Here you can add new pages, customize your design, and organize your store however you choose. Everything is very flexible. Some brands keep things simple with a single-page layout that showcases their main product. Others add multiple category pages, lifestyle images, and how-to videos to help customers better understand their products or brand.
The last point worth mentioning, which many sellers get wrong, is that creating a Brand Store is 100% free. As long as you meet the requirements we’ll talk about next, there is no monthly cost or charge to keep your store active.
What are the Requirements for Creating a Brand Store?
As you may have guessed from the name, Amazon Brand Stores are reserved for brands that sell their own products on Amazon. If you resell other companies’ products or run an arbitrage business, you aren’t eligible to create a Storefront.
The two major requirements you need to meet to be eligible to create a Brand Store are:
- You must be enrolled in Amazon’s Brand Registry
- You must have a Professional Seller Account
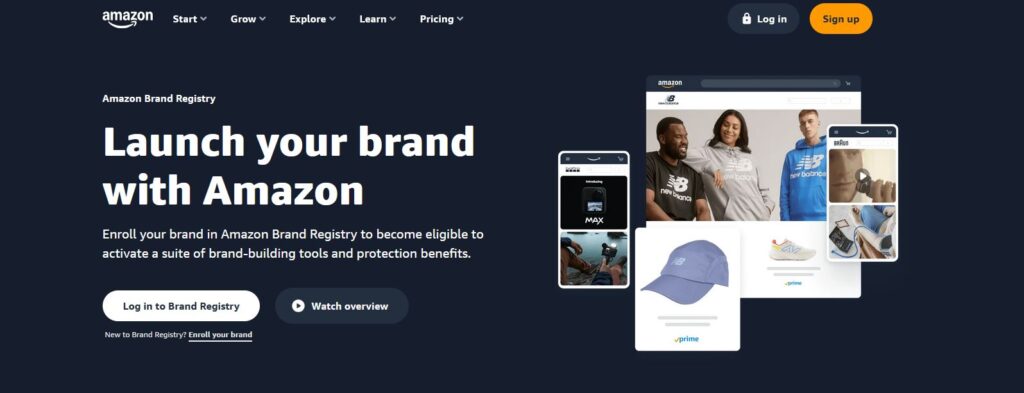
If you’re not familiar with the Brand Registry, it is Amazon’s program for protecting Brands on Amazon from fraud, counterfeiting, or other scams. It also gives you access to several tools and features to help you market your brand, including Sponsored Brand Ads, Sponsored Display Ads, A+ content, and Amazon’s Vine Program.
To enroll, you’ll need a registered or pending trademark, along with proof that you are directly linked to your Brand. For more information, check out our full guide on the Amazon Brand Registry.
The second requirement is a Professional Seller Account, which you should already have. However, if you are using an Individual account, you will need to upgrade before you can enroll in the Brand Registry or create an Amazon Storefront.
How to Create an Amazon Storefront Step-by-Step
If you’re already signed up for the Brand Registry, then you’re ready to start building your store. Before you begin, I recommend making sure you have any creative assets you want to use ready to go. This includes lifestyle images, video, graphics, copy, or anything else you want to include on your store pages.
Once you’ve got everything organized, head over to Seller Central to get started.
Step 1 – Open the Store Builder in Seller Central
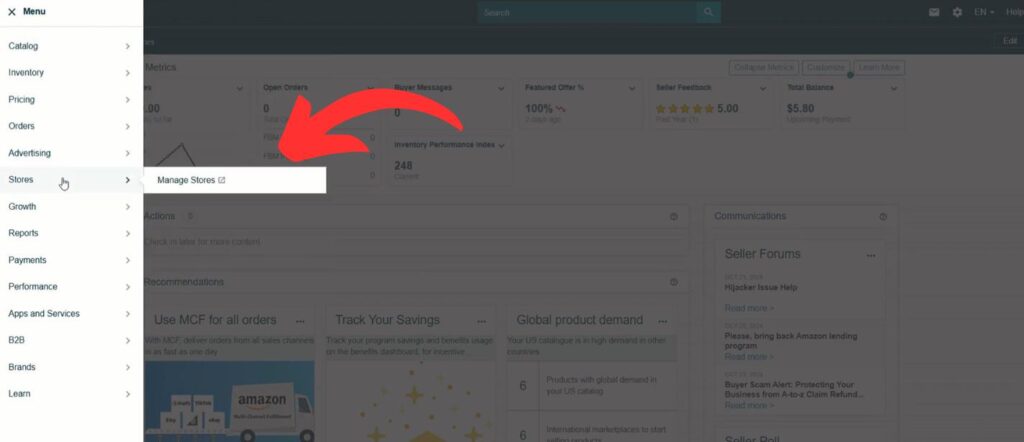
Once you’re logged in to Seller Central, look for the Stores tab in the navigation. If you successfully meet the requirements (Brand registered and a Professional Seller Account), you’ll see an option called Manage Stores. Click on it and then select your brand. Then click on “Create Store” to open the Store Builder.
If you don’t see the Stores tab at all, it usually means that you haven’t been approved for the Brand Registry yet. Amazon will not unlock the Store Builder until your application is approved and your trademark info has been verified.
Step 2 – Enter Your Basic Store Settings
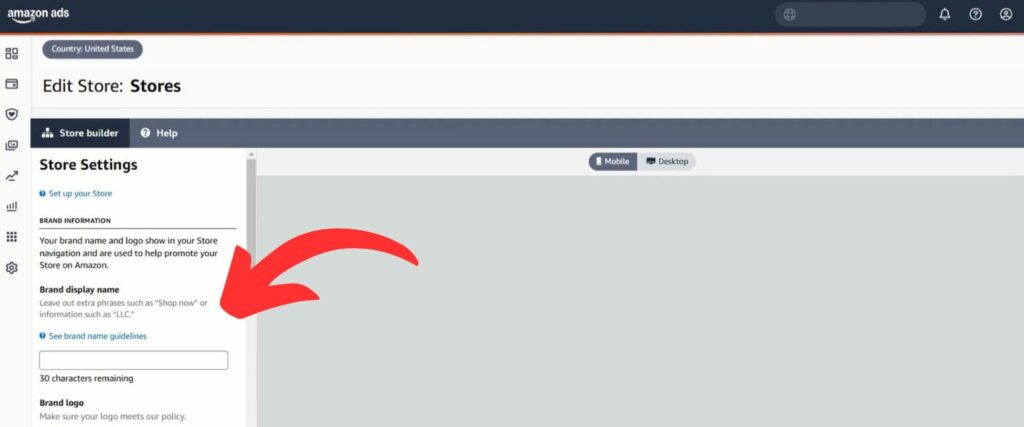
The first screen in the Store Builder lets you set up your basic store settings. Start by entering your brand name exactly as customers recognize it. Avoid using words like “store”, “official”, or “shop.” It’s generally a good idea to use the same name that appears on your packaging and product page so shoppers won’t get confused.
Next, upload your logo. A 400 × 400 PNG with a transparent background works best, and this logo can appear in your header depending on your final design. Make sure it’s readable on mobile, since that’s where most shoppers will see it.
There are also a few additional settings here:
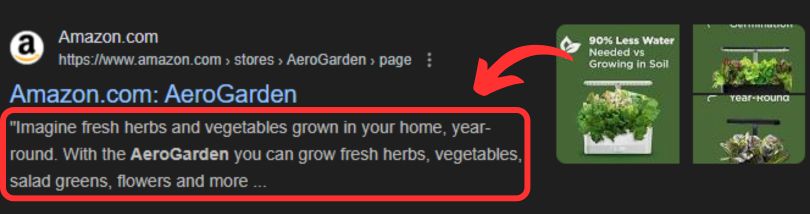
- Meta Description: This is a short sentence or two that appears in Google search results and can help with Google SEO. Keep it simple and descriptive, and try to include your main keyword for your brand, for example: “Clean skincare powered by natural ingredients.”
- Product Grid Style: You have two options: Standard or Tall. Unless you are a fashion or clothing brand, just stick with standard here.
- Deals Page (Optional): You can enable an automatic Deals page that appears whenever you have enough active sales or promotions. It updates on its own and is most useful for larger brands with big catalogs. If you’ve only got a few products, I would recommend turning it off for now.
Once these settings are saved, you’re ready to start planning your store design and creating your homepage.
Step 3 – Plan Your Store Structure and Choose a Homepage Template
Before you start adding products and images to your page, it helps to map out a simple structure for your store. Think about the best ways for shoppers to explore your products and what type of pages you want to include. For example, a pet brand might divide its store by pet size or type. A skincare brand might group routines by skin concerns. Your goal is to create a layout that will be easy to navigate for someone visiting your Brand Store for the first time.
Next, you’ll need to choose a homepage template. Templates are great because they give you a basic, premade layout, so you don’t have to start working from an empty page. You can always add or remove sections later, but picking a good starter template will make things a bit easier.
| Template | Use Case | Best For | Key Features |
|---|---|---|---|
| Marquee | Telling your brand story or highlighting a seasonal collection. | Brands that sell lifestyle or niche products | Uses a clean layout with space for lifestyle imagery, category tiles, and text descriptions |
| Product Highlight | Putting the spotlight on a small number of bestselling or flagship products | Brands with a small collection of products / Single-product brands | Showcases specific products using a mix of media like image galleries, video, and product tiles. |
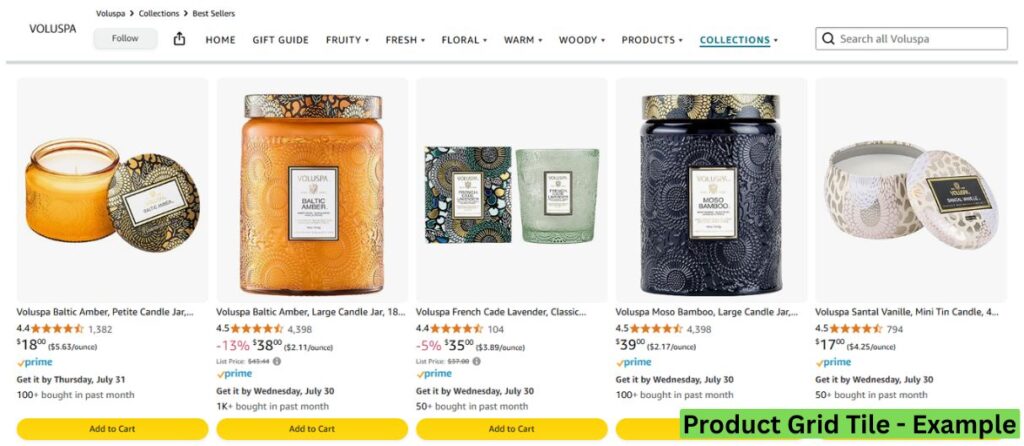
| Product Grid | Letting customers quickly browse a large number of SKUs with pricing info upfront. | Brands with a large catalog | Displays 4 or more products in a clean grid. Includes "Add to Cart" button, Prime badge, price, and rating. |
| Blank | Building your store from the ground up | Brands with a specific layout in mind | No preset tiles, just a blank canvas. Gives you full control over your stores design. |
There are several options to choose from, but I recommend the Product Collection template for most sellers. It’s a multipurpose design that works well whether you have 5 products or 50, and it looks good both on desktop and mobile.
Step 4 – Create Your Homepage Using Sections and Tiles
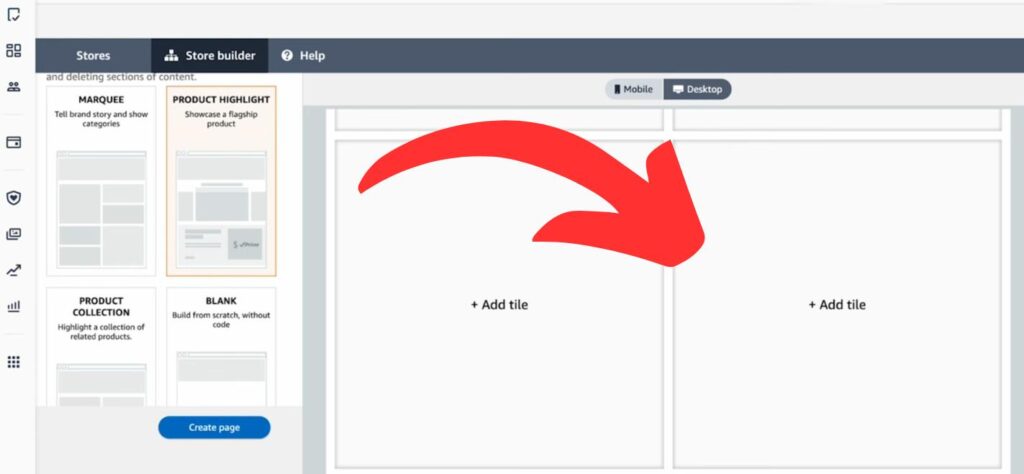
With your template chosen and a rough design in your head, it’s time to start assembling your Storefront. Every page in the Store Builder is made of two parts: sections and tiles. A section is a horizontal block that spans the width of the page. Tiles are the elements you place inside a section, such as images, videos, product grids, or text.
If you choose a premade layout, you’ll already have sections and tiles to work with, but you are always free to remove, change, or add new sections and tiles.
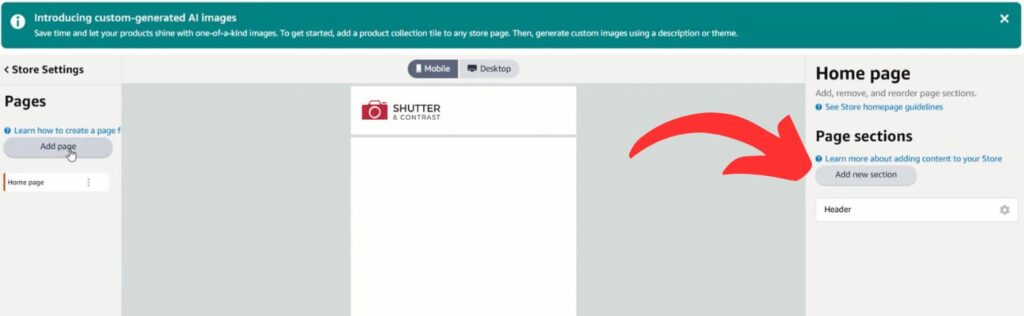
To add a section, click the “Add section” button on the panel of the editor. Amazon gives you several layout options, such as full-width rows, split layouts, or multi-column structures. After choosing a section style, click inside the section to add tiles.
There are a ton of different tiles to choose from, like product tiles, image tiles, video tiles, or shoppable lifestyle images. You can drag tiles to reorder them, duplicate them, or delete ones you do not need.
Product tiles automatically pull live data from your listing (price, images, variations, and “Add to Cart”), while image and video tiles let you upload your own files. Amazon recommended sizes inside each image tile, but I strongly recommend using slightly larger files, for example, 1,500–2,000px square images instead of the minimum. Larger files compress better and stay sharper on mobile, while smaller files can look blurry and a bit unprofessional.
If you want to rearrange sections as you build, you can use the up/down arrows beside each section to quickly reorder your layout.
Step 5 – Add Category Pages and Connect Your Navigation
Depending on your business and design goals, you might be able to skip this step. If you’re a single-product brand or you only sell a small selection of products, you might not need to add any extra pages at all. Personally, I know many brand owners who have done very well using only a single well-designed single-page Storefront.
However, if you sell a larger selection of products, or you want to include more info about your brand/products, adding extra pages can be a smart idea. This way, shoppers can navigate your store without getting lost, confused, or having to deal with too much scrolling.
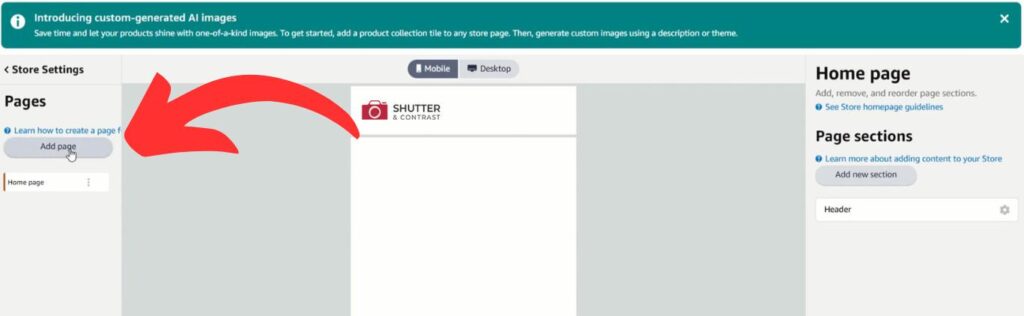
To create a new page, click the “Add page” button in the left panel of the editor. From here, you can use the same workflow you used when creating your homepage. Choose a template, add sections, tiles, and then customize each tile by adding your own content/products.
Once you’re finished creating a page, open the Page Manager to connect them to your navigation. Choose “Add to navigation” for the pages you want shoppers to see and drag to reorder them. I recommend sticking with 3-6 tabs to avoid side-scrolling issues on mobile. Try to keep the names straightforward and easy to understand so shoppers have an easy time finding their way around.
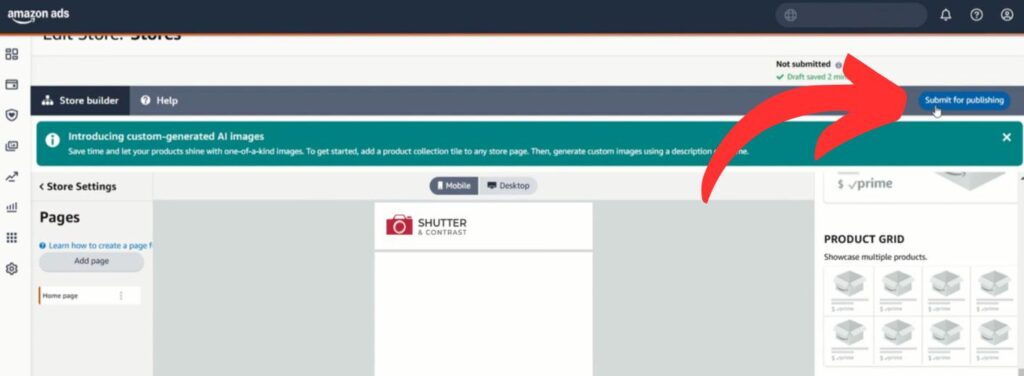
Step 6 – Preview and Publish Your Brand Store
When you’re finished creating and customizing store pages, you’ll want to use the preview tool at the top of the editor to see how your store will look when it’s published. You are able to preview both with desktop and mobile views, and I highly recommend checking out both.
Here are some of the things to look out for when previewing your store:
- All text is readable, especially on mobile
- There are no missing images or blank tiles
- No images are low-resolution or blurry
- There are no broken links, and all products show up correctly
- Sections have room to breathe and don’t appear crowded
Once you’re happy with everything, click “Submit for Publishing” in the top right corner to send your store off to Amazon for approval. This process typically takes a few business days before your store will go live.
If Amazon flags something and rejects your store, they will list exactly what needs fixing, such as unclear wording, formatting issues, or images that do not meet their requirements. When this happens, you can make the proper changes and resubmit.
Tips to Improve Your Store’s Design
When I created my first Brand Store, I didn’t have a clue when it came to design or the optimal way to lay out a store. So if you’re like me and you’re confused about the best layout or how you should organize your store, a simple homepage design I recommend is:
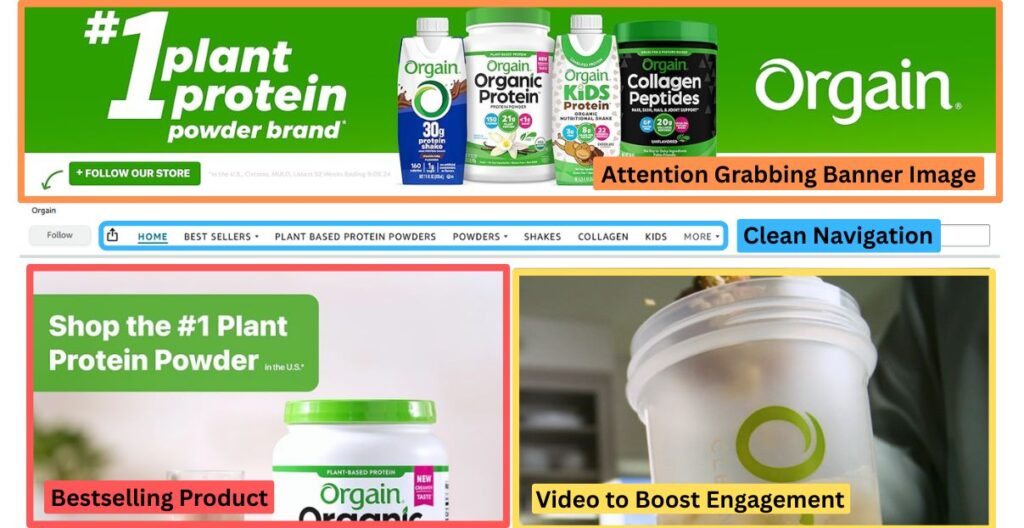
- 1. Start with a strong hero banner at the top of the page. Keep text centered and immediately highlight your product’s biggest benefit
- 2. Place a tile showcasing your bestselling product near the top of the page (above the fold).
- 3. Include a high-quality lifestyle image or attention-grabbing video, also above the fold, to educate customers and improve conversion rates
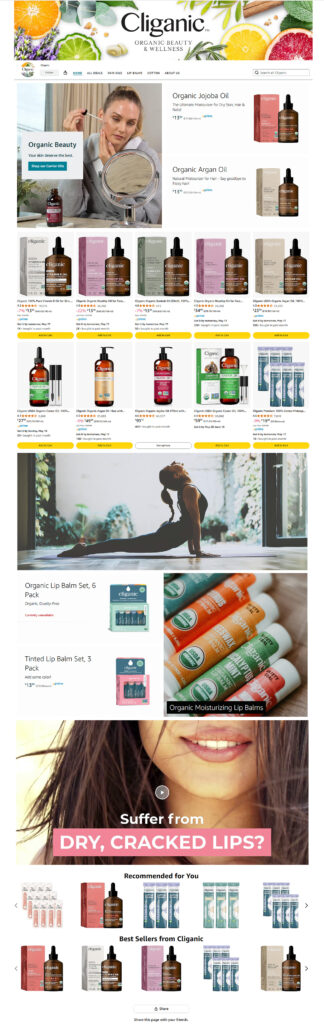
The example image below from the brand Orgain shows this well. They have a clean banner that immediately sets the tone (#1 Plant Protein), a simple, straightforward navigation bar, a tile highlighting their bestselling product, and a short video to increase engagement and educate shoppers about their brand.
If you sell a range of products, try to use a logical order that matches how people tend to shop. For example, if you offer budget, intermediate, and premium versions of a product, list them in that order. Bundles can also work well by including them a bit further down the page because shoppers are more open to them once they understand your product a bit better.
There are a ton of tiles to choose from, and each one can serve a slightly different purpose. While I encourage you to be creative, some of the best tiles I recommend testing out are:
- Product Grid: Great for showcasing multiple items at once. It updates automatically when inventory changes and can automatically hide out-of-stock products to maintain a clean design.
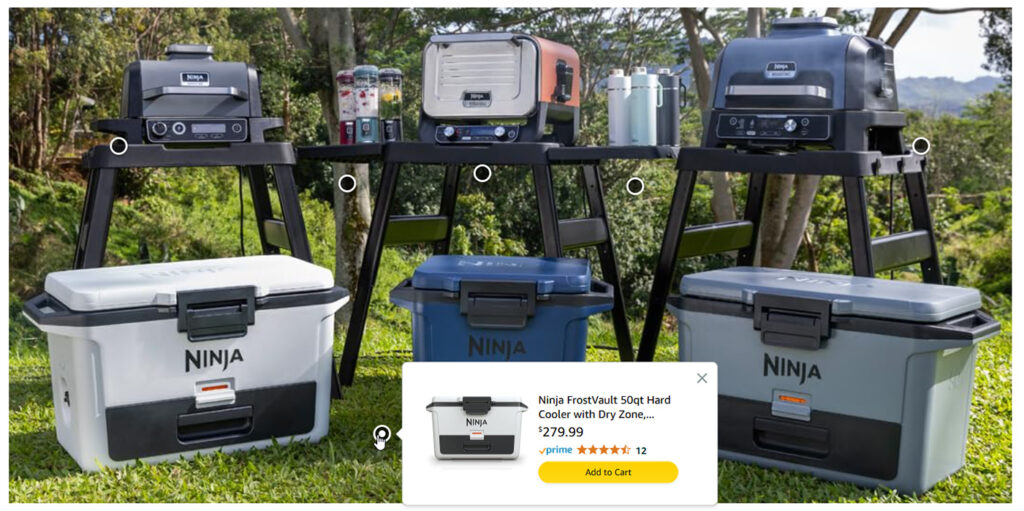
- Shoppable Lifestyle Image: Lets you place clickable hotspots on a lifestyle photo. This is one of the best tiles for bundles, accessories, or demonstrating how your products fit together. (Image below)
- Image Tile: Works well for branded graphics, benefit callouts, or lifestyle images. Not flashy, but always a good option for your design.
- Video Tile: Ideal when you need to show something that photos can’t, like demonstrating how your product works, its scale, assembly, or even before/after results.
- Product Highlight Tile (Single Product): Good for putting a hero product or bestseller front and center without forcing shoppers to scroll to a grid.
Whether you’re creating your homepage or a collection page, I’d recommend sticking to 5-8 sections per page. This keeps your page long enough to show off your products and brand, but short enough that mobile shoppers can avoid endless scrolling.
How to Drive Traffic to Your Amazon Storefront
Once your Brand Store is live, your next step is getting shoppers to it. It doesn’t matter how well your store is designed if no one ever visits it. In this section, we’ll touch on some of Amazon’s internal traffic sources and some external traffic channels that you can use to get shoppers into your Brand Store.
Use Amazon Ads and Internal Traffic to Send Shoppers to Your Store
Amazon’s internal traffic is a great place to start for getting shoppers into your Brand Store, and Sponsored Brand ads are the campaign type I recommend most. This ad type features your logo, a headline, and a selection of products, and it can send shoppers directly to your Store instead of a single product page. One quick tip I have is that most brands see better results when their ads lead to a specific collection page rather than their homepage, since shoppers land on products that match what they were already searching for.

We don’t have time to go into the details of Sponsored Brands here, but if you want to learn more about this ad type, including the different formats and tips for optimizing your campaigns, you can read our full guide on Sponsored Brands for Amazon Sellers.
As far as free methods go, your product pages themselves can be another major source of internal store traffic. Adding simple mentions in your product description or A+ content that encourage shoppers to “see the full collection in our store” can help guide buyers to your Storefront. As your store grows, some pages can even start appearing in Amazon search, especially if your page titles and product collections match how shoppers tend to browse.
Sending External Traffic to Your Storefront
External traffic lets you reach shoppers before they ever start browsing on Amazon. Even simple things like including a store link in your Instagram bio, a short TikTok demo demonstrating your product in action, or a “Shop on Amazon” link from your brand’s homepage can make a big difference. These visitors tend to browse for longer because they are already familiar with your brand and are eager to learn more, compared to shoppers who may have stumbled onto your product listing.
When choosing which landing page to use for external traffic, you should always consider whether the traffic is “cold” or “warm.” Cold audiences, someone seeing your product for the first time, respond best when they land on a hero product page or a small collection.
Warm audiences, like repeat buyers or someone on your email list, are more likely to explore your entire store and compare different products. If you take the time to match your landing page with the type of traffic, you can reduce bounce rates and increase your chances of making a sale.
One big tip I have is that if you plan to share your store link regularly (as you should), it helps to request a short, branded Store URL from Amazon support. The default Store link is long, filled with tracking strings and random characters, and can look unprofessional when pasted into bios or video descriptions. A short link like “amazon.com/yourbrand” is much easier to remember, cleaner to share, and looks good on printed inserts, QR codes, or product packaging.
How to Measure and Improve Your Storefront’s Performance
Once your Storefront is live and starts getting visitors, it’s a good idea to track how shoppers interact with it so you can make the right improvements. Luckily, Amazon tracks all of these analytics in the Store Insights tool. You can find it in Seller Central by clicking on “Stores” and then clicking on the Insights tab right beside the Store Builder.
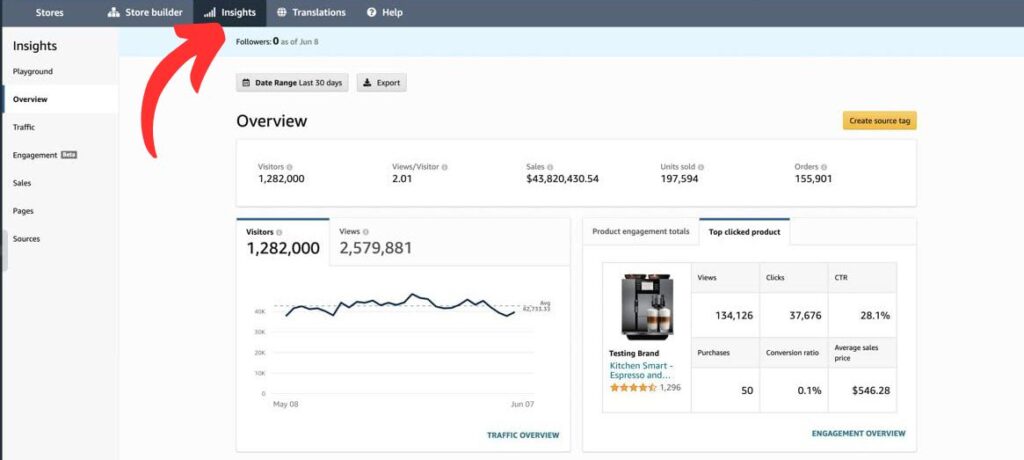
The dashboard will give you a full breakdown of your store, including the number of visitors it gets, which pages shoppers view most often, your conversion rate, and more. Even if you’re not deep into analytics, the dashboard is very easy to understand once you know what numbers to pay attention to.
The first things I recommend you look at are page views and traffic sources. Page views show you how many shoppers land on each page, while traffic source data tells you whether shoppers came from ads, product pages, or social media. If you notice a page with a lot of traffic but no clicks, you might want to consider updating the images or product layout. If clicks are high, but conversions are low, the issue is usually with the product itself, typically price or poor product photos.
If you decide to make a change or test a new layout, remember to focus on one thing at a time. Move high-performing pages higher up in your menu, place a different product in your best-seller slot on your homepage, or replace low-engagement images with updated lifestyle shots. If you’ve been sending traffic to your homepage, consider testing a dedicated landing page, such as a collection page, instead.
Once you make the change, give it at least a week or two before deciding whether the change helped. And once your test is complete, move on to something else. Over time, these minor changes add up and will lead to a fully optimized, high-converting Brand Store.
Frequently Asked Questions (FAQs)
What’s the difference between a Brand Storefront and an influencer storefront for my products?
A Brand Store is built and managed by an Amazon seller and brand owner from inside Seller Central to showcase and sell their own products. An influencer storefront is part of the Amazon Influencer Program and can feature products from many brands, with the influencer earning a commission on referred sales.
Do I need Brand Registry and a trademark to create my Amazon storefront?
Yes, you must be enrolled in the Brand Registry to create an Amazon Storefront, and that requires you to have a registered or pending trademark. There are no exceptions or workarounds; you must be a part of the registry to be eligible to create a Brand Store.
For more information on the Brand Registry, including a complete step-by-step guide and a detailed list of benefits, check out my guide, Brand Registry on Amazon: A Comprehensive Guide.
Does my Amazon Brand Storefront and Store URL help products rank or convert better?
An Amazon Storefront does not directly affect organic search rankings, but it can lead to higher conversion rates than a standard product listing.
Brand Stores reduce distractions for shoppers by removing all competitor advertising, which keeps buyers focused on your products. According to Amazon, Brand Stores also lead to higher average order values, stronger new-to-brand acquisition, and better long-term visibility for your product listings.
How many products should my brand have before launching an Amazon Brand Storefront?
There is no exact number of products you need to launch an Amazon Brand Store, but I would recommend having at least 5-10 products for shoppers to browse. Stores with more products create stronger cross-selling opportunities and higher average order values.
However, even if you only have a single-product brand, you will still benefit from a fully customizable environment free of any competing advertisements, where customers can learn more about your product and your brand.
How long does Brand Storefront approval take, and what if my Store is rejected?
In most cases, Amazon approves new Brand Stores within 3-7 business days, though it mainly comes down to the size of your store. For example, a one-page store typically gets approved much faster than a multi-page complex design.
If your store is rejected, it is often due to image quality issues, grammar or spelling errors, broken links, or content that violates Amazon’s guidelines. You can fix the flagged issues and then resubmit for review again. Typically, the approval process is much faster the second time so you may only need to wait 1-2 business days.
Building a Storefront That Supports Your Brand’s Growth
Creating a Storefront for your brand gives you a place where shoppers can explore your products without the risk of losing them to a competitor’s advertisement. It helps customers get a clearer sense of what your offer is, it increases the time they spend with your catalog, and it leads to higher average order values.
As your business grows, you can continue to update your Brand Store by adding more featured products, improving your images and video content, and paying close attention to how shoppers interact with your store. Remember that even small changes over time can lead to more clicks and a higher conversion rate, especially when paired with ads or other marketing campaigns.
Now that you have a clear understanding of how to create your Storefront, you are one step closer to creating a home for your brand on Amazon.
Related Articles
- Brand Registry on Amazon: A Comprehensive Guide for 2026
- Amazon Sponsored Brands: The Ultimate Guide for 2026
- Amazon A+ Content: A Step-by-Step Guide for 2026
Levi Adler is an experienced Amazon seller, e-commerce specialist, and the founder of Levi’s Toolbox. With over a decade in the trenches selling on Amazon and managing his own Shopify stores, Levi writes from his own experience. Sharing what worked, what flopped, and the strategies he wishes he’d known sooner. When he’s optimizing listings or managing ad campaigns, you’ll find Levi hitting mountain bike trails or hanging out with his two huskies, Emma and Scout.
